Mini Photo Studio
prusaprinters
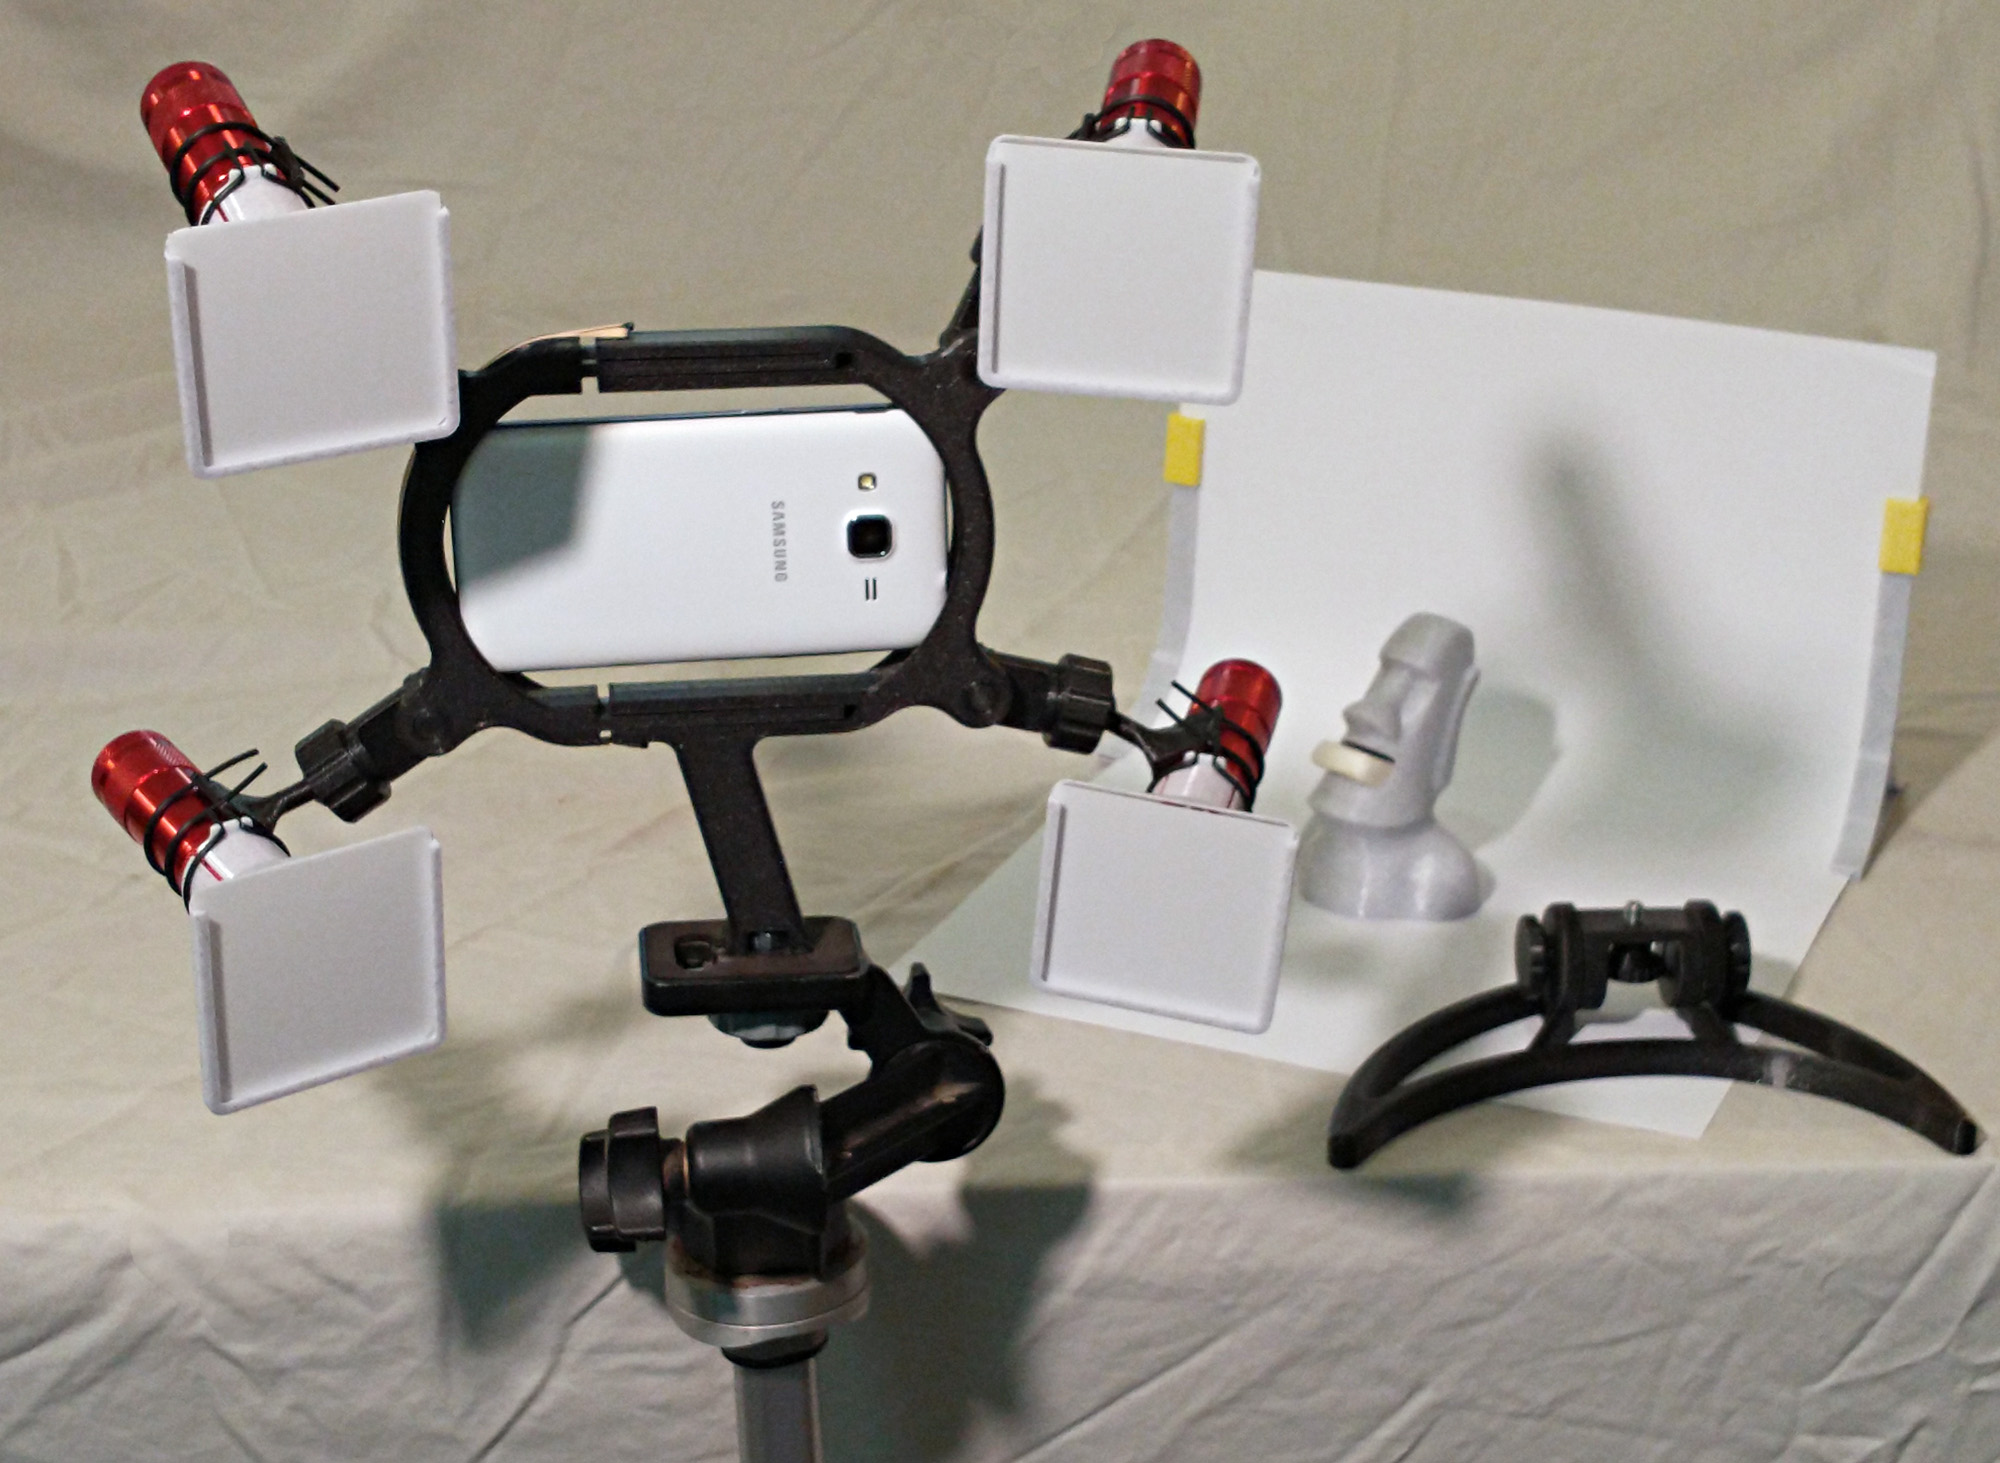
<p>I've needed this for a long time: a mini studio setup to take decent photos of my prints. </p><p>The heart of this system is the <i>frame </i>which holds your phone in landscape mode, along with pivoting <i>arms </i>for holding up to four LED lights. It can be used with a conventional tripod, hand-held, or with the tabletop <i>base </i>described below. There is a <i>diffuser </i>for the lights to help you get the desired lighting effects. And lastly, I've included a sweep <i>backdrop </i>stand with integrated paper clamps. All parts printed easily in PLA on my Prusa Mini+ without added supports, brims or rafts. All parts print in the orientations provided.</p><p><i><strong>FRAME</strong></i><br>The frame consists of three parts: the handle side, the other end that slides into the handle, and the four screws used for securing the lighting arms. You will also need a rubber band (I used a #33) that fits over the little hooks on the handle side and stretches over the groove in the other side to pull the sides together. (See 6th photo) A little light grease on the rails will help the parts slide smoothly.</p><p>You will need to press a standard ¼-20 nut (7/16" x 0.25" thick) into the cavity at the end of the handle. This will allow you to attach the frame to either a standard tripod or to the desktop base below.</p><p>To insert your phone, stick the top end of the phone into the groove in the handle side of the frame and pull back on the other side of the frame until the phone bottom can pop into the opposite groove. The frame will accommodate phones up to 170mm tall x 84mm wide, and cases up to 13mm thick. It can be used with phones as short as 130mm.</p><p><i><strong>Lighting Arms</strong></i><br>The lighting arms screw into the corners of the frame with the frame screws. Note that on the side of the arm that faces the frame, there is an o-ring groove where you can press in a short piece of 1.75mm TPU filament. This is optional, but the rubbery TPU filament provides higher friction than plain PLA-on-PLA contact. </p><p>The ball and cap parts print together as a single piece in the orientation provided. The ball sub-part has a built-in brim to keep it stable during printing. Break this brim away before screwing the cap onto the socket end of the lighting arm.</p><p>At the top end of the stem sticking out from the ball is a v-groove platform for attaching a flashlight. It uses those ubiquitous mini LED flashlights (nominal 25.4mm dia.), but will accommodate slightly larger or smaller diameter lights. (Here's an <a href="https://www.amazon.com/WdtPro-Flashlights-Flashlight-Lanyard-Assorted/dp/B0776RW8DM/ref=sr_1_5?crid=1A524X4WSRC4N&keywords=mini+led+flashlight&qid=1655670249&sprefix=mini+led+flashligh%2Caps%2C246&sr=8-5">Amazon link</a> for the lights I used.)</p><p>The platform has 4 notches that can be used with a short length of 1.75mm TPU filament to bungee the light in place as shown in the 10th photo. Just stretch the filament and slide it into the notches. You can also use rubber bands to lash the flashlight to the platform.</p><p><i><strong>Diffusers</strong></i><br>The diffusers are scaled to fit over the end of the 25.4mm dia. flashlights. If your lights have a slightly different diameter, just scale the whole diffuser up or down accordingly. The diffuser also has some notches for (again) using a short length of TPU filament as a spring to snug the diffuser end onto your flashlight. You can also just as easily use a rubber band.</p><p>Filters for the diffuser can be almost anything, from copy paper, to frosted acetate film, to colored gels. Whatever material you use should be cut in 63 x 63mm squares with slight bevels cut into the corners.</p><p>Note: the diffusers should be printed with white(ish) filament because intermal reflections can color the output light.</p><p><i><strong>Desktop Base</strong></i><br>The desktop base consists of 5 separate printed parts (base, pivot, knob and 2 screws) plus a 1" long ¼-20 bolt. Start by placing the knob in its assembled position in the pivot part, underneath the 2 retaining lips. Then insert the ¼-20 bolt into the knob and up through the hole in the pivot. The head of the bolt should press into the hex socket in the knob. Once the bolt is in place, the knob is captured by the 2 lips.</p><p>The pivot has a small groove cut into the top surface which accepts the small Key piece. Press the key in place, using a small drop of superglue if it is loose. This key helps keep the frame handle from rotating when it is screwed onto the base.</p><p>You'll note that either end of the pivot piece has (again) an o-ring groove for a short piece of 1.75mm dia. TPU filament. This is optional, but again, it'll make it much easier to lock the pivot in place. Use the two printed base screws to attach the pivot to the base. </p><p>Finally, you should be able to attach the frame handle to the base.</p><p><i><strong>Sweep Backdrop</strong></i><br>The sweep backdrop (inspired by countless others posted online) consists of a right frame piece and a left frame piece. There are also little clips (again, right and left) that slide over the tops of the frames, clicking in place. With your backdrop paper slid into the groove, just push each clip downward to clamp the paper in place. Just lift the clip to release the paper.</p><p>Happy shooting!</p><p><i><strong>Sample Photos</strong></i></p><figure class="table"><table><tbody><tr><td><figure class="image image-style-align-left image_resized" style="width:95.69%;"><img src="https://media.printables.com/media/prints/228722/rich_content/c52f4ee4-1d98-4556-902d-de5148784a3a/zipper1.jpg#%7B%22uuid%22%3A%22c38e137e-a171-45ca-9f25-1f7e81e3ee12%22%2C%22w%22%3A2000%2C%22h%22%3A1500%7D"></figure></td><td><figure class="image image_resized" style="width:93.71%;"><img src="https://media.printables.com/media/prints/228722/rich_content/d7d8e33d-2254-4f2d-aeb3-3f8acc698f0a/thumbdrum1.jpg#%7B%22uuid%22%3A%22156adfeb-6f7f-4638-89a9-41dba4d295b2%22%2C%22w%22%3A2000%2C%22h%22%3A1500%7D"></figure></td></tr><tr><td><figure class="image image_resized" style="width:95.67%;"><img src="https://media.printables.com/media/prints/228722/rich_content/509eec75-1efc-4d56-b5bb-9d2933f25a2e/extendo4.jpg#%7B%22uuid%22%3A%22f04ceeaf-59bb-4b6d-bc00-2b87e987abcc%22%2C%22w%22%3A2000%2C%22h%22%3A1500%7D"></figure></td><td><figure class="image image-style-align-right image_resized" style="width:94.92%;"><img src="https://media.printables.com/media/prints/228722/rich_content/4978cf84-55ea-45a7-bfa0-e0e7bfe61709/quickclip1.jpg#%7B%22uuid%22%3A%22d46d5bba-c9d9-44ff-82e1-87bf3fb16110%22%2C%22w%22%3A2000%2C%22h%22%3A1500%7D"></figure></td></tr><tr><td><figure class="image image_resized" style="width:95.11%;"><img src="https://media.printables.com/media/prints/228722/rich_content/7e019c93-a96e-4d24-ad45-a9455109c8a6/failedprintknob2.jpg#%7B%22uuid%22%3A%222a19b4d5-723d-420b-8d33-4188ddf69652%22%2C%22w%22%3A2000%2C%22h%22%3A1500%7D"></figure></td><td><figure class="image image_resized" style="width:94.83%;"><img src="https://media.printables.com/media/prints/228722/rich_content/5fc34e9f-0d85-4374-b252-89e772e45a76/sixspeed0.jpg#%7B%22uuid%22%3A%22c76e2b6b-10b9-4a49-9d1e-852eda336315%22%2C%22w%22%3A2000%2C%22h%22%3A1500%7D"></figure></td></tr></tbody></table></figure>
With this file you will be able to print Mini Photo Studio with your 3D printer. Click on the button and save the file on your computer to work, edit or customize your design. You can also find more 3D designs for printers on Mini Photo Studio.