mini pistol crossbow
thingiverse
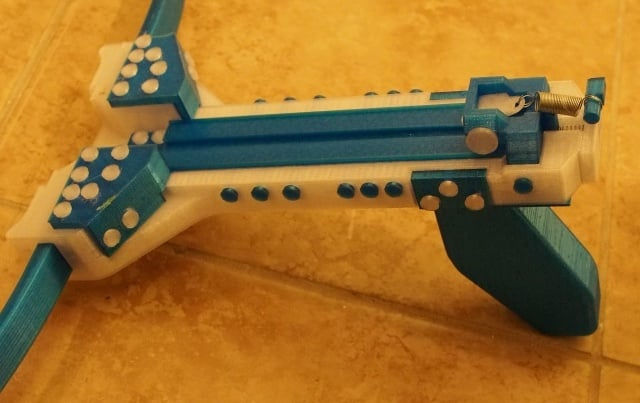
Small, mini pistol, toy crossbow for use in destruction games. Note the provided arms are recurve arms, they will be bent forward when the string is not in place. This is how the crossbow should be stored. When the string is in place on the track and the crossbow is ready to be loaded, they will straighten out. The arms must be printed using PETG, which is also higly recommended for other parts. When slicing the body, it's important to ensure the infill for the top layer runs lengthwise in order to maximize strength and minimize any resistance as the dart slides down the track. Set the infill angle to 0 or 90 degrees to accomplish this. All parts should be printable without support. Build guide video: https://www.youtube.com/watch?v=yGJHjwMeoU4 To load the crossbow, make sure the trigger mechanism is ready, then place a medium-size dart on the track and push it all the way back down the track using your hand (see the demonstration video). You should hear a clicking noise as the trigger mechanism locks. Be sure to push the dart all the way back until it won't go back anymore, then release, aim, and pull the trigger to fire. Safety first. At any time the crossbow is loaded, keep it pointed down range and not at anyone / anything you don't intend to shoot. This is because breakage of the trigger parts, other failure of the trigger mechanism like the string not catching on the L-hinge, or other mishaps, can cause a misfire even if the trigger is not pressed. Likewise, with the default L-hinge, the trigger has a pretty light pull. Demonstration video of the mini pistol crossbow: https://www.youtube.com/watch?v=ycw-g1T3Mnk This device requires two springs, both of which can be found in spring kits from amazon (you only need one of these): https://www.amazon.com/gp/product/B000K7M36W https://www.amazon.com/gp/product/B0002KO1X0 A lot of different materials can be used for the spring, fishing line does a good job, amazon link: https://www.amazon.com/gp/product/B0000AXZL2 For ammunition/darts/bolts, see: https://www.thingiverse.com/thing:4176466 For targets, we often use the loosely fitting wall blocks and/or medieval castle pieces, see: https://www.thingiverse.com/thing:3950204 Except where described below, all parts should be printed with 2-3 perimeters, and at least 10% infill. The given modifier must be printed at least 40% infill. If you don't know how to do this, follow the link to the ammunition/darts/bolts and watch the video there. File Notes: "crossbow_arm_mini_weak_-_left.stl" and "crossbow_arm_mini_weak_-_right.stl" - Must be printed with PETG and nothing but perimeters. Set perimeters to an artificially high number so that there is no infill (except between the innermost perimeters). "crossbow2_L_hinge_mk2_hook_flat_e.stl" - scale it 10% or 1/10th the size. "crossbow2_L_hinge_mk2_hook_flat_i.stl" - scale it to 10% or 1/10th the size. This is a later version of the L-hinge that can be used if misfires are a problem with the original. It is angled backwards and has a much tighter fit above the body. However it will also require more force to get the trigger mechanism into the locked position. "crossbow3_trigger_bar_test_a" - test trigger bar, must slide into the body before printing the full one. You must eliminate any 'elephant foot' due to the print bed, print on a raft and/or sand if necessary. "crossbow3_trigger_bar_g.stl" - Must slide into the body. You must eliminate 'elephant foot' due to the print bed, print on a raft and/or sand if necessary. "crossbow3_lower_j.stl" - The modifier portion "crossbow3_lower_modifier.stl" must be printed at least 40% infill. (2020-05-18) Added a gravity-resetting nut that can be used instead of the L-hinge. This allows the larger reset spring to be eliminated. If there is not enough room between the mount pin and the mounting hole for the nut to move freely when the trigger is pulled, it may not reset itself. For this reason, the OpenSCAD file is included: change the value of "hole_dia" in order to make the mounting hole larger if necessary. Like the L-hinge, this nut should be scaled to 10% in the slicer. Note: If this nut is used, the device shouldn't be stored in the ready position since that holds the trigger back, compressing the trigger return spring. Instead, store it in the cocked position and ready shortly before loading the initial bolt by pulling the trigger.
With this file you will be able to print mini pistol crossbow with your 3D printer. Click on the button and save the file on your computer to work, edit or customize your design. You can also find more 3D designs for printers on mini pistol crossbow.