Mini RC Benchy
prusaprinters
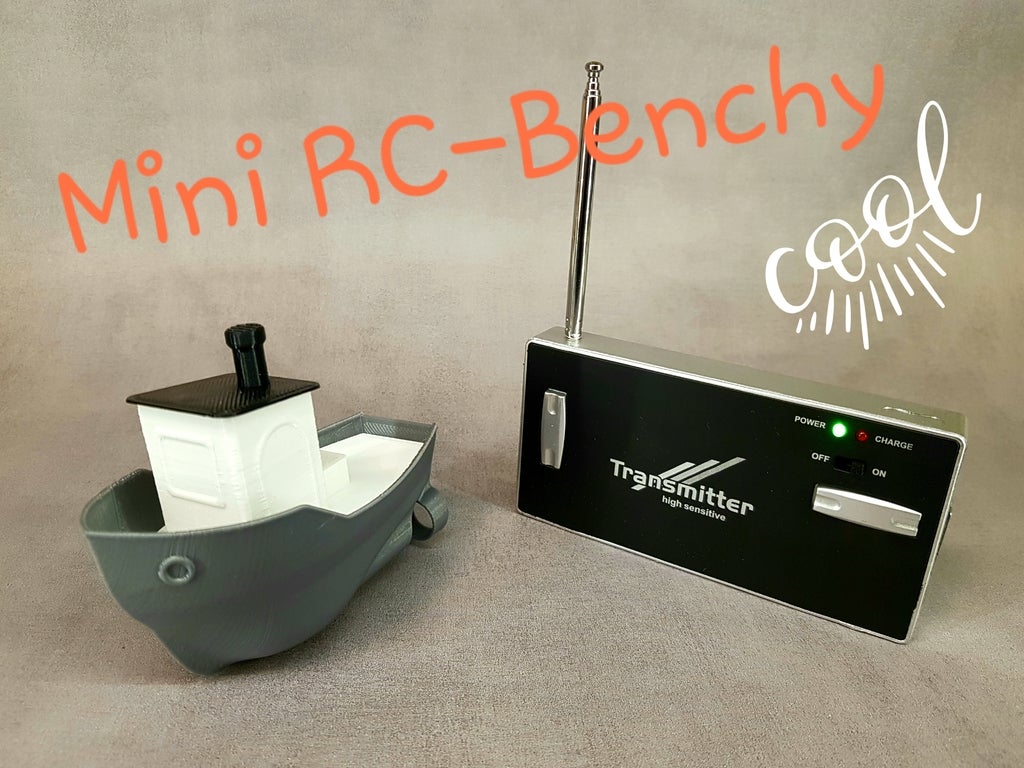
<p>So I´ve got this stupid idea for a smaller RC-Benchy for a while.<br/> And I figured since it is such a small and simple project I just had to get it done, and in time for 2019 3D Meetup here in Sweden.</p> <p>So here it is, the Mini RC-Benchy, perfect for the bath tub, kiddy pool or even the sink :)</p> <p>For this build you'll need one of these small RC boats called "Hurricane", if you search for "777-218 boat" you'll find them on Ebay, Amazon, GearBest and so on shipped for around 10-15$.</p> <p>I've also added an STP-file with the plain deck and an STP with the cutout solid for the charging port, if you want to make your own version such as a tug boat or whatever.</p> <p>Read the description below, and look at the pictures above and you'll have it assembled in no time.</p> <p>Feel free to ask any questions :)</p> <p> <figure class="media"> <oembed url="https://youtu.be/g9n7IUL8Q7Y"></oembed> </figure> </p> <h3>Print instructions</h3><p>Unassociated tags: Mini RC Benchy, R/C, RC Benchy</p> <h3>Category: R/C Vehicles Summary</h3> <p>So I´ve got this stupid idea for a smaller RC-Benchy for a while.<br/> And I figured since it is such a small and simple project I just had to get it done, and in time for 2019 3D Meetup here in Sweden.</p> <p>So here it is, the Mini RC-Benchy, perfect for the bath tub, kiddy pool or even the sink :)</p> <p>For this build you'll need one of these small RC boats called "Hurricane", if you search for "777-218 boat" you'll find them on Ebay, Amazon, GearBest and so on shipped for around 10-15$.</p> <p>I've also added an STP-file with the plain deck and an STP with the cutout solid for the charging port, if you want to make your own version such as a tug boat or whatever.</p> <p>Read the description below, and look at the pictures above and you'll have it assembled in no time.</p> <p>Feel free to ask any questions :)</p> <p> <figure class="media"> <oembed url="https://youtu.be/g9n7IUL8Q7Y"></oembed> </figure> </p> <h3> Print Settings</h3> <p><strong>Printer:</strong> Anet A8</p> <p><strong>Rafts:</strong> No</p> <p><strong>Supports:</strong> No</p> <p><strong>Resolution:</strong> 0,2</p> <p><strong>Infill:</strong> 100%</p> <p><strong>Filament:</strong> Colorfab, ClasOhlson PLA <br/> <strong>Notes:</strong></p> <p>Print with 2 perimiters (or more).</p> <p>Print the hull standing vertically with the rear end to the build plate.<br/> Print with 100% infill, trapped air pockets might with time be filled with water that can mold etc.</p> <p>The deck and roof part prints flat on the print bed, and can be printed with 10-20% infill.</p> <p>Roughly 5h printing time total.</p> <h3> How I Designed This</h3> <p><strong>Parts needed</strong></p> <p>Print the three parts, I printed them in PLA on an old Anet A8 which is far from in good condition, so the quality in the pictured parts leaves much to be desired, but they work. You'll probably have better results ;)</p> <p>You'll need one Mini RC boat kit "777-218 boat", can be found on Ebay, Amazon GearBest and so on, for about 10-15$.</p> <p>You will also need about 15-20 grams of lead beeds or small nuts to use as ballast.</p> <p>Some CA glue and Silicone glue.</p> <p><strong>Assembly</strong></p> <p>I think the pictures above describes it all pretty clearly, but I'll try to explain in text as well :)</p> <p>First of all very carefully disassemble the "speedboat".<br/> On top there are 6 small round plastic dots that can be removed to access small screws.<br/> These screws though are not the only thing keeping the parts together, they are also glued solidly, so to open the boat up you also need to use a side cutter to nibble the way around the boats "gunwale".</p> <p>Once open you have to be very careful removing the motors.<br/> The propellers simply pull off.<br/> But the motors are capsuled in a housing that is glued to the hull, and the wires going to the motors are very thin and fragile, so be very careful and use the side cutter to nibble plastic away until the motors are free.</p> <p>The circuit board is held in place with one screw hidden behind the capacitor.</p> <p>Once the electronics are removed its time for assembling.</p> <p>Start with gluing the roof to the cabin on the deck piece.<br/> Eyeball the roofs location and fix it with CA clue.</p> <p>Place the motors in the holes from inside the hull, push them as far back as you can, you'll just barely see the back of the motor when they are fully seated.</p> <p>Use a bit of silicone adhesive to fix them in place, and also make sure it is water sealed.<br/> you can test for leakage by placing it in water and look for water bleeding through.</p> <p>Then glue the battery in place as pictured. Use CA or silicone, hot glue will also work.</p> <p>Also glue the circuit board on top of the battery with silicone of hot glue.</p> <p>Now it is time to balance the boat to its correct waterline.<br/> Use the clear plastic cover the boat was delivered in and fill it with water, place the boat in the water and look from the side as you place the lead beads or nuts (or whatever suitable weights you might have on hand).</p> <p>Remember that the deck and roof will add weight and affect the balance, so make sure you try with the deck and roof on as well.<br/> Don't make it too heavy, the water line should be where the hull has a crease.</p> <p>Once you're happy with it you can fixate the ballast using CA glue and accelerator.</p> <p>Now put the propellers on and make a test run, if it goes in the wrong direction, simply swap the propellers.</p> <p>If it all works as it should you can place the charging port in the deck piece, fix and seal it off using silicone.</p> <p>Then you can glue the deck in place using silicone.<br/> I use a cheap disposable pipette and fill it with silicone, it makes it easier to lay a nice bead of glue around the edge on the hull inside.<br/> When placing the deck in place make sure you can see a small squeeze out of glue, to verify it is sealed properly.</p> <p>Using silicone on this makes it possible to pry it open if needed.</p> <p>The boat is now done!<br/> Happy sailing :)</p> <p>Don't forget to use the small white plastic T-shaped "off switch" delivered with the boat when it is not used.</p>
With this file you will be able to print Mini RC Benchy with your 3D printer. Click on the button and save the file on your computer to work, edit or customize your design. You can also find more 3D designs for printers on Mini RC Benchy.