Mini scara printer
thingiverse
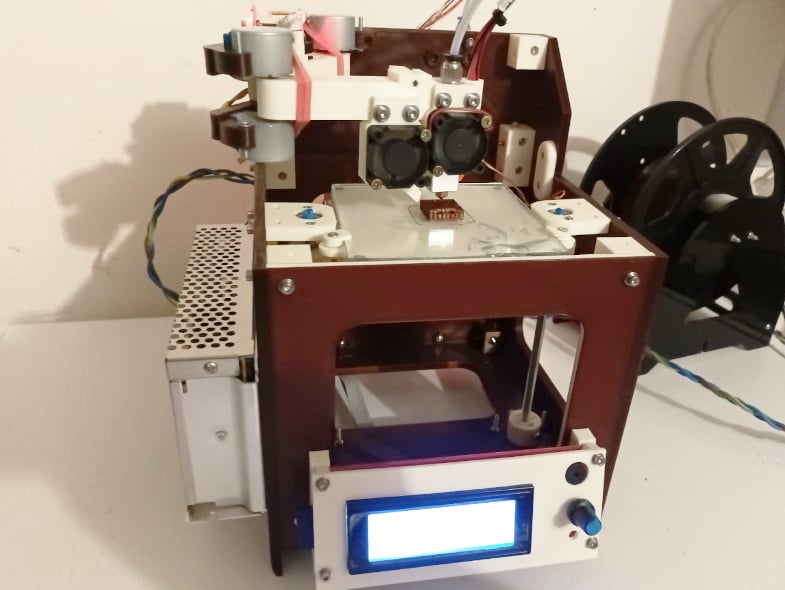
This is a mini SCARA printer. From the first tests I have verified that the printer works but that it is not suitable for normal use because it has poor accuracy, it is only suitable for demonstration purposes on the functioning of SCARA printers. The project is made to be as cheap as possible. The 28byj-48 ministeppers were used because they have a large number of steps per turn (2037.8864 steps/turn) so it is possible to avoid reducers. It is necessary to modify the 28byj-48 steppers from unipolar to bipolar, see attached photo. The X and Y axes must be set at 16 microsteps while the Z axis at fullsteps. Therefore, if you use the A4988 drivers, jumpers MS1, MS2 and MS3 must be placed in the X and Y axes, while jumpers must not be placed in the Z axis. The 28byj-48 5V steppers must be driven with a current of 0.11A, since on each axis there are two connected in parallel, the drivers must supply a current of 0.22A. If you are using A4988 drivers with Rsense of 0.1ohm (they are the most common types), the Vref must be adjusted to 0.176V. If you are using A4988 drivers with 0.05ohm Rsense (they are the less common types), the Vref must be set to 0.088V. Too high a current (or too high a Vref) causes the steppers to overheat with the risk of damage. I was unable to configure Marlin firmware for SCARA printers so I installed firmware for Cartesian printers. Therefore, the mm of the X and Y axes indicated on the display are actually degrees. To make the SCARA printer work with Cartesian printer firmware I used the conversion software written by Tyler Williams (https://www.thingiverse.com/thing:2487048) suitably modified to adapt it to this printer. Experimentally I have seen that the X and Y axes have 93.6 steps/degree this is strange because this means that the steppers have 93.6x360/16=2106 steps/revolution. The steps/degree and endstops must be calibrated accurately otherwise the prints are distorted. So I am also attaching the stl of special protractors. I recommend using optical endstops because mechanical endstops make trouble for the bands used as antibacklash of the XY axes. I recommend setting a low extrusion flow (about 92%) to avoid the loss of steps. https://youtu.be/e9KSNsd6LvY https://youtu.be/BJUTpq4o2vM https://youtu.be/Gu9HeaF0QMA All parts are printable with standard printers because they have a maximum size of 200x200mm. Needed parts: 900g (290m)x 3D filament 6x 28byj-48 stepper 1x Nema 17 stepper 1x Ramps 1.4 board 1x Arduino Mega board 4x A4988 driver 1x LCD 2004 with smart adapter and flat cables 1x Powersupply 12V 60W (or more powerful if you install a hotbed) 2x Fan 3010 12V 2x Optical endstop 1x Microswitch 1x V6 hotend (heatsink+heatblock+throat+nozzle+ntc+heater 12V) 1x PTFE pipe 4x2mm 1x PC4-M10 pneumatic fittings 1x PC4-M6 pneumatic fittings 1x Feeding gear MK8 2x Bearing 606ZZ 1x Bearing 624ZZ 2x Spring 7mm 5x Spring 4mm 2x Threaded rod M6x160 1x Cylindrical head bolt M4x14 4x Cylindrical head bolt M3x45 4x Cylindrical head bolt M3x40 5x Cylindrical head bolt M3x35 43x Cylindrical head bolt M3x25 8x Cylindrical head bolt M3x20 1x Cylindrical head bolt M3x18 14x Cylindrical head bolt M3x15 4x Cylindrical head bolt M3x10 2x Cylindrical head bolt M3x8 6x Cylindrical head bolt M2.5x20 4x Countersunk head bolt M3x35 4x Countersunk head bolt M3x20 4x Countersunk head bolt M3x16 4x Countersunk head bolt M3x15 4x Countersunk head bolt M3x10 6x Nut M6 113x Nut M3 6x Nut M2.5 8x Grub M3x6 76x Washer M3 8x Countersunk head chipboard screws 3x16 1x Glass plate 110x110x3mm
With this file you will be able to print Mini scara printer with your 3D printer. Click on the button and save the file on your computer to work, edit or customize your design. You can also find more 3D designs for printers on Mini scara printer.