Mini Talon Canopy Latch
thingiverse
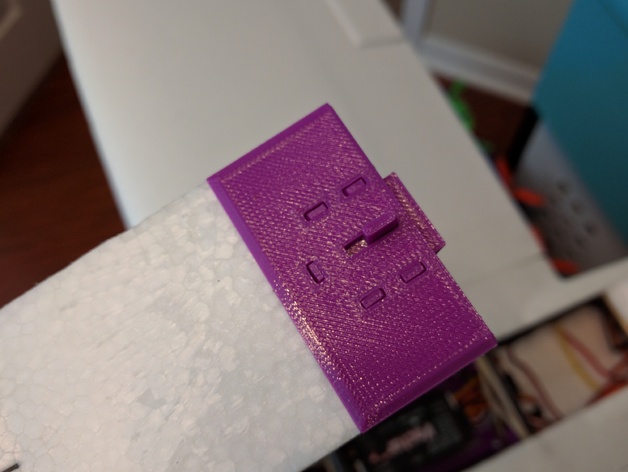
Spring loaded "door" style canopy latch for the Mini Talon. You will need a small spring from a pen to complete this project. The front latches have been slightly modified to add more wiggle room for 3mm bamboo skewers. I had to enlarge them for an easy fit. HOW TO ASSEMBLE THE LATCH Before gluing anything together, use the top plate as a guide to cut out the hatch on the Mini Talon. Place the top plate at the rear of the hatch and mark all five tab locations using it as a guide. Remove the top plate and connect the dots with the exterior markings, which are your cutting guides. Cut along those lines, you may need to use a razor saw to get through the plywood. Insert the spring into the latch and insert the latch into the body (the piece with the five tabs). Make sure the latch moves smoothly if it doesn't find out why and fix it. The spring should move easily into the body of the latch...if it does not you may need to use a drill bit and clear it out. Fit the top piece onto the latch/body assembly. You may need to file down the tabs for a nice tight fit, but don't force it. Glue the top plate to the body using gap filling CA around the perimeter of the joint and some kicker to set it quickly. Don't attempt to create a butt joint between the two pieces, a fillet is adequate. Glue the latch assembly in place in the hatch and place the strike plate against the latch assembly. Place the front of the hatch on the plane and push down on the strike plate such that it makes an indentation in the fuselage...use that as your cutting guide. You will need to cut flush with the existing ledge. Glue the strike plate into the fuselage with your favorite adhesive, medium CA or hot glue works well. Use the hatch and latch to keep it in place while the glue sets. Don't glue the latch to the strike plate. Finish the strike plate off with some 3mm bamboo skewers to add extra rigidity. Make sure they sit flush. Printer Settings Printer: Flash Forge Creator Pro Rafts: No Supports: No Resolution: 0.2 Infill: 100 Notes: All parts printed in Hatchbox PETG with 100% infill and two shells.
With this file you will be able to print Mini Talon Canopy Latch with your 3D printer. Click on the button and save the file on your computer to work, edit or customize your design. You can also find more 3D designs for printers on Mini Talon Canopy Latch.