Miniature LED track lighting
thingiverse
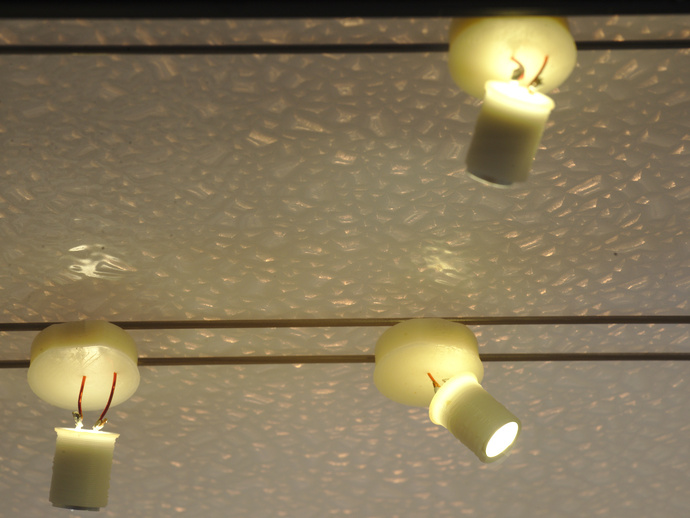
With my partner, I'm building a tiny museum called The Mμseum. We wanted to have a track lighting system similar to what one would find in a full-size museum. This lets the curator light pieces individually to help set off works in different ways. Each spot light is posable and has a can to create a crisp light cone. This is a miniature track lighting system using standard through-hole 6mm LEDs as the light sources. The tracks themselves are simply stiff wires that run in parallel along the ceiling, holding the lights in place with magnets. This is designed to have 5V 1A rails and can support up to 25 LED spot lights. Note: the notch to mark the polarity shown in the photos is inverted from the files here. After creating the photographed ones, I realized that it'd make more sense to publish with the notches matching that of LEDs (marking the negative/cathode instead of the anode). The source files of the openSCAD files are in the The Mµseum git repository Instructions See the included photos for all the parts and steps. Individual spot ingredients list LED (warm white, 5mm, Digikey part 1080-1006-ND) 82Ω resistor, ¼W, 3mm (Digikey part S82QCT-ND) file can be easily tweaked for larger resistors. LED spot shade (led_spot_shade.scad) super glue LED spot magnet holder (led_spot_magnet_holder.scad) 2× cube magnets (4mm to each side. Unfortunately, the source I got mine dried up when they became illegal to sell. The magnet holder file can be automatically-adjusted to fit any size cube magnets by tweaking the magnet_size parameter.) magnet wire (22 gauge, 50mm wire per spot) reflector: thin, flexible shiny material that can be bent into a cylinder (I used some scrap metalized anti-static bags) 10x26mm rectangle per spot if the magnet wire is not ferrous, scrap ferrous wire (a 3-4mm sections per spot. I used scraps cut from the resistor leads, which were ferrous) Tools soldering iron, solder needle-nose pliers scissors or knife sandpaper or a metal file LED can Prepare the LED spot shade by ensuring that there are two holes at the bottom. If the 3D print didn't come out well, a knife or awl can be used to punch/ream a hole in the bottom. Put the LED leads into the shade and glue the LED it into place using super glue. Cut out a 10x26mm rectangle of the reflector material and roll it into a cylinder. This should have about 2mm of overlap on the long side to ensure full coverage. If it has one side that's shinier than the other, ensure that the shiny side is on the inside. Place this between the LED shade and the LED itself, to act as a light reflector and to block the light from causing the shade to glow. Wiring Cut off two 25mm lengths of magnet wire and sand off the wire coating. I've done about 5mm on each end, sanding until the wire is shiny. If the magnet wire isn't ferrous, solder a 3mm section of scrap ferrous wire along side one end of each piece of the magnet wire. This will be placed under the magnet and allow it to stick to the wire, creating a strong electrical contact. Then place the wire with the ferrous metal on it through the center hole in the LED spot magnet holder. This will be your + connection. Bend one of the resistor's leads into a flat spiral such that it can make good contact underneath the magnet. Solder the other piece of magnet wire to the other lead and feed it through the non-center hole. This will be your - connection. Solder the + connection to the positive side of the LED. Make a loop of the magnet wire and hook them together before soldering. If you look into the LED itself, the positive side is connected to the smaller half of the metal part inside the LED (if you look closely, there are two halves, one notably smaller than the other, connected via a tiny wire). The remaining side should be soldered to the - connection in the same fashion. Magnets Insert the magnets into the two cubical recesses in the LED spot magnet holder. You may need pliers to get them to stay in. They can be kept in place using a drop of super glue (be careful to not block the electrical connection). Rails For the rails, I used piano wire. The main criteria is that it is stiff and ferrous. I had hoped to use flat strips of metal, but couldn't find any that are 4mm wide.
With this file you will be able to print Miniature LED track lighting with your 3D printer. Click on the button and save the file on your computer to work, edit or customize your design. You can also find more 3D designs for printers on Miniature LED track lighting.