Minimal K40 Drag Chain Adapter for Air Assist (one part for both axes)
thingiverse
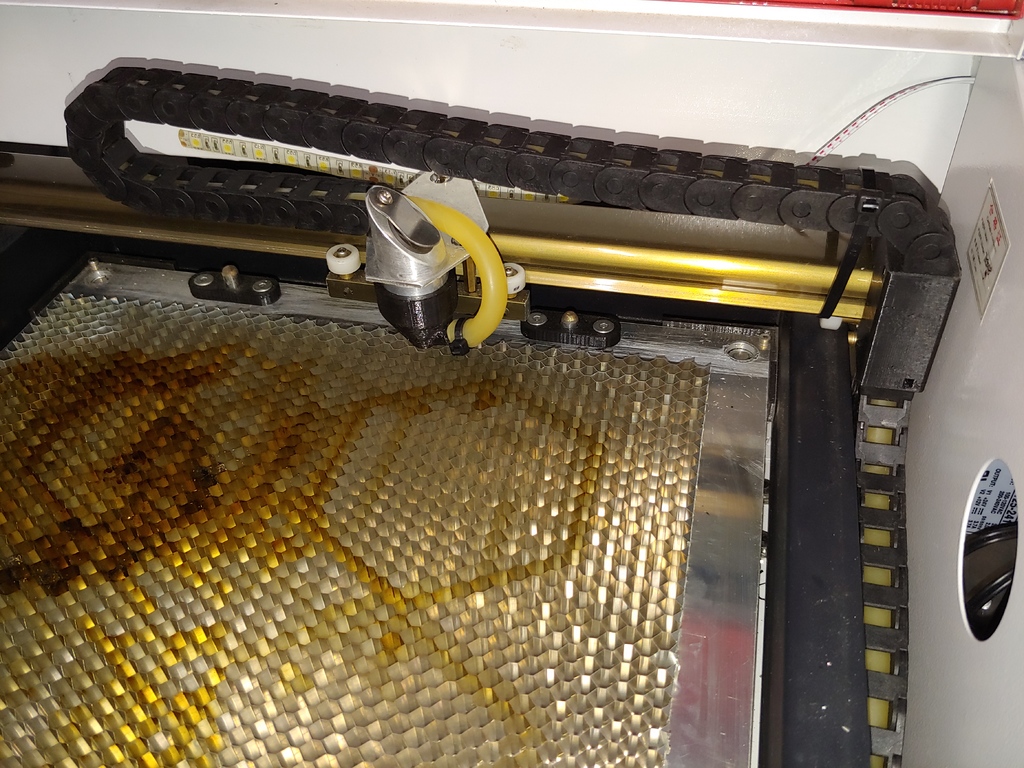
All of the other K40 drag chain adapters I found were either too complicated or got in the way too much internally in the machine. This one attaches the chain with a single screw to the carriage with no additional parts, and holds itself to the plate on the end of the gantry with no fasteners. The last part of the chain can be fixed to the base of the chassis with a piece of VHB tape. Here is a rundown on the parts needed: 1. 10x10 R18 (narrow radius) drag chain. I used this one: https://www.amazon.com/gp/product/B01LX02PSW/ref=oh_aui_detailpage_o07_s01?ie=UTF8&psc=1 2. Surgical tubing around 10mm max diameter. I used this: https://www.amazon.com/gp/product/B01GXXZGZ6/ref=oh_aui_detailpage_o09_s00?ie=UTF8&psc=1 Remove links from the chain and flip them over to match the layout of the chains in the picture. If you alternate the links, you can make a solid section of chain. The chain on top is for the X, and the one on the bottom is for the Y. The 3d printed part slides down the plate on the end of the gantry. The plate on mine had a nice razor sharp burr all the way around it and needed to be filed smooth so the part would fit nicely. You may also need to run a small file up the inside of the slot on the 3d printed part to get it to slide down without binding too much. The unterminated ends of the drag chain slide into the rectangular holes of the 3d printed part. When I printed it, the friction alone was enough to hold the drag chains in place. I also provided some slots to fish zipties through the links to make sure the drag chains don't fall out, but I doubt you'll need them. Once you have the drag chains mounted to the part, fish the tube and whatever thin wire you need through the chain, attach the chain to the leftmost bolt on the X carriage, slide the printed part down the end plate, and use some VHB to attach the Y chain to the floor of the machine and you're done! A couple notes on assembly: if your drag chain was like mine, it wouldn't sit flat when extended. Because it would curl up instead of flattening out, it would rub the glass on the lid of the laser. I fixed this by heating the chain in the oven to 160°C (320°F) or so and flattening the chain on my countertop. You may need to play with this a little to get the links to sit flat. Also, keep in mind the path of the laser, you need to make sure the chain doesn't ever get into it. Mine was totally fine where it was mounted in the pictures. Lastly, the surgical tube ended up acting like a spring inside the chain, causing it to rise up above the carriage and rub the glass on the lid. I fixed this by using a zip tie to pull the end of the chain down towards the 3d printed part. Let me know if you think any changes need to be made to the part to make it better. Including the Fusion360 file in case you want to make changes. Thanks!
With this file you will be able to print Minimal K40 Drag Chain Adapter for Air Assist (one part for both axes) with your 3D printer. Click on the button and save the file on your computer to work, edit or customize your design. You can also find more 3D designs for printers on Minimal K40 Drag Chain Adapter for Air Assist (one part for both axes).