Minimalist Upcycling Cable Management
thingiverse
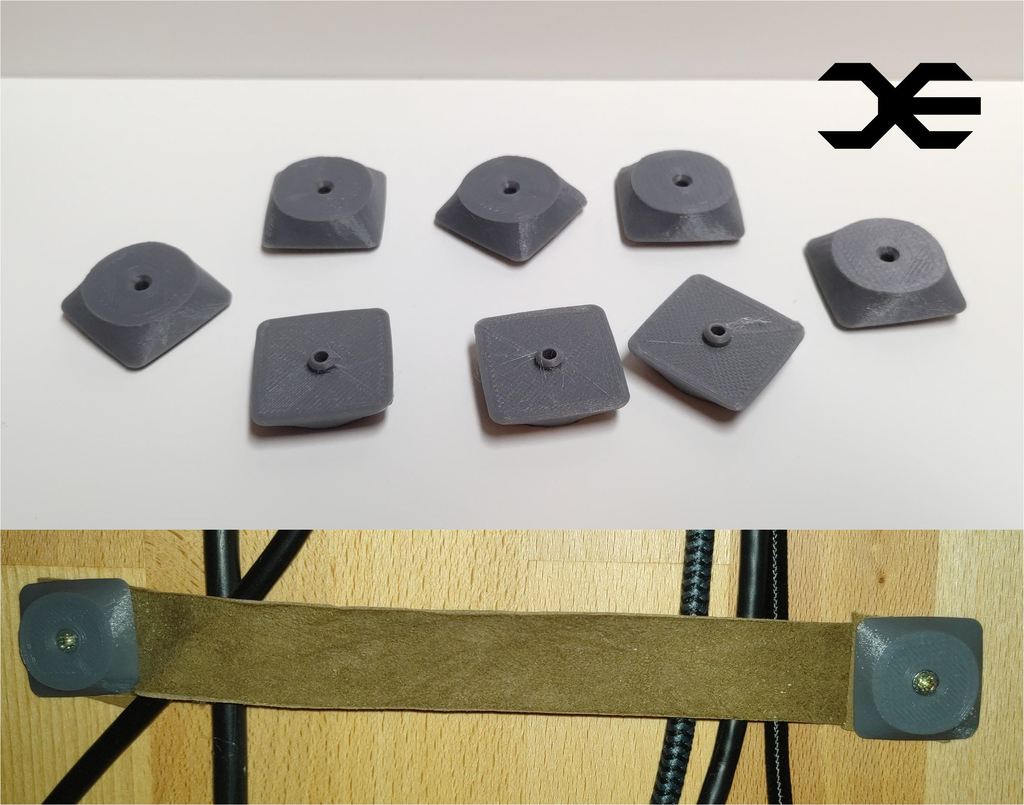
This a yet another cable management approach. While I like other designs on this platform, there is just too much plastic. They are also usually bulky. This is why I came up with this minimalist solution. It uses very little plastic and you are able to repurpose materials you already have at home. Two "anchors" are used to fix a strip of slightly flexible material on a surface (e.g. under a desk). The cables are then passed through and the tension of the chosen material will hold them to your surface. Benefits over other cable management systems: - "one size fits all" - You can use thick or thin cables, many or few. With this you can do it all. - Sustainable design. Very little material used, other material recycled. - Very flat. It is not bulky at all. In my constellation it protruded maybe one centimetre from the surface. - Elegant. By mixing materials you can achieve a very sleek look. - Flexible. You can change the cables with special assembly. Materials needed per fixture: - Strips of slightly flexible material (I used thin strips of leather cut from an old coat, you could also e.g. use rubbery fabrics like maybe an old mousepad etc.) in this constellation they were 20-25mm wide and between 0,4-0,7mm thick - Two printed "anchors" (customized for your material and screws) - two screws, I used 2,5mm all-purpose screws (250 pcs. ~3,50€ at a german hardware store) Design choices: - organic, very flat, no really sharp edges >This is visually pleasing, results in a small footprint and, in case of collision with body parts, reduces injury as well as damage potential. - Little stub (~5mm diameter) with strong chamfer >This will keep keep your fabric locked in place. It will also protect the fabric from the sharpness of the screw. The reason for the 5mm diameter is the compatibility with your standard hole punch (like you would use in an office). With this you can punch holes in your fabric. The chamfer and stub will slide in your pre-drilled hole and make the assembly very secure. - flat top with chamfered hole for screw head > This will help the anchor print easily. It will also create a flat surface when it is assembled. This reduces injury potential. Assembly instructions (one fixture): 1. (Customize and) print two anchors 2. Cut appropriate material to strips with correct width and length 3. Use a hole punch to punch holes on both side (I used two layers on the end to increase stability) 4. Drill a small hole for the first anchor (appropriate for your screw - I used 1,5mm) 5. Use a bigger drill (5mm) to widen the hole to a depth of 2-3mm, so the stub will fit into it 6. Screw in the first anchor with the fabric strip already on the anchor 7. Repeat steps 4-6 for the second anchor. Use the strip to achieve the right amount of tension. Done. It is fairly intuitive and quick. One fixture requires less than 5g of material. They are also a good print for cleansing between colours. Designed with FreeCAD. I have included the FreeCAD file, so you can easily customize the design for your purpose. Conceivably Engineering - Little competence, big smiles.
With this file you will be able to print Minimalist Upcycling Cable Management with your 3D printer. Click on the button and save the file on your computer to work, edit or customize your design. You can also find more 3D designs for printers on Minimalist Upcycling Cable Management.