Minted - Arcturus a SlimeVR Case (Current version v1.7b)
thingiverse
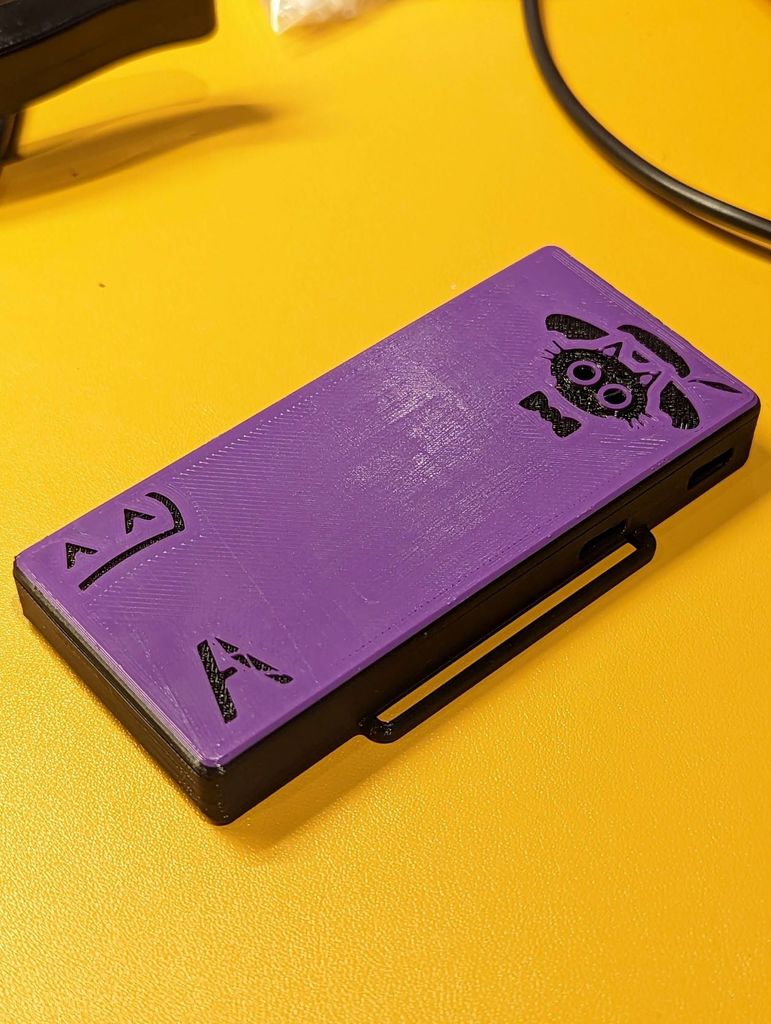
M,in,te,d - Arcturus More in the design I have added more in the current design of the Arcturus by Lixulia.https://github.com/Lixulia/Arcturus The Arcturus case is an already solid case however I wanted to modify it to what I feel is the best it can be Changes from the original - Rearranged layout to allow for prioritising easier access to the charging port - New layout allows for more efficient use of empty spaces this will allow for better use of space for wiring, especially for the diodes (The case is mirrored/flipped compared to the original) - Trenches/Grooves for solder joints (and esp) to sit live in. Solder joints will not interfere with assembly and bring risk of damaging the case or a joint to a minimum. - PCBs are cliped in rather than friction fitted. Much more secure and permanent (However still removable with a tool) - Fully supported switch (No wiggling) - Custom Lid vent - Added a fillet/curve at the point where the straps go through. This makes straps much easier to insert, remove and adjust than before - Supports 1100mah 60345 Lipo and 1800mah 804040 Lipo (Different cases) (Can fit smaller dimensions. Note do not use lipos smaller than 1000mah when making a DIY SlimeVR tracker) - Removed a disassembly slot to protect against accidental piercing of lipo during the disassembly of a tracker - Included my Lime AUX case, you can use a zip tie to secure the cables from pulling out if you like - Includes my Lime AUX ultra-low profile lid, to reduce the AUX height to its absolute minimum of 7.6mm tall. For those who can manage their cables properly in a tight space and want the lowest profile for an AUX possible (Makes spine mounted AUX significantly less noticeable when lying on your back against a hard surfaced floor, near unnoticeable when on anything soft). - Included is a Go Pro chest adapter for attaching the tracker to a gopro chest harness for added stability (Compatible with the original arcturus) - Included is a GoPro body case (No need for an adaptor and is much more stable and rigid, making above point a bit redundant now) - Included Hip clips. These are to go on the hip strap and have an extra strap to hold the upper leg/Thigh trackers from sliding down - Included Upper leg/Thigh Lid for straps from Hip clips to attach to. This system provides increased stability and prevents the upper leg trackers from sliding down, without needing them to be on tight. Thus increasing comfort to the user. - Solder guide included, to allow for out-of-case soldering. Reducing the chance of stray solder causing shorts, easier soldering experience and more elegant wire sizing Print notes You may get better results printing at < 0.2mm layer height. I personally print at 0.12mm with a 0.16mm initial layer Assembly notes - When pushing the boards in, do not use a metallic and sharp object. You can use the rubber on the end of a pencil to not cause any part damage. - For the d1 mini and TP charger. Insert the port side first then click down on the opposite end. It is normal for the d1 mini to not sit in the port hole. - All tracking is performed by the BMI160 IMU. If you have concerns that it may jiggle around or come loose. You can secure it with a tiny dab of super glue in the two circular mounting holes on the break-out board (Note this will become permanent) - Battery physically small? Or has a bit of a rattle? You can use a bit of blutak to fill in gaps (Don't need to use a lot) - When disassembling the tracker, rotate your pry tool in the disassembly groove rather than levering or pushing it in. As this greatly reduces the risk of damage to the case and the tracker electronics and it is generally easier as well - The max Lipo battery dimensions are determined by picking the 804040 or 603450 case - The power switch used is a "DPDT 2P2T" switch. Take a look at the pictures to see the specific model What and how many do I print? For a set of 8 (Including feet) (Excluding elbows) x5 Body x3 Lids x2 Thigh Lids x1 Guide x2 Hip clips x3 Aux body x3 Aux Lid (of your choice. I personally use the ultra low profile) x1 GPCA (of your choice. I personally prefer high tension) For a set of 10 (Including feet) (Including elbows) x7 Body x5 Lids (Same as above) What are the GPCA, Hip clips, Cable management clips and Thigh lids for? No one else has them - GPCA is a goprochest adapter. For the main unit to attach to and connect to a goprochest harness or similar. This allows for "greatly" increased stability, comfort and accuracy. It also stops the trackers from sliding down the body. NOTE THIS IS NOW REDUNDANT! USE "DGB Body (Lipo size) - DGB Body (Lipo size). Is a merge of the adapter and tracker body and accomplishes the same objectives as GPCA, but better - Hip Clips go on the AUX/EXT strap of your hip tracker. One on the left and the other on the right. You will need a short velcro strap for each, as they will connect to the thigh trackers' "Thigh lids" handles. This also "Greatly" increases stability, and accuracy and prevents them from sliding down your legs. Comfort can increase as a result as they don't need to be as tight anymore to prevent this. (I recommend you secure this strap last when putting on your trackers) - Back and Shoulder cable management clips are meant to attach to the gopro chest harness and manage the extension cable coming from the "Chest", over the shoulder and down the back to the "Hip". Please use velcro cable management ties - Knee cable manager (For those on a super tight budget and need to use extension trackers from thigh to ankle) Extra notes - I highly recommend 28AWG or 30AWG be used as well as heat shrink or electrical tape. - To get the best look out of the Lid, consider doing a color filament swap during printing - "I don't know if my tracker is on, there is no LED showing" Check the underside of the tracker you will see the status glow. - Any issues please contact me on discord or the slimevr server "Rosdayle#0920" - The files included are strictly for non-commercial use. Under CCA Non commercial. Exception allowed for 3d printing services Don't have a 3D printer but want these made for you? I'm available to do so https://discord.com/channels/817184208525983775/1103353183998312448/1103353183998312448 Changelog v1.1 - Removed flipped name - Reduced extension port hole size - Tightened tolerance for BMI160 (Should wiggle less) - Increased tolerance for charge board (Less force needed to clip it into place than before) - Raised d1 mini clips (To grab d1 mini a tad better) - Lowered the d1 mini shield trench (D1 mini shield should push against the case less now) - Lowered walls of the soldering guide (To allow for iron to come in at more steep angles and make soldering BMI 160 easier) Changelog v1.2 (Main body update) - Tightened tolerance slightly for charge board (Reduce wiggle) - Loosened tolerance and reduced clip size for BMI 160 (Less force required to clip in) Changelog v1.3 (Main body update/WIP candidate) - Loosened tolerance by .3mm long ways for charge board (Less force to install while being snug) - Loosened tolerance and reduced by .1mm wide and long (Less force required to clip in and should accommodate low tolerance/precision cut D1 mini's a bit more) Changelog v1.3 (Final candidate) Chargeboard tweaks - Prongclips increased to .5mm long - Prongclips curved on top to allow for easy installation but strong locking Changelog v1.3 (Mirror fix) - The body uploaded was mirrored incorrectly Changelog v1.4 - All clipping prongs now have a curve to allow for easier insertion of PCBS - Increased length .2mm for BMI160 area - 2 bodies exist now, one is for 603450 Lipo the other is for 804040 Lipo - Lids have been remade to be compatible with both Lipos and any future lipos (V1.1 will still work for the 60350 Lipo body) - Current version is now included in title Changelog v1.4b - V1.4 no longer WIP (Complete) - Removed previous versions (Prevent confusion, RIP download stats) - Added new bodies. "DGB" stands for "Direct Gopro body". Literally cutting out the middle man, which is the adapter Changelog v1.5 - Removed v1.4 and older files (Rip Stats again) - Main bodies take into account the D1 mini antenna poking out by .1-.2mm - Simplified and updated naming - Updated and unified extensions for other of my Mint and Lime projects - Only one extension will be uploaded here "Aux End BMI160" as others are not applicable for this case - Updated soldering guide and downscaled it (Usable for both battery versions) Changelog v1.5b - Fixed naming of "Handle lid" to "Thigh lid' was causing confusion (My bad) Changelog v1.6 Credit to Marro64 for identifying issues - D1 mini area now symmetrical - Fixes A0 trench and Light trench - Allows the Minted Arcturus to be flipped/mirrored back into its original orientation - All body files and solder guide updated to reflect this - Added a note regarding "DGB Body (Lipo size)" Changelog v1.6a - Added Cable management clips for extension cables (Chest to Hip, by over shoulder) -- Shoulder -- Back -- Knee cable manager (For those on a super tight budget and need to use extension from thigh to ankle) - Added a note about this in GPCA, Hip clip ETC section Changelog v1.7 - Fixed the eye features on the lid being 0.05 off from the base of the lid. Could cause print issues Changelog v1.7b - Fixed naming getting mixed up for the main units (No idea how or when. Thanks LocaCola for spotting this)
With this file you will be able to print Minted - Arcturus a SlimeVR Case (Current version v1.7b) with your 3D printer. Click on the button and save the file on your computer to work, edit or customize your design. You can also find more 3D designs for printers on Minted - Arcturus a SlimeVR Case (Current version v1.7b).