MintyBoost XL - Custom MintyBoost
thingiverse
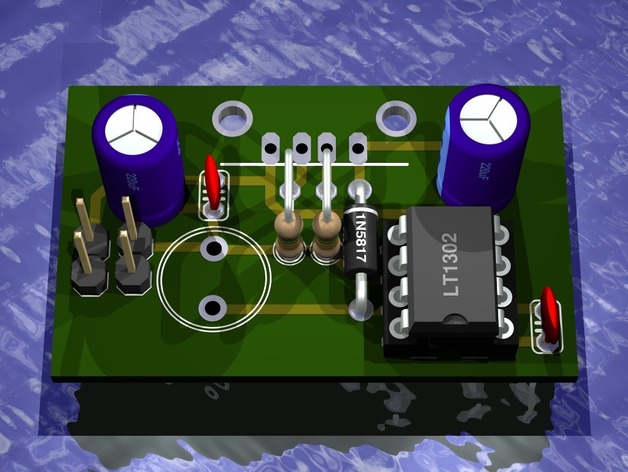
This is my modification of Ladyada's excellent open source MintyBoost kit that is documented at http://www.ladyada.net/make/mintyboost. My modification consists of a custom PCB design based on the original schematic that it slightly larger than the MintyBoost's PCB but is single sided with no links and has room for two battery connections. It is still small enough to fit in a large Altoids tin along with 4x AA batteries. You have the option of running the MintyBoost XL at 2.4v - 3.0v by putting the two pairs of 2x AA batteries in parallel or running it at 4.8v - 6.0v by putting the two pairs of 2x AA in series. The LT1302 runs at a maximum input voltage of 8.0v so the higher voltage produced by the batteries in series isn't an issue. Running in parallel might cause issues if the battery packs are not evenly charged as it may result in the higher charged one draining into the lower one. You have the option to decide when building as there is room to connect them in parallel on the PCB. The resistors that I chose for the D+ and D- pins of the USB connector were 100k as I wanted it to work with my iPhone 3G. Some devices are fussier than others, most notably Apple's newer products, you may need to adjust the design to get it to work. See Ladyada's documentation and forums for more information about this. To etch the PCB I used the toner transfer method which is extensively described at http://www.fullnet.com/~tomg/gooteepc.htm. Basically it involves printing the track design onto photo paper with a laser printer and then ironing it onto the copper clad board. After it has transferred to the board it is soaked in water to remove the paper which leaves an etch resistant layer of toner on the copper board. It is then etched in a corrosive solution such as ferric chloride to remove the remaining copper. Be sure to wear safety glasses, protective gloves and suitable clothing when dealing with etching solutions and keep it away from anything metallic. The toner transfer method isn't perfect as the quality can vary quite a lot and requires a bit of tweaking. The real beauty of this method is that you can always scrub off the toner before you etch if you're not happy with the quality and try again. Altoid tins are notoriously hard to get hold of in the UK but luckily Marks & Spencer sell "Curiously Strong Mints" which are identical to Altoid mints and come in the same sized tin. Instructions Etch the board design onto copper clad board using your desired method. Drill the holes in the etched board. solder al of the components in place. Cut a hole in the tin for the USB connector (Dremel or snippers are handy). Insulate the metal by the circuit board and glue the board into place. Insert 4x AA batteries. Charge you gadgets on the go! You will more than likely be stopped by airport security if you take try and take a device like this on board despite it being harmless.
With this file you will be able to print MintyBoost XL - Custom MintyBoost with your 3D printer. Click on the button and save the file on your computer to work, edit or customize your design. You can also find more 3D designs for printers on MintyBoost XL - Custom MintyBoost.