Miyoo Mini Tate Grip (mmTG)
thingiverse
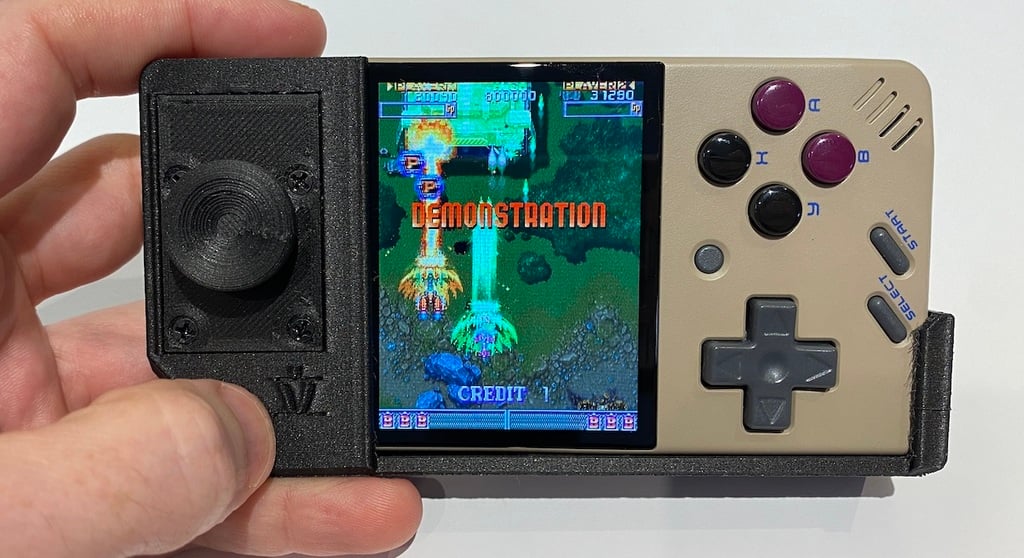
# mmTG The Miyoo Mini Tate Grip! Perfect for playing vertical shmups on the go. This requires some modifications to the Miyoo itself so PROCEED ENTIRELY AT YOUR OWN RISK. ## Updates! * 2023-02-13 Updated "deluxe" version: since the ALPS switch is taller, now the hole for it is deeper and the joystick plate cover is thicker to move the thumbstick closer to flush * 2023-01-31 Added "deluxe" version, see below ## Parts list * 5-pin JST 1.25mm pitch connectors M & F https://www.aliexpress.com/item/1005004015984711.html * Magnet wire * M2.5x8mm screws x 4 For *standard* version: * 5-way navigation switch module https://www.aliexpress.com/item/33004744585.html For *deluxe* version: * ALPS Alpine 8-way switch RKJXM1015004 https://www.mouser.ca/ProductDetail/Alps-Alpine/RKJXM1015004 * Breakout PCB https://oshpark.com/shared_projects/NYMjlWqy ## Modding This mod hardwires the external joystick into the Miyoo's control pad, but we do so with a JST connector so it can be removed. The JST connector can fit inside the battery bay when not in use, and aside from a small (optional) hole no modifications are visible from the outside when stowed. The Miyoo PCB has test points for the D-Pad. Use magnet wire to attach to each of the test points. Thread the magnet wire through drill holes in the PCB and solder to the wires on the JST connector. You can pull ground from the unpopulated USB connector. (SEE PHOTO.) NOTES: If you go through the drill points and superglue in place as pictured, you'll have a more secure connection, but you may have to trim the membrane around the bottom of the A button to compensate. For less modification, you could try going around the side with magnet wire, if you can find a way to fix it in place securely. I initially tried this with the 20? gauge wire already attached to the JST connector but it was too bulky for a good fit, thus the magnet wire. Desolder the header pins from the 5-way switch module. Directly solder up the 5-way switch to GND/up/down/left/right matching the colors to what you wired to on the PCB. NOTE: I soldered the male end of the JST connector to the PCB because the housing is slightly smaller, making it easier to jam back in the battery cover. If desired, you can create a tiny conduit in the battery door by drilling out a small hole and opening it to the edge (SEE PHOTO). A set of files works well for this. Alternatively you can try the modified battery door 3d print, but it's difficult to print in a way that will be strong. If you try it in ABS or resin and it holds up, let me know in the comments. ## Deluxe version The Deluxe version uses a quality part for the joystick from ALPS: RKJXM1015004. You can find it at your favourite parts supplier like Digikey or Mouser. This will give you absolutely superior control, feel, reliability, but comes with a little extra cost. The thumbstick and joystick cover have alternative STLs for the deluxe version. ## Printing Choices: Your choice of the thumbstick or joystick. Options added for channeling the connector across the Miyoo: the default uses a channel on the bottom that you can glue or tape over. There are also options for clips, and one with no extra features if you have your own method. Prints well standing up with no supports, or supports just for the overhang of the joystick inset. I also use supports for the wire channel on the bottom. Pictured printed in Matter3D Carbon Fiber PLA. Optional battery lid modified from https://www.thingiverse.com/thing:5547209, thank you! CC-BY-NC ## Software To set up your Miyoo for arcade games, I found this guide really helpful: https://www.reddit.com/r/MiyooMini/comments/vfirs8/ultimate_miyoo_mini_arcade_guide_onion_os/
With this file you will be able to print Miyoo Mini Tate Grip (mmTG) with your 3D printer. Click on the button and save the file on your computer to work, edit or customize your design. You can also find more 3D designs for printers on Miyoo Mini Tate Grip (mmTG).