MK CUB3D (Prusa i3 MK2 mod)
thingiverse
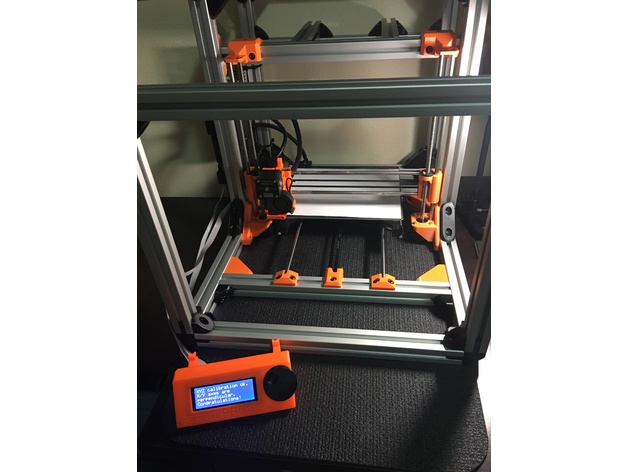
Update (4/26/17) - Been pretty slammed lately, haven't had much time to work on this project. Added a Tinkercad public link for those requesting access to the files, and I'll keep adding more as I progress. I'm heading out of town next week so I might finally have some time to focus on it. TinkerCad public share: https://tinkercad.com/things/cYHTzPqzv9R Right now, I'm printing the PSU enclosure but I'm not loving the design yet. I'll get it done and then redesign it after I've got everything up and running. UPDATE (4/16/17) - Migrated all the MK2 components to the new frame! All Frame assembly and kinematic relative parts updated to the current working versions. Added PSU Lower, LCD, and Temp control panels (still figuring out how I want to complete the PSU enclosure). Need to add a cover assembly. Added some photos of the current build. UPDATE (3/30/17) - Got most of the extrusions cut and assembled, with multiple revisions to many of the chassis parts. These may still need adjustments since it's not fully assembled, but I wanted to get what I have posted. Expecting to migrate functional components of the printer to the new chassis within a few days. Remixed the reinforced Y-stepper mount from sipo75 to attach to the 3030. Still need to work on some end caps for the extrusions and a modified X-axis end on the non-motor side that allows for belt tensioning from the extruder facing side rather than the outside since the frame blocks those screws. Decided to skip the removable front frame assembly for a couple reasons: keeping it integrated offers a great spot for the display and some other goodies, and it also reduces the amount of aluminum extrusion needed as well as the number of parts required. Plus, it eliminates potential points for rattles and noise. Got my Prusa i3 MK2 in January and it's been amazing! One reason I bought a 3D printer is that I love tinkering, so tinker I shall! What problems am I trying to solve? One major drawback of the i3 design when needing climate control (ambient temp & humidity) is the open frame. Wanted a way to enclose my printer so that I could confidently print more exotic or sensitive filaments. Many existing enclosures can accomplish this, but they use up too much space and I don't want to relocate the printer. The other issue is that the electronics and power supply are also subject to the same ambient temps. Believe they're still within their operating range, but feel keeping them cool by removing them from the "hot zone" will increase longevity and potentially performance as well. The frame design on the i3 leaves room for movement when high on the z-axis, making it hard to square this dimension as well. Adding a spool of filament on the Prusa spool holder makes this even worse. Cables sag over your prints. This has been addressed in the new MK2S and I imagine that will do the trick, but I feel that the new placement of my electronics (renderings don't show this yet) will help with this issue. Didn't have any awesome print projects to work on at the time - problem solved! So far, I've only ordered supplies and put together a basic rendering in Tinkercad. Would have preferred to do it in Fusion 360, but I just can't seem to get the hang of it and didn't want to spend the rest of the year learning so I could pursue this project. If anyone knows some great resources for learning Fusion 360, I'd love to see them in the comments. Only printed the modified X-Axis stepper side so far, and I've already changed that twice. Will continue to post updates, pics, and STL's as the project continues. Hoping to complete everything by mid to late April 2017, since some hardware won't be here for a few weeks. Will be adding in designs for the electronics housing & PSU housing that will be actively cooled with a couple 12omm PC fans after I get the frame assembled. Will likely do the side panels in acrylic on the cover, using TPU printed mounts that slide into the extrusion channels. Will also reuse the Sorbothane dampers that I have on the MK2 currently for vibration dampening. Love to see comments, suggestions, and criticisms in the comments so I can evolve the design with any input from the community!
With this file you will be able to print MK CUB3D (Prusa i3 MK2 mod) with your 3D printer. Click on the button and save the file on your computer to work, edit or customize your design. You can also find more 3D designs for printers on MK CUB3D (Prusa i3 MK2 mod).