MK3S+ LGX Shortcut Compatible X-Axis Upgrade with Tensioner (Bear-Derived)
prusaprinters
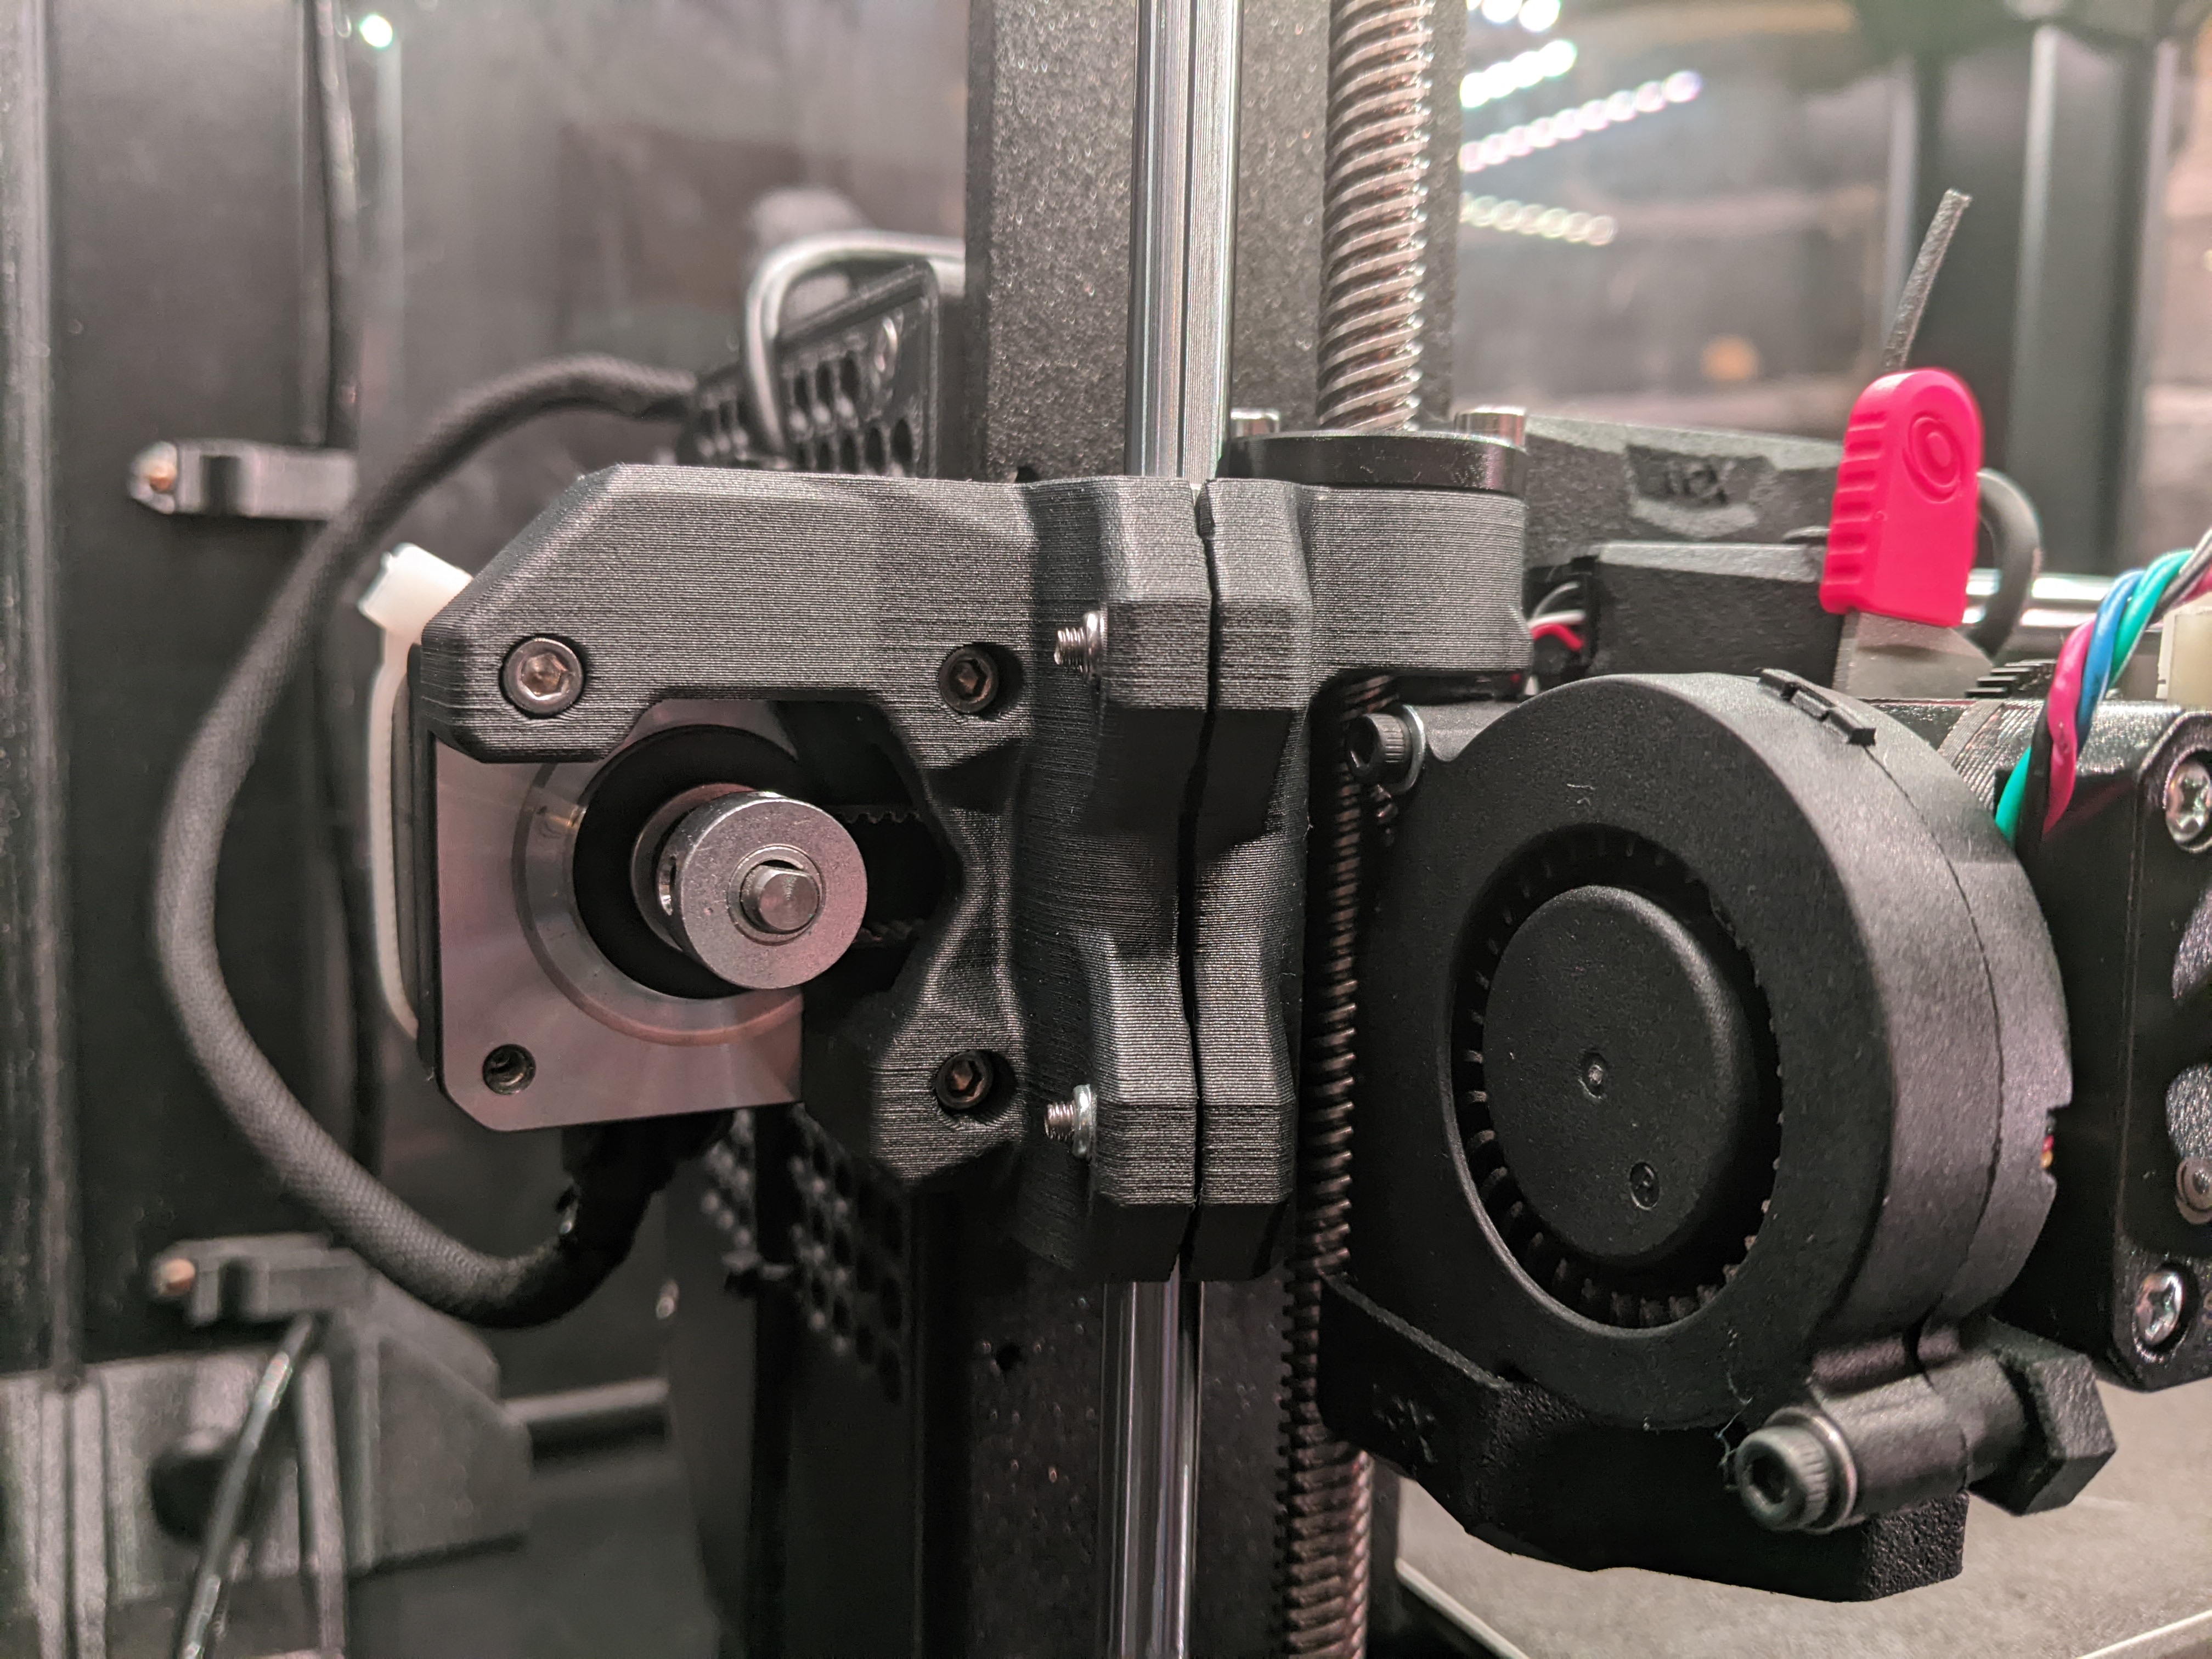
<h3>Background</h3><p>When I first built my Prusa i3 MK3S+ and already having a <a href="https://www.sliceengineering.com/products/the-mosquito-hotend">standard Slice Engineering Mosquito hotend</a>, I opted to immediately upgrade the stock extruder / hotend assembly to utilize <a href="https://www.bondtech.se/product/prusa-i3-mk3s-mosquito-extruder-upgrade/">Bondtech's BMG Prusa upgrade kit</a> (specific to the Mosquito hotend).</p><p>Like many, over time, I slowly upgraded and augmented several parts of my printer with several popular community upgrades. Specifically, one upgrade I adopted was the popular <a href="https://www.prusaprinters.org/prints/56241-x-axis-revision-with-belt-tensioner">Boogie Bear-derived x-axis upgrade</a>. While this worked exceptionally well with my printer's BMG-centric extruder / hotend setup, I recently opted to again upgrade my extruder / hotend assembly to the recently released <a href="https://www.bondtech.se/product/bondtech-lgx-shortcut-mosquito-for-prusa-mk3s/">Bondtech LGX Mosquito Shortcut Extruder Prusa upgrade kit</a>.</p><p>Given the mechanical geometry of this setup with the the hotend and part cooling fans in a “sandwich” configuration on either side of the extruder / hotend assembly, mechanical interferences occur between the fans and the clamp geometry on the Boogie x-axis upgrade due to the clamps being angled inward towards the z-axis leadscrew interfaces (a design aspect inherited from the <a href="https://github.com/gregsaun/bear_extruder_and_x_axis">Bear x-axis upgrade</a>). When running the printer calibration wizard, this would cause a myriad of errors including incorrect x-axis length measurement and XYZ calibration sequences to fail.</p><p>In order to correct for this, I redesigned this upgrade to angle the clamps outward instead, allowing the interferences to be avoided and the the correct x-axis length measurement to be achieved. Rather than attempting to remix the original Boogie upgrade, I opted to go to the original upgrade source instead: the <a href="https://github.com/gregsaun/bear_extruder_and_x_axis">Bear x-axis upgrade parts</a>. Utilizing the Autodesk Fusion 360 files provided with the upgrade, I reverse-engineered the associated CAD files and regenerated them from scratch with the aforementioned alterations. Additionally I mixed in my own style of mechanical component design and made the necessary dimensional alteration needed to make the parts compatible with the MK3S+ x-axis carriage assembly / x-axis belt retention geometry.</p><p>In addition to the attached <i><strong>*.STL </strong></i>files, I have also included the <i><strong>*.STP </strong></i>CAD files for any other user to more easily do any future revisions / remixing.</p><h3>Key Features:</h3><p>This redesign features similar to those offered from the aforementioned Boogie upgrade and the Bear x-axis upgrade.</p><ul><li>Easy to access x-axis belt tensioner mechanism.</li><li>Z-axis linear bushing clamps, aiding in prevention of potential lack of retention and dynamic slippage.<ul><li><i>This design rotates the angle of clamps to aid in not interfering with the Bondtech LGX Mosquito Shortcut Extruder Prusa upgrade kit.</i></li></ul></li><li>Insertion end-stops for z-axis linear bushings, generating a snug and perfect bearing fit, preventing inward slippage.</li><li>Stiffer than original x-axis printed parts.</li></ul><h3>Additional Hardware Needed:</h3><p>In addition to the MK3S+ stock x-axis printed parts hardware, the following additional hardware will be needed to implement this upgrade.</p><ul><li><i><strong>(6) M3 Lock Nuts</strong></i><strong> </strong><ul><li>(4) Used for linear bushing clamp retention.</li><li>(2) Used for tensioner insert retention / tightening / adjustment.</li><li>Can be obtained from MK3S+ spare parts bag.</li></ul></li><li><i><strong>(4) M3 x 14mm Hex Button-Head Socket Cap Screws</strong></i><ul><li>Used for linear bearing clamp retention.</li><li>This is what I had on hand in my parts stock but I'm sure some of the screw in the MK3S+ spare parts bag would also work.</li></ul></li><li><i><strong>(2) M3 x 18mm Hex Socket Cap Screws</strong></i><ul><li>Used for tensioner insert retention / tightening / adjustment.</li><li>Can be obtained from MK3S+ spare parts bag.</li></ul></li><li><i><strong>(1) 3mm Diameter Steel Dowel Pin (Length: 16mm)</strong></i><ul><li>Used for idler bearing mount / retention in the tensioner insert.</li><li>Can be substituted for an M3 screw or threaded rod, cut-to-length.</li></ul></li></ul><h3>Recommended Print Settings:</h3><p>For my prints, I utilized <a href="https://www.prusa3d.com/product/prusament-pc-blend-carbon-fiber-black-800g-2/">Prusament PC CF Blend</a> (since I'm currently in the process of upgrading all printed parts on my printer to this material) with the following print settings:</p><ul><li><strong>Material:</strong> Prusament PC CF Blend</li><li><strong>Perimeters:</strong> 4</li><li><strong>Infill:</strong> 50%</li><li><strong>Infill Pattern:</strong> Gyroid</li><li><strong>Layer Height:</strong> 0.2mm</li><li><strong>Supports:</strong> No</li></ul><p>That being said, I'm sure the recommended settings from the Bear / Boogie upgrades would be more than sufficient:</p><ul><li><strong>Material:</strong> PLA or PETG</li><li><strong>Perimeters:</strong> 2 to 3</li><li><strong>Infill:</strong> 20% to 25%</li><li><strong>Infill Pattern:</strong> Rectilinear</li><li><strong>Layer Height:</strong> 0.2mm</li><li><strong>Supports:</strong> No</li></ul><p>I have uploaded G-Code for both my personal prints I use on my printer using the Prusament PC CF Blend profile as well as G-Code using a Prusament PETG profile and the associated aforementioned recommended print settings. I have tested and verified the parts printed with the Prusament PC CF blend G-Code but have not tested the parts using the PETG G-Code. Use the PETG G-Code at your own discretion (uploaded for user convenience).</p><h3>Assembly Notes:</h3><p>Be careful when tightening the screws used for the z-axis linear bushing clamps. Overtightening the screws could potentially damage the bushings. <i>I tightened the clamps till just past snug and then slightly back the screw off.</i> The clamp slit should <i><strong>NOT </strong></i>be completely closed.</p><p>If you have some difficulty with inserting the x-axis steel rods into the printed parts, I found using the Prusa supplied lubricant on the ends of the rods and coating the interior of the associated mating holes on the printed parts eased insulation substantially such that it could be easily done by hand.</p><p>After assembly, I re-ran the calibration wizard as a “catch-all” to ensure any deviations from the new parts were captured in the printer calibration. I would recommend doing the same if installing this upgrade or, at a minimum, rerunning the self-test and Z calibration.</p><p>If, after assembly and re-running the printer calibration wizard, an error occurs either during the x-axis length measurement or the XYZ calibration sequence, insure the x-axis rods have been completely seated in the printed parts. This can be verified via the visual ports on both the top and bottom of both the associated printed parts.</p><h3>Printables Posting Update / Revision Log:</h3><ul><li><i>Date: 2022/03/05 </i><strong>|</strong><i> Part(s) Version: rev01 </i><strong>|</strong><i> Notes: Initial Release</i></li><li><i>Date: 2022/07/04 </i><strong>|</strong><i> Part(s) Version: rev01 </i><strong>|</strong><i> Notes: Updated title.</i></li><li><i>Date: 2022/09/18</i> <strong>|</strong> <i>Part(s) Version: rev01</i> <strong>| </strong><i>Notes: Updated Printables posting description sub-headings.</i></li></ul>
With this file you will be able to print MK3S+ LGX Shortcut Compatible X-Axis Upgrade with Tensioner (Bear-Derived) with your 3D printer. Click on the button and save the file on your computer to work, edit or customize your design. You can also find more 3D designs for printers on MK3S+ LGX Shortcut Compatible X-Axis Upgrade with Tensioner (Bear-Derived).