MK8 Silicone Sock Mold
thingiverse
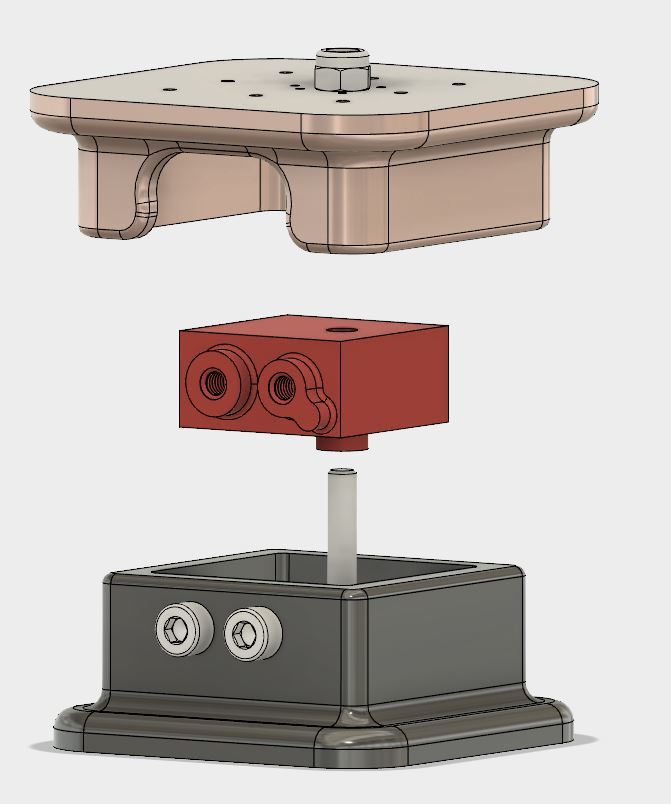
For english description, pls scroll down! :) UPDATE: Habe noch einen Mischgefäß für das Silikon hinzugefügt! Hallo, Dies ist eine simple Form um eine Silikonsocke für einen MK8 Heizblock (20x20x10mm) gießen zu können. Die Maße stammen vom original CR-10 Block, sind aber auch mit Nachbauten identisch. Es ist zwingend Notwendig 2 Komponenten Silikon zu verwenden, da 1 Komponenten Silikon Bauartbedingt nicht aushärten würde! Sollten Fehler oder Mängel auftreten, lasst es mich wissen! Das erste Bild zeigt den schematischen Zusammenbau, das 2. die optimale Druckorientierung. (Ihr müsst 2 Teile im Slicer manuell drehen, da ich noch nicht dahinter gestiegen bin, wie man die globale Orientierung im CAD zum drucken ändert.) SO WIRD'S GEMACHT: 1. Teile drucken und mit Trennmittel einsprühen/pinseln 2. 25mm M3 Schraube von unten in die Basis stecken 3. etwas Silikon in die Form gießen um Blasen zu vermeiden 4. Block einsetzen und mit 8mm M3 Schrauben fixieren 5. Die Basis bis zur Oberkante aufgießen 6. Etwas Silikon in den Deckel gießen 7. Basis und Deckel nun zusammendrücken (da wird's schmutzig ;) ) 8. Das ganze mit der M3 Mutter fixieren und auskurieren lassen. Das überflüssige Silikon wird durch die Löcher herausgedrückt Das entnehmen der Form sollte selbsterklärend sein. Viel Glück und habt Spaß! -ENGLISH- UPDATE: Added a pot to mix the silikone and pour it! This is a simple mold i designed to create a silicone sock for my CR-10 Heatblock. The dimensions are given by the stock parts. The block is 20x20x10mm and should work with all MK8 heatblocks (even clones). It is necessary to use 2 component slicone, since the design doesn't allow to cure 1k components. If you find any concerns, please let me know! The First pic shows the assembly with 2x M3x8mm screws + 1x M3x25mm Srew with hex nut. The Second shows the optimal print orientation for the parts. (you need to flip it manually in your slicer, since idk how to change the global orientation :/) HOW TO: 1. print the parts - use mold realease on the surfaces!! 2. put the 25mm screw into the base 3. poor a bit of silicone onto the bottom to avoid bubbles 4. put in the block and fasten it with the two 8mm srews 5. poor the silicone to the top of the base 6. poor some silicone into the cover 7. push base and cover together (this will be a bit messy) 8. secure with ne nut and let it cure The exceeding silicone will vent through the top holes. The Release should be self explaining. Good luck, have fun!
With this file you will be able to print MK8 Silicone Sock Mold with your 3D printer. Click on the button and save the file on your computer to work, edit or customize your design. You can also find more 3D designs for printers on MK8 Silicone Sock Mold.