MKS 12864 V3 Anet A8 fully working
thingiverse
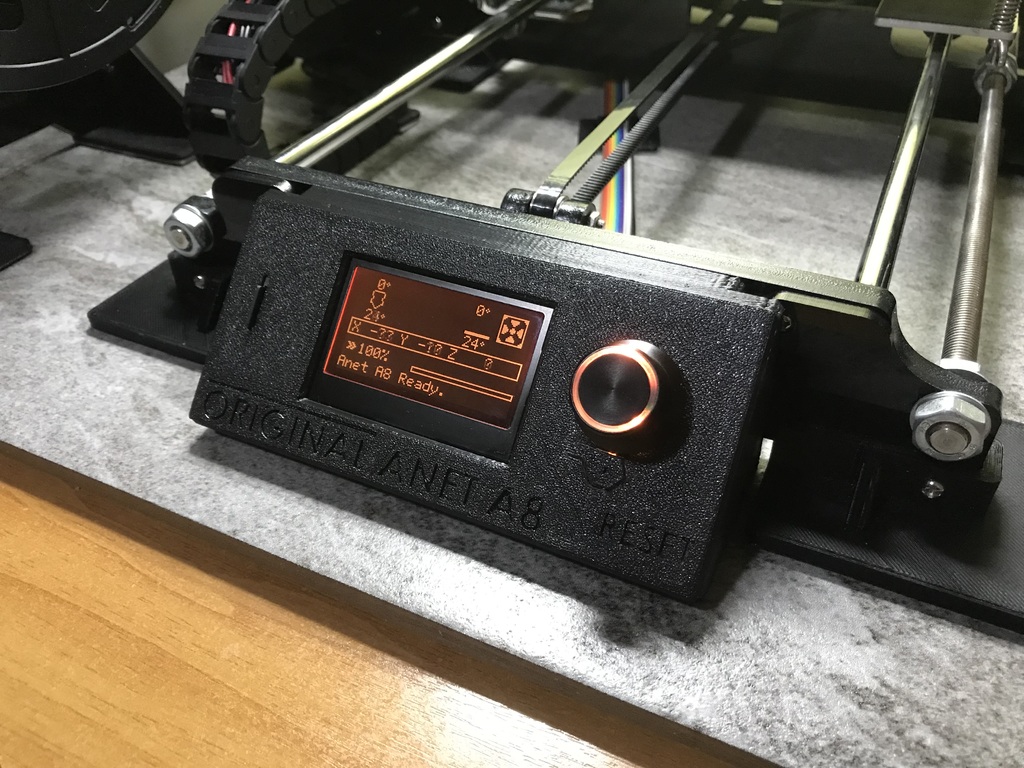
MKS 12864_V3 WITH SD_SLOT FULLY WORKING ON ANET A8 If anyone wants to use this lcd with the Anet A8 here is how I got it working. You can find the LCD here: https://www.aliexpress.com/item/1005005352031746.html?spm=a2g0o.order_list.order_list_main.23.eca03696G4rPr2&gatewayAdapt=glo2 If you want the SD_Slot working you will also need a micro sd cable extension like this one: https://www.aliexpress.com/item/1005004149375152.html?spm=a2g0o.order_list.order_list_main.131.27f13696utYHa3&gatewayAdapt=glo2 WIRING : Wiring diagram is in the second picture. Be careful! Those in the picture are the PCB connectors seen from top. Flat cables need to be soldered accordingly. If you want to position the LCD in the front you can cut the original Anet flat cable in half and solder it to the cables the LCD comes with. For the LCD to be working you need both the LCD and the J3 cable to be connected, even if you don't want to use the LCD SD Slot, because J3 connector has the DOGLCD_SCK and RESET signals. The SD needs GND, 3V3, MISO, MOSI, SCLK and SDSS/CS to work. J3 connector carries all of these signals except SDSS/CS hence you will need the micro sd extension cable. Dissolder the male end from the extension cable and solder the SDSS/CS cable to it. Then you can insert it into the Anet microsd slot. J3 flat cable has 5 unused wires, use one of them. Since this display has only the SD slot, if you want to add a microSD slot you can use the female end of the extension cable. It needs to be soldered to J3-J4 pads on the display PCB. I added a picture. MARLIN: In "pins_ANET_10.h" add, after #if HAS_WIRED_LCD, the following lines: <code>//#define LCD_SDSS 28</code> <code>//#define SERVO0_PIN 27</code> <code>#define DOGLCD_CS 29</code> <code>#define DOGLCD_A0 30</code> <code>#define LCD_RESET_PIN 17</code> <code>#define BEEPER_PIN 28</code> <code>#define BTN_EN1 11</code> <code>#define BTN_EN2 10</code> <code>#define BTN_ENC 16</code> <code>#define KILL_PIN -1</code> <code>#define LCD_CONTRAST 255</code> <code>#define LCD_BACKLIGHT_PIN -1</code> (This sets LCD_CONTRAST at 255 by default, you can change it to the value you prefer) In "configuration.h" -Comment #define ZONESTAR_LCD -Uncomment #define MKS_MINI_12864_V3 or #define FYSETC_MINI_12864_2_1 // Type A/B. NeoPixel RGB Backlight (It's the same, does the same thing) -After you uncomment one of those two displays add the lines: <code>#define LCD_CONTRAST_MIN 200</code> <code>#define LCD_CONTRAST_MAX 255</code> <code>#define DEFAULT_LCD_CONTRAST 220</code> -Uncomment #define NEOPIXEL_LED -Change original values with: <code>#define NEOPIXEL_PIN 27</code> <code>#define NEOPIXEL_PIXELS 3</code> <code>#define NEOPIXEL_BRIGHTNESS 255</code> DONE. Enjoy this cute little cheap display. Thanks to teramix (post 4851657) and OderWat (post 2103748)
With this file you will be able to print MKS 12864 V3 Anet A8 fully working with your 3D printer. Click on the button and save the file on your computer to work, edit or customize your design. You can also find more 3D designs for printers on MKS 12864 V3 Anet A8 fully working.