Mo' Cello parts for the O'cello
prusaprinters
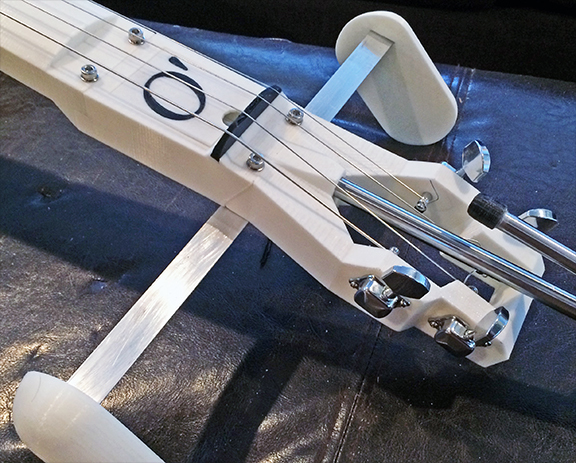
<p>I modded and added some parts for the O'cello after making my own. This is a very cool print to make and not too hard to build with a little attention to detail.</p> <p>update: I made a scroll for the top too. <a href="https://www.thingiverse.com/thing:2672095">https://www.thingiverse.com/thing:2672095</a></p> <p>One change I made was to use 12mm and 10mm hardened rod I found on ebay for the neck and endpin. It is very stout. I also used 3/4"by 1/16" thick aluminum angle from the local hardware store for the knee bar and it fits fine.</p> <p>Firstly, I made "undrilled tuner" STL and STP files of Part 6 from the O'cello. This will give you a head start on laying out fresh tuner holes to match your tuners. The STP file is reverse engineered from the original STL files, so some "flat" planes are not perfectly flat. It does not affect the build, but is just something to look out for. I built my O'cello from them, so I know it works fine.</p> <p>Next, I added my Part 6 custom version that I made to fit my tuners. Sorry I don't know what the tuners are, they have no name and have been sitting in a box for a few decades. They are small guitar-like tuners, not big bass tuners. You don't need huge tuners for cello strings. Also, my tuners don't need an extra plastic plug insert like the original. I simply made the holes the size of the screws and post and they function and fit just fine.</p> <p>The next parts are remixed from the Zarlor "Add-ons" parts.</p> <p>Zarlor's revised neck-heel design has a flaw in it. The bolt lug is not Boolean unioned to the rest of the part, only grouped with it. This may cause printing errors, as it did with my slicer. I unified it and have uploaded the repaired part.</p> <p>I also like the chest and finger rest he designed, but for my needs, there is no real need for the finger rest, as it blocks easy access to higher notes. Not adding it makes for a very weak join to the neck. I cut down the long finger rest so that it is just the block needed to fill the joint. It is easily super glued in place. Make sure to check the orientation, as it only fits one way.</p> <p>Lastly, I made a simple hook that can be glued on to the side of the neck-heel part. This is a handy place to hang your bow when not in use.</p> <h3>Print Settings</h3> <p><strong>Printer Brand:</strong></p> <p>MakerGear</p> <p class="detail-setting printer"><strong>Printer: </strong> <div><p>MakerGear M2</p></div> <p><strong>Rafts:</strong></p> <p>No</p> <p class="detail-setting supports"><strong>Supports: </strong> <div><p>No</p></div> <p><strong>Resolution:</strong></p> <p>.20mm</p> <p class="detail-setting infill"><strong>Infill: </strong> <div><p>20-25%</p></div> <p><strong>Notes:</strong></p> <p>I printed all the parts for the body with 4 top and bottom layers and three perimeters and 25% hexagon fill.</p> <p>I printed the neck-heel parts at 20%</p> <p>All parts printed in eSun PLA+</p> <h3>Post-Printing</h3> <p>Better get your file ready so you can make good, flat mating surfaces.</p> </p></p></p> Category: Music
With this file you will be able to print Mo' Cello parts for the O'cello with your 3D printer. Click on the button and save the file on your computer to work, edit or customize your design. You can also find more 3D designs for printers on Mo' Cello parts for the O'cello.