Moby Whale
thingiverse
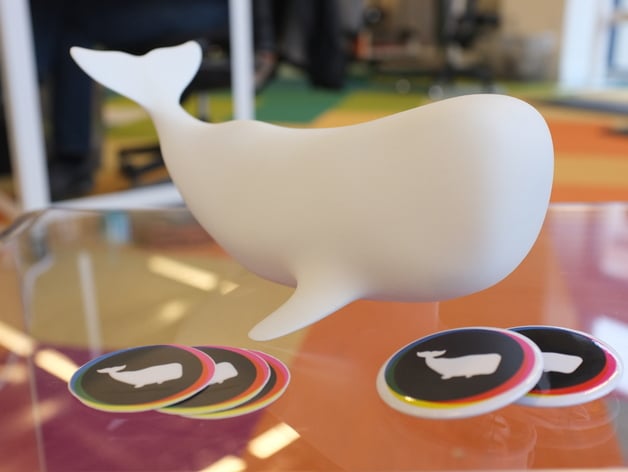
When we first got our 3D printer, one of the very first things I was itching to design was our Moby logo. People always point out how much fun it is, and how friendly the whale appears floating in the middle. Turning an illustration/logo into a 3D model can be quite tricky, but I figured I could do a decent job while still capturing the all-important whimsy of the logo. In the original illustration, I spent loads of time playing with proportions and exaggeration to make sure it would read really well as a "whale" at many sizes. Plus, the illustration isn't based on Moby Dick, but rather on a small passage from The Hitchhikers Guide to the Galaxy where a whale is contemplating its short existence while falling to its demise. So, the flying/floating feel of the illustration had to be translated in the 3D version. I started off by creating a basic whale shape and refining the proportions so that they were somewhat similar to the illustration. Since the illustration is at a 1/3 front angle, this was mainly a process of choosing how long and squat the whale should be. I tried loads of versions but found that something a bit more realistic offered more flexibility. Next, I used some simple skeletal manipulations to get the whale into the right floating pose. Then I refined the shape to match the logo's slightly exaggerated hump, fin size, and flipper placement. I kept the flippers fairly stylized with a thicker body attachment so that they would print very easily and help support the outer edges of the body. Finally, I added some subtle musculature right behind the flippers to give the entire tail a bit more life and movement. All in all, I think it's an excellent translation of the logo into real life. The friendliness definitely translated over, and choosing to keep it somewhat more realistic helps it feel more like a sculpture than a toy; perfect for welcoming clients to the Moby office. Print Settings Rafts: Doesn't matter. Supports: Yes. Infill: 10% or more depending on size. Notes: I've found that the best results come with cutting off a small part of the belly that sticks below the flippers within the slicer. This gives it a solid start directly on the build plate and makes it very stable once printed. You don't have to print supports of the tail-fin, however when printing it really large I do just for some piece of mind. The underside of the belly and flippers do need support, however the placement hides the after effects of pulling off supports nicely. The STL included is a pretty good small size for our printer. Results will vary because of the tail-fin shape, but I would recommend keeping the fin thickness at least 3 nozzle widths thick. Post-Printing I really enjoy printing out in white PLA and then sanding it all the way from 150 to 1200. It can take a whole barrel of elbow grease, but it ends up looking/feeling fantastic. Plus, when people ask what it's made of you can say "whale bone, of course." How I Designed This I tried modeling the whale in a few different 3D modeling packages including Autodesk's Sculpt + iPad app. It was really interesting to start modeling in this way; it just feels right using your fingers to manipulate virtual clay. It was the most fun and expressive piece of software to play around on, so it's what I ended up using. I'd highly recommend modelers try out the various Autodesk iPad apps. Designing apps for an iPad puts a lot of restrictions on what you can do with the UI, and the Autodesk team has really embraced the platform and thought through how to intuitively model with a touch interface. They're adding more features to the apps all the time, and I could see lots of hobbyist users completely migrating over to this way of modeling.
With this file you will be able to print Moby Whale with your 3D printer. Click on the button and save the file on your computer to work, edit or customize your design. You can also find more 3D designs for printers on Moby Whale.