Model crane 3 axis working servo motor Arduino controlled UPDATE
thingiverse
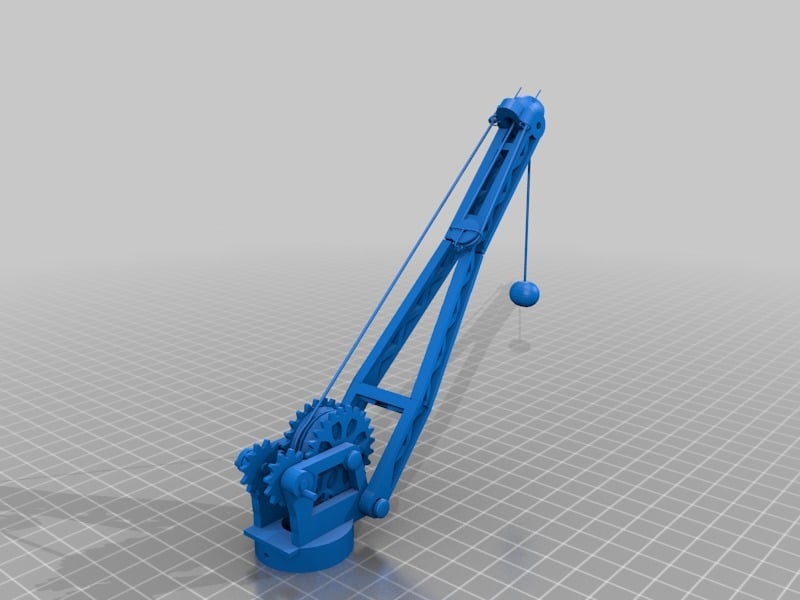
UPDATE December 9, 2019 Arduino Software Update Docks4.ino This software controls a circuit that powers floodlights (use a driver like a Mosfet or relay) and a level crossing servo motor, as well as two sensors that control them. Grounding Sensor 2 triggers the gates and lights. Grounding sensor 1 will turn off the lights and close the gates if sensor 2 has not been grounded for thirty seconds and the crane is in park position. This time can be set in software. All these features can be omitted, but there will be a twenty-second delay on startup. Ensure sensor 2 pin is grounded and sensor pin 1 is held at +5 volts (see comments in software). Suggestion: after trying many different types of string, the best "rope" is the sheath 'tear' or 'rip' string found in UK telephone/alarm multicore cable. It's very strong, flexible, and light. This lineside crane servo operated and Arduino controlled will pan 180 degrees, raise and lower its boom, and lift and lower its magnetic hook about 150mm. All files for printing, assembly, and Arduino are included. The crane uses magnet pickup (fixed not electromagnet), so the magnet ball needs to weigh around 25 grams. I used four 4mm nuts and a 5mm rare earth magnet. Two prints of parts with filenames ending in "2" are required. Most of the model is hidden under the table, but the main gears visible above the table are just for show. The handles will turn when the crane moves. The control box has eight buttons for user-set positions and three knobs and one switch for setting these positions or manual control. User instructions are in the crane2.ino Arduino sketch. I used a mini Arduino and included the .stl file for the electronics box. I built the circuit with veroboard, but I don't have drawings of this. The circuit is simple and included in the INO and PDF files. Please message me if you have any questions; I will try to get back to you within a few days. Materials: Your plastic of choice (I used ABS). 1 Arduino Uno (or an Arduino of your choice, such as a pro mini with FDTI programmer). Three 10K linear potentiometers. Eight push-to-make switches. One mini toggle switch. One LED and one 100 ohm resistor. A 5V power supply. Hook-up wire. String (I used builders' chalk line from a builder's merchant, £2.50 for fifty meters). Wire (I used straightened paper clips), about 0.8mm in diameter. Small screws (the ones that come with the servo horns are fine). Print the parts: Cut a servo horn to fit inside the recess in the servo pan gear. No need to glue it; assemble the horn into the servo and screw the servo to the fixed base, ensuring the gear is free to turn. Glue the main pan gear to the top side of the rotating base so that the main hole aligns with the gear spigot. The spigot will pass through the hole in the fixed base, and the gears should mesh. Don't do this yet; screw the servos to the servo base. Use wire to form axles for two small pulleys. I also added wire string guides to help keep the string on the pulleys. Screw large pulleys onto the servo. Super glue the 2 boom sides together so that they curve symmetrically. Fit the top pulley and glue the cowl. See the illustration for wire bending for the 2 cowl ties, the pulley block, and the mini pulley axles.
With this file you will be able to print Model crane 3 axis working servo motor Arduino controlled UPDATE with your 3D printer. Click on the button and save the file on your computer to work, edit or customize your design. You can also find more 3D designs for printers on Model crane 3 axis working servo motor Arduino controlled UPDATE.