Model for resin casting COVID-19 / Coronavirus face shield
thingiverse
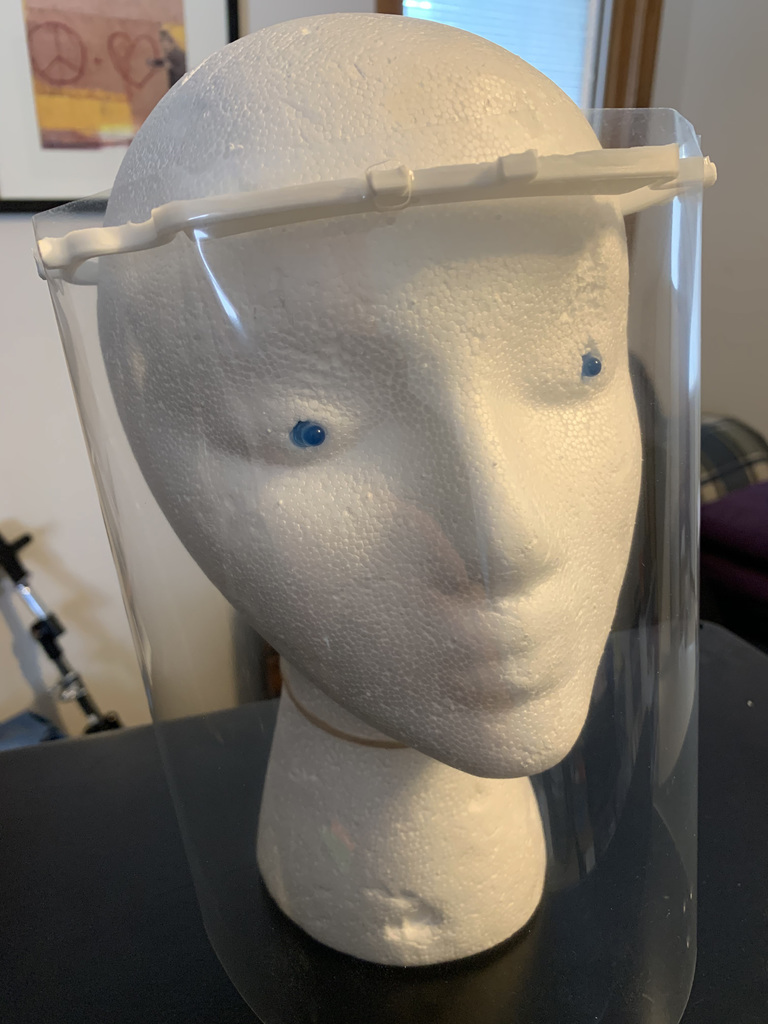
This model is intended to 3d print, then make a silicone mold, then resin cast face shields like https://3dverkstan.se/protective-visor/protective-visor-versions/ You can then attach clear plastic sheet protectors to the final cast item. All of this should be cleanable and reusable by health care pros but if parts have to be discarded everything is relatively cheap. ### Making a Silicone Mold Get https://www.michaels.com/amazing-mold-putty-kit/10410575.html or similar. This should make 2 molds. 3d Print Frame-mold-boxed-v2.stl which is a "mold mold" that you'll use to make your silicone mold. Here's a video showing the process: https://www.youtube.com/watch?v=IuxWS1tVYNU Mix half of each of the components per the instructions, split into about 6 equal parts, roll into balls then roll out into "snakes". Quickly mash them down into the 3d printed form, focusing on the peg sections that stick out to ensure that their shapes are accurate. Work around the silicone pressing everywhere to make sure the entire form is filled. Flip the mold over and press the silicone onto a flat surface to even it out. There's extra silicone you can remove with a sharp knife at this point if you like. Be quick! Let the silicone cure completely (about an hour), then gently work a flat tool into the front of the form between the 3d printed plastic and the silicone. Once you have an area lifted out, work gently around the entire form to remove the silicone mold. If there are holes or problems with the silicone, mix a bit more and patch as needed. It adheres to itself well but will leave visible seams in your resin frames. ### Casting Frames Get https://www.michaels.com/alumilite-amazing-casting-resin/10269138.html or similar. One kit makes about 24 frames. Here's a video showing the process: https://www.youtube.com/watch?v=1NHTAN3y93Q 1. Heat your oven to its lowest setting, ideally around 150 degrees Farenheit 2. Heat the silicone mold for 15+ minutes. This helps the resin set. 3. Pour 10ml of each resin component into the provided measuring cup. Leave separate until ready to mix 4. Remove silicone mold from oven. Place on a level surface. 5. In a paper cup (not styrofoam), add both resin components and stir with a chopstick or similar for 10 seconds 6. Pour resin slowly into the thickest part of the silicone mold, ensuring that it distributes all the way down each arm. You shouldn’t need to pour into the thin sections of the mold. 7. Clean your chopstick and paper cup with a napkin. Discard napkin. 8. Let the silicone mold and resin cool for 15+ minutes so you can get the frame out of the mold. 9. Remove the frame from the silicone mold. Work along all outer edges, separating silicone from resin, then pull the thick section of the frame out and work along each arm of the frame being careful not to damage the mold or the frame. 10. Place the frame in your 150 degree oven for 15+ minutes to harden the frame 11. Remove the frame and place on a level surface with the two arms of the frame separated by about an inch 12. Let cool for 15+ minutes During step 9, put the silicone mold back in the oven to re-heat, then repeat making another frame. ### Clear Plastic Shields These can be 3-hole punched. If you have a punch with an adjustable bar, move it out 1/2 inch, punch the paper, flip the paper over, and punch again. This gives the 6 holes needed for the frame.
With this file you will be able to print Model for resin casting COVID-19 / Coronavirus face shield with your 3D printer. Click on the button and save the file on your computer to work, edit or customize your design. You can also find more 3D designs for printers on Model for resin casting COVID-19 / Coronavirus face shield.