Model railroad, brick arch bridge
thingiverse
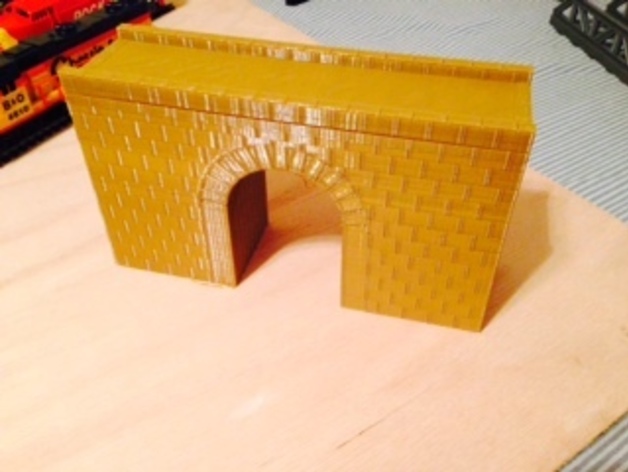
This is a model of a brick arch railroad bridge scaled for HO. This design is based on pictures on the internet and does not model a specific bridge. The bridge was designed so that a train could pass underneath it. It has also been designed for printing. The sides of the bridge have a wall thickness of 1.5-mm to minimize the amount of filament needed. Instructions The .stl file is for a HO version of the bridge. It has the following dimensions: overall height, 110 mm length 190 mm width 55 mm top of arch ~ 78 mm clearance under arch for rolling stock ~ 60 mm width of arch 55 mm The bridge can be scaled up for O or down for N or Z. See below for some typical measurements for different scales. If you want to be able to run a train through the arch, roughly speaking, an O bridge will need to be scaled by 150%; a N or Z bridge will have to be scaled by about 60%. Parts list: None. Assembly instructions: None. Print instructions: This bridge has been designed for printing. While it looks huge, the amount of filament needed is small. The sides have a wall thickness of 1.5 mm. The bridge is a little thicker around the arch and at the top. Still, the infill percent you set will not have a big impact on the print. The top of the arch will need to be cleaned up with a knife or coarse file. The .stl was printed and the bridge is shown in the pictures. It was printed on a Makerbor Replicator2 PLA (Makerbot filament) Printed: Low(faster) resolution, 8% infill, 2 shells, 0.30 mm layer height, 230C This program is free software; you can redistribute it and/or modify it under the terms of the GNU General Public License as published by the Free Software Foundation; either version 3 of the License, LGPL version 2.1, or (at your option) any later version of the GPL. see http://www.gnu.org/licenses/gpl-2.0.html Woverine Boat LLC is providing this document and its contents on an "as is" basis and makes no representations or warranties of any kind with respect to this communication or its contents. Woverine Boat LLC disclaims all such representations and warranties, including for example warranties of merchantability and fitness for a particular purpose. Version number 4.A (first distributed version) Author : Wolverine Boat, LCC - wolverineboat@flash.net Copyright é 2014 by Wolverine Boat, LCC Created March 2, 2014 Modification: March 2, 2014 ... original version Special instructions: User feedback: Limitations: Designed with OpenSCAD 2013.06 Model train info (approximate values and may depend on manufacturer (1" equals 25.4 mm) O27 scale 1:48, track ~50.0-mm W x 10.3-mm H, typical car ~54.8-mm W x 79.3-mm H, car+track ~ 89.6 mm H, 1-ft = 6.4 mm S scale 1:64, track ~47.0-mm W x 13.6-mm H, typical box car 51.2-mm W x 67.8-mm H, car+track ~ 81.4-mm H, 1 ft=4.8 mm HO 1:87, track ~28.5-mm W x 4.6-mm H, typical box car 36.0-mm W x 55.8-mm H, car+track ~60.4-mm H, 1 ft=3.6 mm N 1:160, track ~16.0-mm W x 3.8-mm H, typical box car 20.3-mm W x 31.5-mm H, car+track ~ 35.3-mm H, 1 ft=1.9 mm Z 1:220, track ~16.0-mm W x 4.7-mm H, typical box car 15.6-mm W x 21.9-mm H, car+track ~ 26.6-mm H, 1 ft=1.4 mm Lionel O track is 4.4-mm higher than O27 track. I have not listed G scale because it's too big for this bridge. Model train Disclaimer: This bridge was not based on a specific prototype and there isn't a true scale for this item. The design is based loosely on Google images of various brick arch bridges around the world. Features and dimensions of real bridges were altered for the simplicity of the design and to make the bridge printable. Some best practices for printing: optimize print parameters for your printer, filament, etc (only you can determine the best parameters) use good filament level your build plate prior to printing complex parts. it's worth the few minutes it takes. always level after removing tape, or if pulling hard to remove a part. make sure the build plate is clean. if using blue tape, stretch it tight when applying it to the build plate. pre-feed the filament 30 to 60-s before printing (i.e., run load for 30-60s) do not print several complicated parts in one build (do complex parts by themselves) I find that printing faster is better (probably so the filament can't ball up in one spot) when the filament spool gets low, the filament can be tightly wound on the spool and the filament may not feed properly... take special care... when a new spool is used, it is easy for the filament to jump outside the spool and then it will bind up later around the spool holder ruining your build make sure it is easy for the filament to enter the filament feed tube. others have designed spools, mounts, etc. for that purpose. i use a small rope that forces the filament away from the spool before entering the filament feed tube. if you hear clicking when printing, that may be a result of the filament wrapped around the spool and not feeding make sure that there aren't any obstructions on the spool, such as some filament used to hold it in place during shipping for the replicaor2, look at the blob a filament in the left front part of the build plate and then the trail of filament to the biuild location. there should be a glob, and the line of filament should be continuous and smooth one way to remove parts when using blue tape is to use a very thin spatula bought in craft-art stores (advice from youtube). get one with a wide, blunt front end (not long and thin). mine is 11 mils thick (0.011") and 20-mm wide at the front. a painting spatula/scraper in hardware stores won't work and may damage the build plate. (I use blue tape so I don't have any best practices for bare plates, heated plates or for other tapes like mylar) perform regular maintenance (grease, etc). when I continued to have problems printing even after performing maintenance, following troublshooting instructions, changing filaments, cleaning gears, cleaning everything, optimizing print parameters, changing temperatures, etc., I bought a new extruder assembly from Makerbot and it solved all of my problems.
With this file you will be able to print Model railroad, brick arch bridge with your 3D printer. Click on the button and save the file on your computer to work, edit or customize your design. You can also find more 3D designs for printers on Model railroad, brick arch bridge.