Model Rocket 2
thingiverse
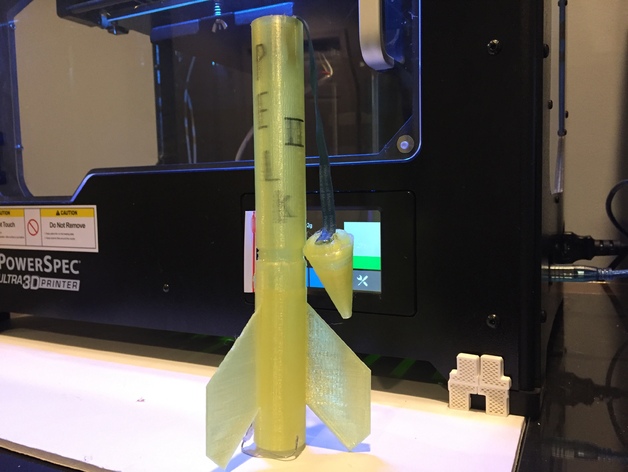
This Model Rocket Really Works!!!! I Have Tested It Numerous Times Myself. It Can Be Powered By Any ESTES Model Rocket Engine A Through C. Note, The Bottom Piece Is Printed Upside-Down End Needs To Be Flipped After Printing So That It Can Be Properly Assembled!!!! Print Settings Printer Brand: MakerBot Printer: MakerBot Replicator 2X Rafts: Doesn't Matter Supports: No Resolution: .01 mm or .02 mm Infill: 30%- 50% Notes: Print as oriented!!! Post-Printing Step 1 Print Our Model Rocket In PLA Filament With Provided Print Settings. Step 2 Assemble The Rocket By Gluing Bottom And Middle Together. Step 3 Cut A Rubber Band So That It Is One String. Glue One End Of Band To Inside Of The Middle Section Of The Rocket Where The Nose Is Inserted. Glue Other End To The Bottom Of The Nose. Step 4 Tie Strings Of Parachute In Middle Of Rubber Band. Step 5 Insert Band And Parachute Into The Middle Section With Tissue Paper To Block The Parachute From Fire. Step 6 Glue On Small Cut-Off Piece Of A Straw To The Middle Of The Rocket So That It Is Vertical. Step 7 Insert Model Rocket Engine, Igniter, And Ignitor Holder To The Bottom Of The Rocket. Slide The Rocket Into A Launch Pad Rod. Attach Electric Ignitor Leads, Push The Button, And Blast Off!!! How I Designed This My Design Process Through Countless Hours Of Research I Came Up With The Design Of My Rocket. A Couple More Hours On The Computer Designing And Printing, My Rocket Was Born!
With this file you will be able to print Model Rocket 2 with your 3D printer. Click on the button and save the file on your computer to work, edit or customize your design. You can also find more 3D designs for printers on Model Rocket 2.