Modified Wilson II Printer
thingiverse
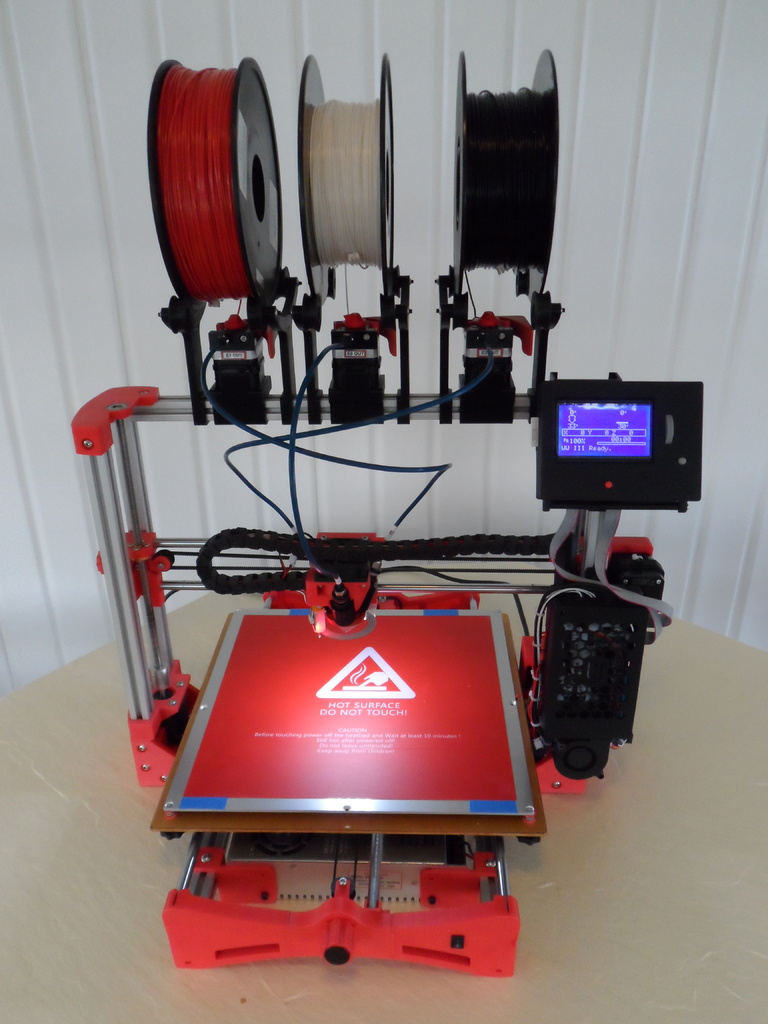
Human: NOTE: Please see important update 3/27/2020 Originally, I became interested in converting my Flashforge Creator Pro to use a Diamond hotend. After much work toward this end, I decided that it would be more practical to build a completely new printer. So, as a starting point, I chose to use the Wilson II/Prusa design as published by Marty Rice www.thingiverse.com/thing:1086101 . I named my printer WWIII (Weber-Wilson III). My printer is basically the same as the original, but with a 300mm x 300mm bed and many changes or modifications to most of the parts. There are two power supplies, a 24V supply for the heated bed, and a 12V supply for everything else. In order to isolate the two supplies and take the high current bed load off the mainboard, a solid-state relay is utilized. The two supplies fit nicely between the Y-axis rails along with the relay. I modified the original bed mount using bearing holders that eliminate the original wire-tie mounts. All parts were printed in ABS. The mainboard is a Rumba with six TMC 2208 stepper drivers. Firmware is Marlin 2.0. The three extruder steppers are 1.8° 17HS8401 /48mm long. All other steppers are 0.9° 17HM19-2004S 48mm long. One of the major challenges of this design was the wire management. A couple different types of flexible wire chain was used for this purpose. (JD Miles: www.thingiverse.com/thing:1760952) I also used the RepRap Full Graphic Smart Controller and modified it so the encoder has a thumbwheel and separate push button for control. I changed the AC power input module to use a panel mount power socket with fused switch which uses a standard removable power cord. A Y-axis brace (threaded rod) was added to the Y-axis due to the flex of the longer end pieces. A touch probe was installed on the carriage for precise bed leveling. Since I often print with only one filament at a time, I found that the idle filaments get "cooked up" in the nozzle and cause a clogged nozzle. To prevent this from occurring, I run an extra 50mm of filament from each of the three filaments at the conclusion of every print. I used scripting in the slicer program to do this. I have uploaded my current Marlin 2.x configuration files for those who have expressed an interest. Also, due to the rather large nozzle, I would suggest that in addition to a moulded nozzle cover, a 50W heater be used. A 40 W heater is very weak. A major shortcoming of this printer design is with its Z axis lift. The two motor system is not mechanically locked together and can easily be skewed thus requiring frequent adjustments. The single 8mm lead screw nut also has quite a bit of backlash. In an effort to overcome these problems I re-designed the X axis end pieces to incorporate a second adjustable lead screw nut. The adjustable nut is set such that (with the screw in place) there is a slight drag on the screw when moved and thus providing anti-backlash. I highly recommend this upgrade. Addendums: 2/8/2020 With the extruder motor slipping and struggling to get enough filament pressure on the Diamond nozzle, I decided to try a geared extruder to increase the torque. I combined the Pitan Geared Extruder (thing:2728600) with the Tevo Tarantula Titan Bowden fitting (thing:2677766). This seems to work very well, so I have added the BOM and stl files for this addition. NOTE: Some stl files may be 10X in size. Also, since I like to print with PETG, I am also adding files to add a part cooling fan to the carriage.
With this file you will be able to print Modified Wilson II Printer with your 3D printer. Click on the button and save the file on your computer to work, edit or customize your design. You can also find more 3D designs for printers on Modified Wilson II Printer.