Modified X-Carriage for Prusa i3 "Acrylic", Extended Mountplate and Bed-Autoleveling for Prusa i3
thingiverse
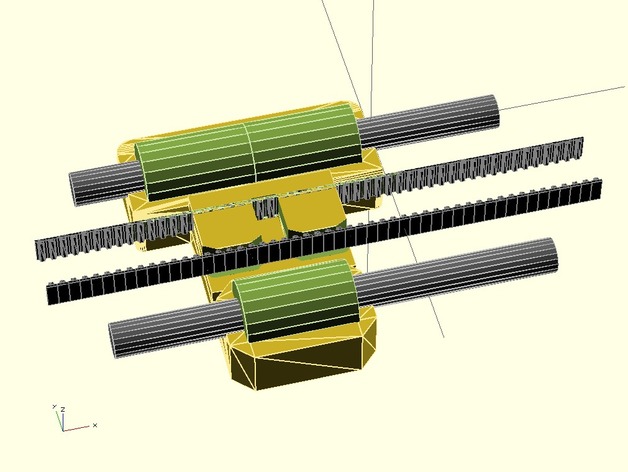
Update 2014-10-26: Modified Belt clamp (was to narrow) Update 2014-10-31: Added Mountplate for Dual-Bowden Extruder Setup and Servobracket/Switchflag for Bed-Auto Leveling Printed it out, seems to fit perfect on my printer ;) I am going to maintain this time by time when i am optimizing/upgrading the carriage. Modified X-Carriage: For use with Igus RJMP-01-08 linear bushings on 8mm rods Rod distance: 45mm Spacing between Belts: 13mm Extended Mountplate: It should fit on standard Prusa i3 X-Carriage - tested on my Modified X-Carriage. You can use it standalone to have the ability to mount two bowden J-Heads Topplate, Switchflag and Servobracket: Printed out and assembled, but UNTESTED Made for a standard Hitec HS-55 Micro-Servo (a little smaller than noname 9g servos) and a standard optical endswitch. I choosed this design to have the "switch" mounted as near as possible to the printheads, so i decided to use a 1.6mm steel rod traveling through a hole in the back of the mountplate neat Aside from similar solutions i did not like to pull the steel rod down from the magnets every time i am starting a print so i choosed to use a micro-servo to push the rod upwards when the leveling is done. Planned features: .) Auto Bed-leveling with clip-in 9g servo and optical switch, probe driven through one- dualhead mountplate .) Mounting plate for dual bowden extruder setup and single fan-mount .)Cooling fan - have to checkout Biomushrooms desing Motivation: As I do own a Pusa i3 "Acrylic" design and upgrading some basic parts i searched a lot for a X-Carriage fitting my needs. The only design i found here on thingiverse which supports the basic frontplate of i3 and do have the capability of clamping the bearings from all sides is the one from Biomushroom. After printing out his design i mentioned that the belt of my printer is not in the same place as on the basic i3 designs so i decided to make some modifications. Included a .zip with the used source stl files and the OpenSCAD project. Please forgive the verry basic coding, this is my third OpenSCAD project ;) You can use it also as a base for your own layouts as it includes rods, belts and bushings/bearings, I have documented is as good as i can. Credits: Based on the GREAT Design of Biomushroom, Thx for Sharing.http://www.thingiverse.com/thing:399130 Parametric belting section generator By - The DoomMeisterhttp://www.thingiverse.com/thing:19758 Instructions Building the X-Carriage: Original instructions from Biomushroom: Holes have been undersized to thread them. Print at 40% infill and maximum 0.2mm layer height. In Slic3r put: Perimeters Minimum: 4 Solid Layers: Top 4 - Bottom 4 Assembly: Looking the Carriage of the Prusa in front -> Front Back Chiller This one will be fixed on the X-Carrige BACK using the 4x40mm bolts. The Back needs two 3mm nuts and two 3x50mm bolts. Extended Mountplate and Auto-Level Switch: I sliced my Printout with CuraEngine, 1mm top and bottom Wallsize You have to drill the Holes for your needs Be careful with the switch-flag - "glue" it on the bottom with some ABS-Acetone mix to gain more stability Vitamins used: M3 screws and nuts Hitec HS-55 Micro-Servo 1.6mm steel rod Standard optical Endswitch
With this file you will be able to print Modified X-Carriage for Prusa i3 "Acrylic", Extended Mountplate and Bed-Autoleveling for Prusa i3 with your 3D printer. Click on the button and save the file on your computer to work, edit or customize your design. You can also find more 3D designs for printers on Modified X-Carriage for Prusa i3 "Acrylic", Extended Mountplate and Bed-Autoleveling for Prusa i3.