Mods For The He3d K200 Delta Printer
thingiverse
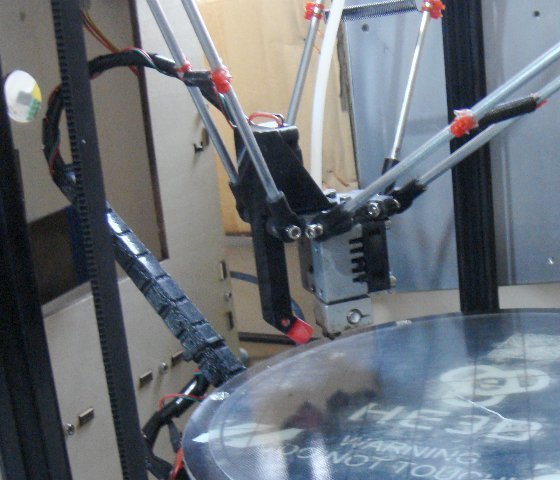
Some parts I made for my he3d k200 delta kit. They just finish it off and give it a more professional look. Feet: I printed mine from polyflex, but pla will work just as well. Tap them in gently with a hammer. Should be a reasonable fit. Psu bracketts: You only need these if you bought the heated bed. Fit bottom braceket on bottom of strut opposite the control panel. centre psu and rest it on the brackett. Fit top brackett so that the tongue fits over the metal edge of the psu. Push down on the brackett so the psu is firmly gripped and then tighten the bolt. Filament Holder: Fit this on the strut to the right of the extruder. You want to adjust the height so that the largest spool you use is about 4mm off the ground and can turn easily. Make sure you mount the holder with the shaft pointing up. The 10 degree angle lets gravity stop the filament coming off. Baseplate: This is simply to cover the wires that I stored under the motherboard. gather the wires together and securee loosley with either a wire tie (what i use) or cable tie. The plate bolts on to the strut at the wide end and rests on the corner piece at the narrow end. I secured it at the narrow end with another wire tie. But a cable tie would work as well. Camera Boom. Very simple, just a boltable strip that you can attach a webcam to with it's spring clip. Pictures of it mounted at the side and top of printer included :-) Holding the camera out to the side lets you take pics and video without the carriage and arms blocking the view. I currently use Video Velocity free version for time lapse videos.http://www.candylabs.com/videovelocity Great software, free version limited to 640x480, but pretty much all other features work. Unless i get a better webcam, 640x480 works fine. Particularly if you side mount the camera you can get it pretty close to the build plate. When printing the baseplate - you might want to use a brim. I didn't, but if I make a larger plate at some point I will use a brim. . time lapse video of base plate being printed: https://www.youtube.com/watch?v=tUN_YI46MjU You will need 5 of the small bolts and rectangular strut nuts. 2 for the psu bracket, 2 for the filament holder and 1 for the baseplate. The single extruder carriage is not my design. It's 'idontneedone's'. https://www.thingiverse.com/thing:2417445 It is larger than the original carriage/effector and you will need to print it to use my Fan duct setup as it's designed to fit this larger carriage. You should print it anyway as it improves dimensional accuracy. Fanduct & Interchangeable Nozzles: This is designed for a 30mm 12volt fan. The fan clips into the duct. It takes a little force, label side of fan faces into the duct shroud, plain side faces out. Make sure the bottom goes in first and then firmly push the top down and into the shroud. I extended the fan wire and plugged it into the fan socket on the printer motherboard. Wrapped the wire round the hotend wire tidy, to keep it clear of everything else. No extra bolts or screws are required. Duct uses the first two bolts on the carriage. The nozzles simply clip in and out of the duct end. I recommend printing the duct, fitting it and then print the nozzle. The duct still blows air even without the nozzles, just not quite as focussed. I've also included a blank clip so you can attach your own nozzles to it. At some point I'll convert the script into a parametric thingiverse script. Once you've got a nozzle fitted, probably best to print a cleaner duct - it's a little messy without cooling. I printed the nozzles at 0.1mm ad 0.2mm layer heights. No obvious practical difference, so 0.2mm layer height is fine for both duct and nozzles. Print them nozzle down, as the files are oriented. You shouldn't need to use a brim, I didn't. 20-07-2017 Added 'super charger' nozzles. basically put holes in the nozzles. The theory is that the air going down the nozzle is at a lower pressure than the air surrounding the nozzle, so extra air is sucked into the nozzle and gives it a bit of a boost. All i can say is using the nozzles with the holes in my results are at least as good as using the ones without holes. I have no accurate way of actually measuring the air flow. 23-07-2017 Added: Spare z stop as z probe clip on adaptor. (it'll make sense when you see the pictures) Pull off z probe from cable, and put somewhere to keep. Wire spare z-stop onto a connector and plug it into the cable connector. Push z-stop onto the two columns of the clip. push clip into gap between nozzle and extruder block. Line up the click switch on the z-stop with the tip of the nozzle. Perform g29 calibrations. Unclip the clip and carry on printing. Added cable snake 01-08-2017 Bendy Cable Snake. This tidies up and keeps the cable clear that goes to the extruder. Uses one bolt and strutnut. Pictures should make it's use clear. I Also used a cable tie to keep the cable locked in at the bottom of the snake. Cable stays in the top all by itself. Print with flexible filament or it won't work. And yes, your k200 can print flexible filaments (if you've got the bowden tube at the optimal length - ie: shorter than it was when you got the kit) . I've so far been able to use: ninjaflex, filaflex, flexismart and polyflex. The trick is to keep the print speed very low - 10-15 mm/s print speed. Up your extrusion to 120 or 130% and as flexibles stick to everything and don't need a heated bed you can also print your first layer at 100% - which saves a lot of time.
With this file you will be able to print Mods For The He3d K200 Delta Printer with your 3D printer. Click on the button and save the file on your computer to work, edit or customize your design. You can also find more 3D designs for printers on Mods For The He3d K200 Delta Printer.