Modular 1U Relay Rack Mount for TP-Link TL-SG108 or Netgear GS308 8 port switches (with STEP file)
prusaprinters
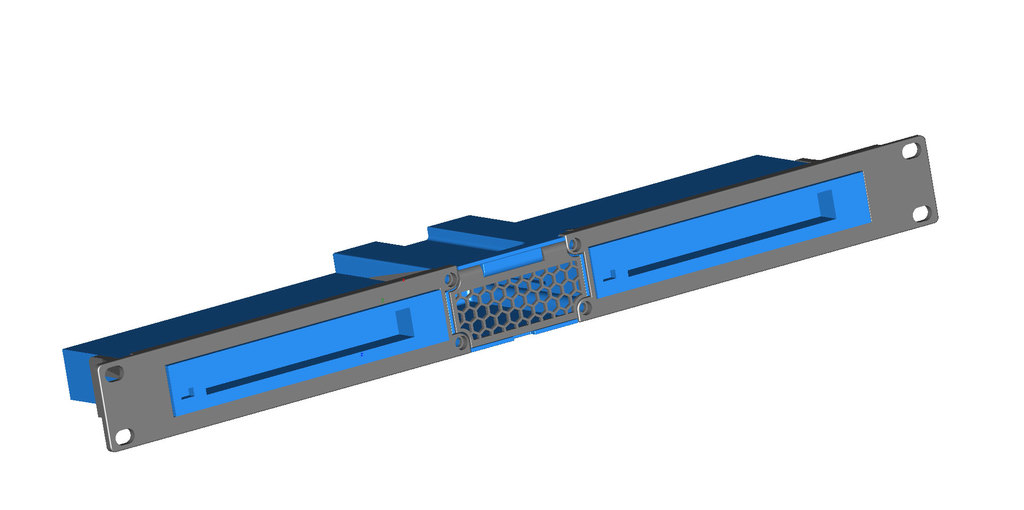
<p>Update -<strong>Feb 24, 2021 - Was reported in the comments that this did not fit a model of the TP-LINK TL-SG108 (UN) V5. After checking into it I found a doc which says that there are 2 hole spacing configurations on these switches, one is 94mm between holes and the other is 110mm. The original model had the option of either 111mm or 80mm between holes (the 80mm fit Netgear GS308 GigE). To hopefully address the problem quickly, I uploaded another version of the wings which which use 94mm hole spacing. If you need 94mm hole spacing on your TP-SG108 switch, please try the following:</strong></p> <p>TPLink-TL-SG108-94mm_HOLE-SPACING-3Z49-LEFT.stl<br/> TPLink-TL-SG108-94mm_HOLE-SPACING-3Z49-RIGHT.stl</p> <p><strong>If your TP-SG108 uses 110 hole spacing, or you are using a Netgear GS308 GigE (with 80mm spacing), then use the original model below:</strong></p> <p>TPLink-TL-SG108-NG-GS308-rack-2x-3Z49-LEFT.stl<br/> TPLink-TL-SG108-NG-GS308-rack-2x-3Z49-RIGHT.stl</p> <p>Update -<strong>I updated the side modules so now they should be able to accommodate either the TP-Link TL-SG108 or the Netgear GS308 GigE switches. This was previously designed for the TP-Link switch, but I recently received a Netgear GS308 and it fit aside from different hole spacing for the mounts (80mm). I confirmed the GS308 fits but did not re-print to check the holes (though based on measurements they should work fine).</strong></p> <p>Update 2 -<strong> I found the holes on the Netgear switch are very tight with the M4 screws used on this thing. So if you need to mount a Netgear switch, I posted a remix (link below) that uses M3 screws which should slide in the mounting slots on the base of the switch without a problem. Thanks to the make by DasFasty for testing the M3 version!</strong></p> <p><a href="https://www.thingiverse.com/thing:3758303">https://www.thingiverse.com/thing:3758303</a></p> <p>This is a 1U space for two TP-Link TL-SG108 or Netgear GS308 8 port GigE switches. It also can take the TP-Link managed 8 port switch as well, which has the same form factor. There will be a remix with interchangeable "wings" for using Trendnet switches, however that model will be a work in progress.</p> <p>This thing includes a center module with a covered compartment in 3 sizes. There are openings in the center module to allow airflow to the switches, therefore only large items should be stored in here (like short Ethernet cables). The sizes are regular, short and extra short. The difference between the sizes, is the length of the modules (in case the rack being used is not very deep):</p> <p>Regular 147mm<br/> Short 108mm<br/> Extra (ex-) Short 91mm</p> <p>There is also a version of the Extra Short center box which does not have a vent for the switches. This was intended for use with the Keystone Jack modules that will be posted as a remix.</p> <p>Hardware needed:</p> <p>Qty 4 : M4 x 20mm (or longer) screws (cap screws will work)<br/> Qty 4 : M4 x 10mm screws (button head, used to hold the switch in place)<br/> Qty 8 : M4 nuts (can use locknuts or regular)<br/> Qty 2 : M3 x 20mm screws (any type should work, they will be hidden in the door hinge)<br/> Qty 2 : M3 brass inserts (I used 3mm long inserts, but the pocket is 5mm deep)</p> <p>This uses M3 brass inserts, which I know sucks since not everyone has these around, but I could not make the door hinge without them. You may be able to get by without the inserts, and use glue to hold the M3x20 screws that make the door hinge.</p> <p>A problem I had with the one in the pic (which is an earlier model), is that the center sagged a bit. To remedy this, I changed the design, and added additional supports around the connection between the center module and the left and right side modules. That change has corrected the sag and it now feels very solid once assembled. The downside is that it is very hard to remove the sides now.<strong>That should not be a problem as long as the door and the M4 locknuts are assembled in the center module prior to sliding the sides on.</strong></p> <p>There are several remixes for this which I will post up soon:</p> <ol> <li>(I have not posted this one yet) An untested re-mix designed to add a pair of 40x28mm fans and a temperature PWM controller board to the center section. This was not necessary in the rack I was building so I made the storage box instead. </li> </ol> <ol> <li>(remix is posted) I am also working on a left and right module which will hold nine keystone jacks, using MWU's "RJ45 Keystone Receiver" model and the rest is just a bit of cutting and clipping of the wings shown here, so they will be compatible with the switch modules. That way there can be a 9x patch on the left and a switch on the right. I will also make a center module that does not have the side vents for use with the Keystone patch modules.<br/> <a href="https://www.thingiverse.com/thing:3691362">https://www.thingiverse.com/thing:3691362</a></li> </ol> <ol> <li><p>(remix is posted) Side modules for a Trendnet TEG-S80G switch. These modules were printed and I updated the design but have not tested it to confirm if the fixes work (the model I printed will work for me and I don't want to waste PLA on something I won't use).<br/> <a href="https://www.thingiverse.com/thing:3691299">https://www.thingiverse.com/thing:3691299</a> The remixes will be posted soon. I also plan to post the STEP files.</p> <p>I printed in 0.2 and 0.25mm resolution with supports. I used tree supports on the wings and regular supports on the center box part. On the center box part, I used Cura's support blocker to keep supports out of the door hinge area. The door itself does not need supports. The parts will need to be oriented for printing.</p> <p>Update 7-18-2019: The STEP file is now uploaded for easy remixing</p> <p>Update 2-21-2020: Check out reibuehl's remix of the door for a simpler and easier to install (hardware free) door option:<br/> <a href="https://www.thingiverse.com/thing:4382663">https://www.thingiverse.com/thing:4382663</a></p> <h3>Post-Printing</h3> </li> </ol> <p><strong>Above is a pic of the center part, which holds the whole thing together. I glued the M4 locknuts in place and held them in position till it was dry with some M4x14mm screws. Once i is dry I will remove the M4x10mm screws and use some longer M4x20mm cap head screws to assemble it.</strong></p> <p><strong>The door is installed with M3x20mm screws and a pair of M3 inserts (I used M3x3mm brass inserts, but the pocket is 5mm deep). The screws are inserted from both sides off the door, and the inserts secure them. The inserts go in from the center of the door hinge. There are no inserts in the red part, they only go in the door. The door must be installed prior to assembling the sides, otherwise it will not be possible to get it in there. The sides are also very hard to remove once assembled.</strong></p> <p><strong>These are the M3x3mm inserts used in the door.</strong></p> <p><strong>M4 locknuts were pressed into place (used a M4 screw to draw them into the pocket). Glue should not be needed since it is a tight fit. A vice could also be used to seat them.</strong></p> <p><strong>The M4x10mm button head screws go though to the M4 locknuts and need to stand just a few mm proud of the base in order to catch the holes in the base of the switch. It will be a bit of trial and error, but when it catches it should be pretty tight.</strong></p> <p><strong>This is designed so the face of the switch will be flush with the front of the part when everyting is seated correctly. Nothing should be loose and the M4 screws should be seated in the slots in the base of the switch.</strong></p> Category: Electronics
With this file you will be able to print Modular 1U Relay Rack Mount for TP-Link TL-SG108 or Netgear GS308 8 port switches (with STEP file) with your 3D printer. Click on the button and save the file on your computer to work, edit or customize your design. You can also find more 3D designs for printers on Modular 1U Relay Rack Mount for TP-Link TL-SG108 or Netgear GS308 8 port switches (with STEP file).