MODULAR 3D CALENDAR
prusaprinters
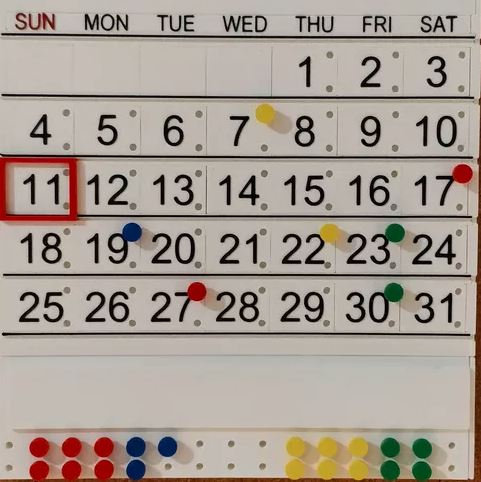
<p>Calendar can be used in a desk or wall mode.<br>Without printing all parts again, you can easily switch the calendar from desk to wall mode or vice versa, just print the additional parts.</p><p>Parts that you will need:</p><p>Required:<br>- board- the main part that is used to hold day tiles. Use lighter version if you would like to reduce the filament usage by ~30%<br>- days (choose version you would like to have- with or without pin holes)<br>- days_blank- used to fill empty space, you need 7 blank day tiles total<br>- side_cover<br>- day_name_track</p><p>Desk mode:<br>- desk_stand- connect it to the board and store excess day tiles and pins here</p><p>Wall mode:<br>- wall_holder- choose the appropriate size and attach it on the top base connector<br>- wall_storage_base- in case you would like to store day tiles and pins<br>- wall_storage_side_cover<br>- wall_storage_cover- covers the excess day tiles (not required)<br>- connector- used to support multiple months</p><p>In case if you want multiple month(s) on a wall version, print additional board parts and connect them with a connector part.</p><p>Optional parts<br>- day_mark- use it to mark the current day<br>- pins- to mark specific dates, print them in different colors<br>- addon_month_name + addon_month_name_tracks- shows the current month, place it on the top left or right</p><p>If you would like to have day/month names in your language, add a comment below and I will attach the translated parts.</p><p>3D PRINTING SETTINGS<br>feel free to use 10% infill for board and days parts, together with a default settings (2 vertical perimeters, 3 horizontal top/bottom shells)<br>avoid the brim if not needed for the base part, it will be much harder to clear holes used for connectors<br>all text and horizontal week lines (on the board part) that should be printed in a different color are extruded 0.4 mm, that gives you 2 color layers if using a standard 0.2 layer height<br>if parts that contains a board (male) connector does not fit well, feel free to scale them by X axis (+-1 to 5 percent should be enough)<br>A help for printing tolerance issues:<br>Since that each printer has it own size tolerance, there are some additional parts to help you with printing.<br>You can choose one of the three pin variations (normal, smaller, larger) that is a best match with day tiles you printed.<br>The ideal approach would be to print a board part first and to test if one day tile (use day_blank_for_testing) fits perfectly. If that is not a case, change the Y axis scale of day tiles by 1 to 3 %.</p>
With this file you will be able to print MODULAR 3D CALENDAR with your 3D printer. Click on the button and save the file on your computer to work, edit or customize your design. You can also find more 3D designs for printers on MODULAR 3D CALENDAR.