Modular BIQU H2 Mount for Ender 3.X
prusaprinters
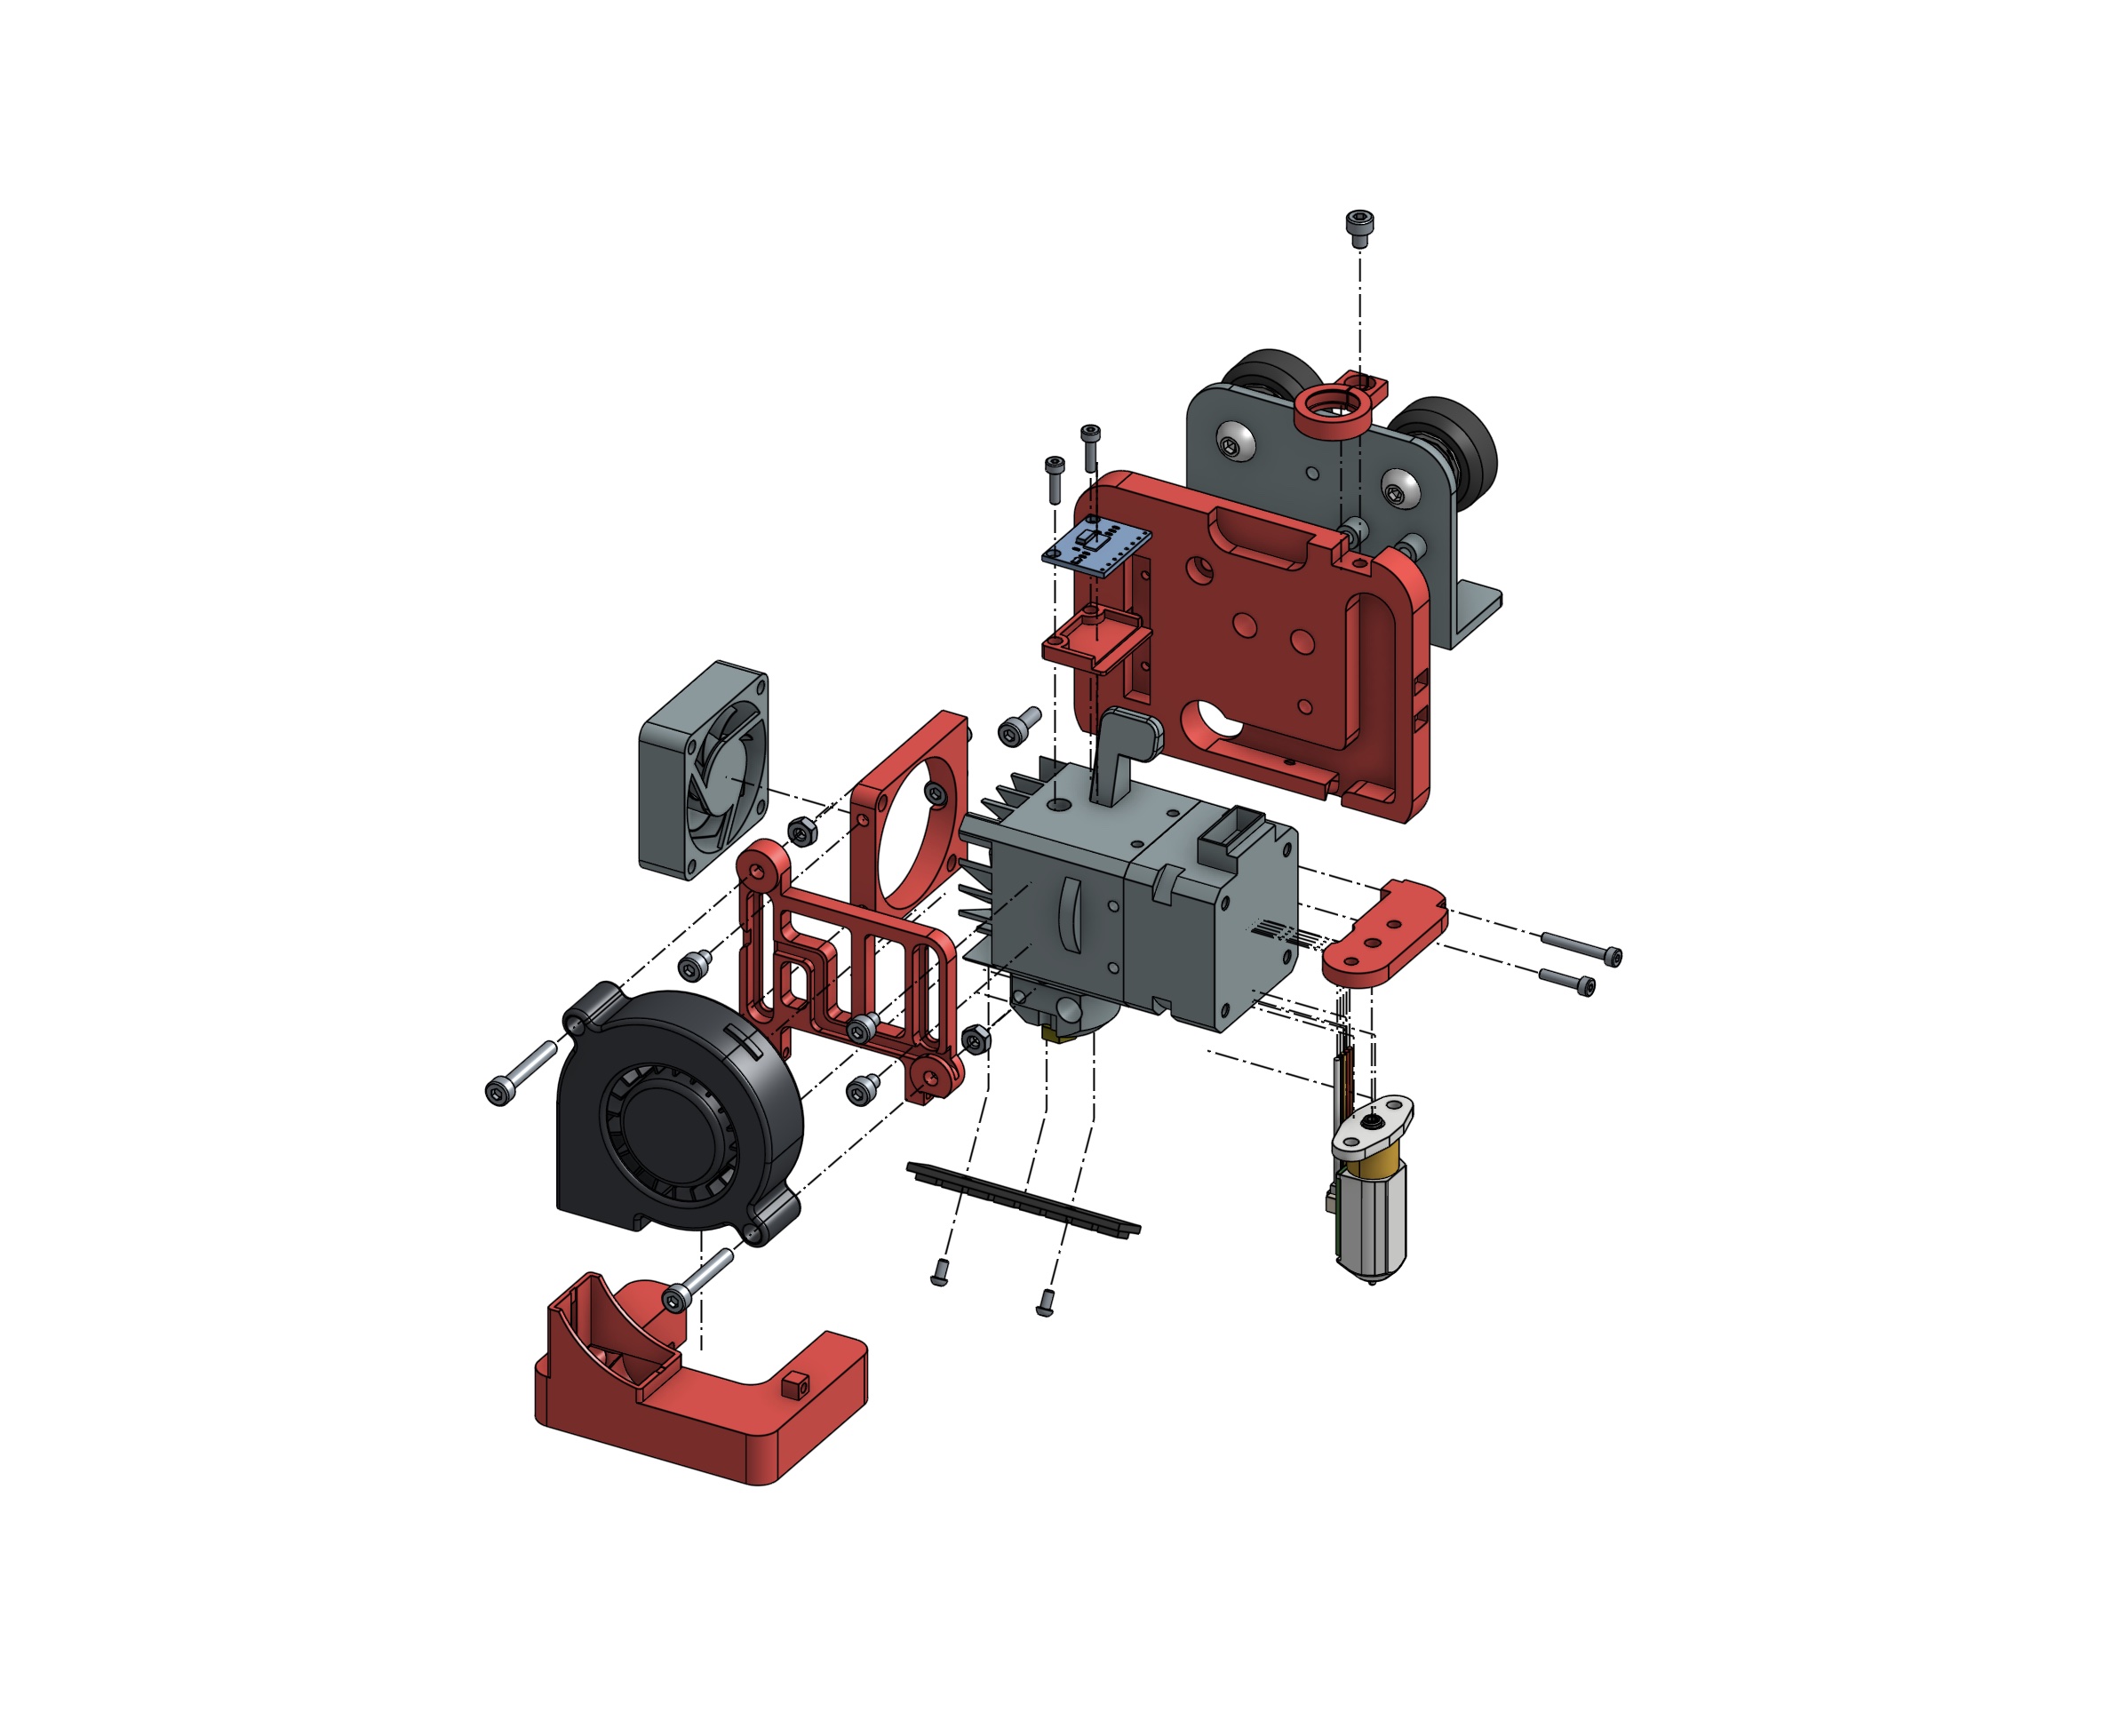
<p>This is a BIQU H2 mount for the base Ender 3/3 Pro and the Ender 3 V2. </p><p>It comes in 2 variants, depending if you prefer to mount one or two 5015 fans.</p><p><strong>Key features</strong></p><ul><li>designed for the Ender 3 <strong> </strong>and the <strong>Ender 3 V2 [new]</strong></li><li>modular, small, lightweight, yet sturdy</li><li>fast and easy to print, (almost) without supports</li><li>optional probe mount, for either a BL Touch or a <strong>CR Touch [new]</strong></li><li>optional ADXL345 accelerometer mount</li><li>support for an Adafruit WS2812 LED strip</li><li>modular cable management system, currently designed to pinch in place a 10mm wide flexible cable management sleeve</li><li>designed to hide and organise fan, heater and accessories cables</li><li>duct airflow design validated by fluid simulations</li></ul><p>Both single and dual mount have been printed, installed and tested ;) I posted a make if you want to see in for real.</p><p><strong>Notes</strong></p><ul><li>Probe offset : <ul><li>BLTouch + BiQU H2 V1 / PTFE heat-break : <strong>x:57.0mm y:0.0mm z:3.0mm</strong></li><li>BLTouch + BIQU H2 V2 / all metal heat-break : <strong>x60mm y0.0mm z3.0mm</strong></li><li>CRTouch : <strong>x:62.0mm y:0.0mm z:3.0mm</strong></li></ul></li><li>Nozzle offset (<strong>you need to change this in your firmware in order to print correctly center with your machine's bed</strong>) : x:-12.5mm y:-6.5mm</li></ul><p><strong>Edit 1 - 20/10/2021</strong></p><p>I'm currently testing and running the single fan version. So far, so good. I'll post more update, including a water test maybe, on my make.</p><p><strong>Edit 2 - 24/10/2021</strong></p><p>Another user successfully printed the double fan version and reported a very good airflow. Mission accomplished ! Thanks for the make @krmnl !</p><p><strong>Edit 3 - Mk2 is here ! - 17/09/2022</strong></p><p>Here's finally the mk2 revision of this mount ! Here's a summary of all changes :</p><ul><li>flatter thus easier to print carriage mount</li><li>added a carriage mount variant for the Ender 3 V2</li><li>revised the BL Touch mount, with a sturdier design</li><li>revised fan mounts for a more stable and durable mount</li><li>tighten various mounting holes on all mk labelled pieces</li><li>smaller and shorter cable manager</li><li>added step files, to encourage and facilitate remixes</li></ul><p><strong>Edit 4 - CR Touch mount - 20/09/2022</strong></p><ul><li>added a CR Touch mount. As i currently don't have this probe, any feedback on this mount would be appreciated. Theoretically, the probe offset for this mount should be : <strong>x:62.0mm y:0.0mm z:3.0mm</strong></li></ul><p><strong>Edit 5 - BL Touch mount updated</strong></p><ul><li>enlarged the BL Touch mount to allow more clearance for the BL Touch plugs. The new offset is now : <strong>x:57.0mm</strong> y:0.0mm z:3.0mm</li></ul><p><strong>Edit 6 - new probe mount added for BiQU H2 with an all metal heat-break</strong></p><ul><li>Added a BL Touch mount and a CR Touch mount variation that works with the 2mm shorter all metal heat-break on the BiQU H2 V2<strong>.</strong> In that way, probe offset remains the same.</li></ul><p><strong>Edit 7 - Fixed all metal heat-break BL Touch mount</strong></p><ul><li>The all metal heat-break mount for BL Touch was too close from the H2 motor's magnets, causing interferences in its reading. The mount has been revised with a 3mm additional clearance to solve this issue. As a result, the probe offset for this mount is now <strong>x:60.0mm</strong> y:0.0mm z:3.0mm</li></ul><p><strong>Edit 8 - Fixed the Ender 3 V2 carriage plate top mounting screw alignement - 17/10/2022</strong></p><p> </p><p><strong>BOM</strong></p><p>For this build, you'll need a couple of M3 and M2 screws and nuts :</p><ul><li>9x Hex M3 4mm (5015 mount, extra cable support hose, ADXL345 mount, LED Light bar mount)</li><li>2x Hex M3 20mm (BIQU H2 Fan mount) and 2x Hex M3 20mm (Single 5015 fan) or 4x Hex M3 20mm (Dual 5015 fan)</li><li>2x Hex nut M3 (Single 5015 fan) or 4x Hex nut M3 (Dual 5015 fan)</li><li>3x Hex M3 8mm (carriage mount & Biqu H2 mount)</li><li>2x Hex M2 6mm (carriage fan support mount)</li><li>2x Hex M2 8mm (fan duct mount)</li><li>1x Hex M2 16mm & 1x Hex M2 12mm (BL Touch mount)</li></ul><h4> </h4><h4>Printing tips</h4><p>Support are only required for some small areas. You can probably print without any and get a functional print, but i'd advise to use paint-on-supports for best results. </p><p>All pieces are designed to be printed flat on their flattest side, including the ducts.</p><p>You can print with 0.4mm or 0.6mm toolhead, preferably in PETG, but PLA works fine as well.</p><p> </p><h4><strong>Building instructions</strong></h4><p>1 - Try all screw holes before building. Some are designed to be tight in order to keep in place the screw.</p><p>2 - Build the carriage fan support on the carriage using two M2 6mm.</p><p>3 - Install the two M3 8mm screw that will hold the whole support on the ender's carriage (the one in the middle of the fan support, and the other one slighty above.</p><p>4 - Install the BIQU H2, without its fan, using the M3 8mm from the back of the support. Use the wide gap in the support to arrange and hide the heater cardrige and thermistor cable</p><p>5 - Install the mount on the ender's carriage and fasten the 2 M3 8mm from step 3. Use the gutter on the mount to organise the BIQU fan wire.</p><p>6 - Mount the LED strip using 2 M3 6mm screws</p><p>7 - Install the BIQU H2 fan using 2 M3 20mm screws</p><p>8 - Install the fan mount loosely using the 4 M3 6mm screws. Don't tight them much for now.</p><p>9 - Install the fan duct(s) using the two M2 8mm screws.</p><p>10 - Level your toolhead, and leave 3mm of clearance between the noozle and the duct(s). You can use a M4 Hex key to help you with that</p><p>11 - Install the fan(s) and secure it/them using 2 or 4 M3 20mm screws and nuts. I suggest to add a touch of glue on the nuts to keep them in place in the mount. For the double 5015 version, use the gutter on the mount to hide the left fan wire.</p><p>12 - Mount the BL Touch on it support using the M2.5 screws provided with the sensor</p><p>13 - Mount the BL Touch support using the M2 16mm and M2 12mm screws</p><p>14 - Mount the ADXL345 using 2 M3 6mm screws</p><p>15 - Mount the cable support on top using the last M3 6mm screw</p><p>Build is now complete ! Wire everything correctly on your board, double-check your wirings, reconfigure your extruder e-step and current voltage in your firmware, make some test print and you should be good to go !</p>
With this file you will be able to print Modular BIQU H2 Mount for Ender 3.X with your 3D printer. Click on the button and save the file on your computer to work, edit or customize your design. You can also find more 3D designs for printers on Modular BIQU H2 Mount for Ender 3.X.