Modular Boomerang - two bladed
prusaprinters
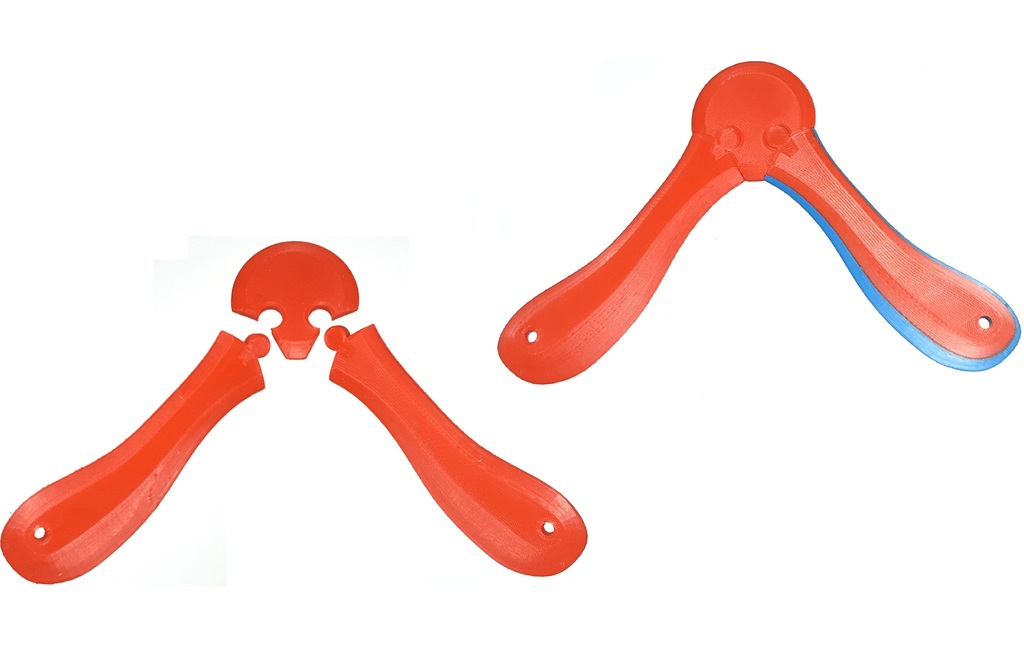
<h3> Two-bladed Modular Boomerang</h3> <p>Schm4704's <a href="https://www.thingiverse.com/thing:107862">Tri-Bladed Boomerang</a> is too large for my print-bed so I decided to chop the blades off and my Modular Boomerang was born.</p> <h3> Safety</h3> <p>Boomerangs were originally invented in Australia as a hunting weapon so they are definitely not a toy! Always fly yours in a suitably large safe area and consider eye protection and gloves. Children should be supervised.</p> <h3> Two-bladed boomerang</h3> <p>Two-bladed boomerangs are suited to skilled throwers and provide best distance but are not so easy for having your boomerang come back to you.<br/> If you are a beginner then you should consider my four bladed boomerang <a href="https://www.thingiverse.com/thing:3678915">thing:3678915</a>.<br/> If you have some skill at throwing boomerangs then you should look to my three bladed boomerang <a href="https://www.thingiverse.com/thing:3679312">thing:3679312</a>.<br/> The blades are interchangeable except that in this Thing the 350 and 400 blade files are renamed 175, 200 and the larger blades are additional. Only the hubs are different.</p> <p>You may also like to see my one piece Frizbee Boomerang here <a href="https://www.thingiverse.com/thing:4727942">thing:4727942</a>.</p> <h3> Files</h3> <p>To print your boomerang you need to make one left blade, one right blade and one hub.<br/> You can scale the models to any size that you like. I include files for small 175mm (size from centre of hub to tip of blade) (requires a minimum print bed length of 150mm), a regular 200mm (requires a minimum print bed length of 170mm) and a large 250mm (requires a minimum print bed length of 210mm)..</p> <p>The boomerang is suitable for left or right-handed throwers.</p> <h3> Printing</h3> <p>As with any model which has a large contact area with the print bed you need good print-bed adhesive. If you have a heated bed then set it a few degrees higher than the recommended temperature to prevent warping.<br/> Use a maximum 0.2mm layer thickness to keep the top of the boomerang smooth.<br/> You need to make the boomerang as heavy as possible so that it will fly well. Print it solid with plenty of top and bottom layers. Set infill to 100%.</p> <h3> Flying your boomerang</h3> <p>The blades should clip tight into the hub however you may wish to glue the joints to stop movement of the blades. Before gluing the joints, you can make small adjustments to the angle of the blades to get different flying characteristics.<br/> There are a number of sources on the internet which show you how to throw your boomerang. Here is one I found on <a href="https://www.boomerangs.com/pages/how-to-throw-boomerangs">boomerangs.com</a>. The holes in the end of the blades are so that you can rivet metal into the holes for extra weight if needed.</p> <h3> Print Settings</h3> <p><strong>Rafts:</strong></p> <p>No</p> <p><p class="detail-setting supports"><strong>Supports: </strong> <div><p>No</p></div><strong>Resolution:</strong></p> <p>0.2 layer height or less</p> <p><p class="detail-setting infill"><strong>Infill: </strong> <div><p>100%</p></div><br/> <strong>Filament:</strong><br/> . . .</p> </p></p> Category: Sport & Outdoors
With this file you will be able to print Modular Boomerang - two bladed with your 3D printer. Click on the button and save the file on your computer to work, edit or customize your design. You can also find more 3D designs for printers on Modular Boomerang - two bladed.