Modular Braille Labeling and Learning System
pinshape
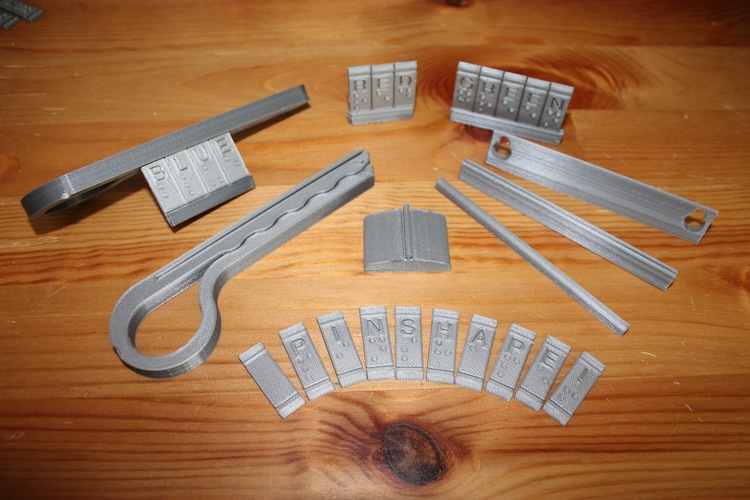
While pondering ways to assist visually impaired individuals, I conceived an idea to make everyday items easily identifiable in and around the house, school, and workplace by creating a system for labeling objects. My initial notion was to develop a keychain attachment system, but this seemed restrictive and limited in its utility. A more practical approach would be to design a modular system that enables users to select the labels most useful to them, allowing for greater versatility and customization. Research was essential to validate my idea. I consulted various resources, including the diagramcenter.org website, which provided valuable information on vertical prints being preferred for braille (most of the time). To further understand spacings, symbols, and accents in braille, I referenced the English Braille American Edition 1994 (Revised 2002) from the Braille Authority of North America. Additionally, I utilized Unified English Braille for Math by Heather Harland and Cheryl Roberts to comprehend math symbols and their setup in braille. To bring my concept to life, I sketched some rough designs before transitioning to Adobe Illustrator, where I had extensive experience. Initially, I planned to create single-row labels but soon realized that this was too restrictive. I expanded the design by opening both sides of each tile, allowing for more comprehensive customization. With the designs finalized, I created 3D models and printed them on my printer using Slic3r slicing software. However, the first prints were subpar, leading me to experiment with various settings without significant improvement. I eventually switched to Cura for slicing, which yielded remarkable results. I printed at a resolution of 100 microns with a print speed of 35 mm/s and a print bed temperature of 35 degrees Celsius. To ensure that the tiles could be printed vertically, as suggested for braille prints, I rotated them on their side and added support material. The rods were designed to be printed without supports. After cleaning up the tiles, which included math-related ones, I created flashcards using the double-sided rod. A modular system like this would be perfect for making flashcards for individuals or classrooms. When comparing horizontal and vertical prints, I noticed minimal quality differences in the braille dots but more post-processing required for the vertical parts due to my printer's limitations. Nevertheless, I successfully demonstrated that tiles can be printed vertically or horizontally. The final outcome is a modular braille label and learning system that empowers individuals, families, schools, and workplaces to add braille labels where needed and in whatever configuration suits their needs. The system consists of friction-fit components that require no glue, making it easy to change labels. Potential applications include name tags for cubicles, clips for clothing identification, or clips for distinguishing between different types of chips. The alphanumeric symbols on the tiles also enable those who can see but don't know braille to understand the system or learn braille for everyday objects if they anticipate becoming visually impaired. To facilitate customization, I created DXF files in Fusion 360, which can be downloaded from Google Drive. These profiles allow users to create rods of any length needed. If you have questions about this system or would like to contribute your ideas, please don't hesitate to reach out!
With this file you will be able to print Modular Braille Labeling and Learning System with your 3D printer. Click on the button and save the file on your computer to work, edit or customize your design. You can also find more 3D designs for printers on Modular Braille Labeling and Learning System.