Modular castle kit - Lego compatible
thingiverse
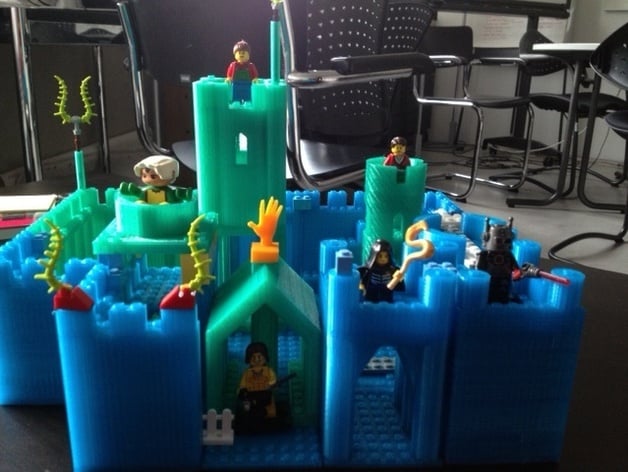
UPDATE (feb 2017) This version is deprecated. If you start new, please take http://www.thingiverse.com/thing:2141175 "Blocks" that can be assembled into a large medieval castle, Lego-compatible size Your choice: Print bricks with base platform attached Print stackable objects that you can put on top of a base plate Combine the two I had the following in mind: Reduce print time. Provide incentives to be creative: kids can adapt and expand with their own bricks Should be easy to print Should be sturdy Should be expandable by people with minimal openscad skills (create your own blocks) You don't need all the pieces. Look at them and decide. A single castle-tower.stl can do for starters. By XMas you should be done printing a reasonably impressive set :) File names: By default, bricks have a flat bottom and are not stackable (easier to print). All files called *_legobase are stackable, i.e. can be put on top of a base plate or other pieces. File names including _16 use a larger 16x16 base plate. Instructions Status and versions This is version 1.x. Certainly, each and every block could be improved. I printed all designs. So far I only had two print aborts at later stages Both explained by bad filament, i.e. ">2mm knots in 1.75mm" filament. I usually finish prints over night and then come back to my office to discover the wonders. In version 1, each block (aka castle module) had the same 8x8 (6.4cm) footprint. As of version 1.2 I added stackable objects that you can put on a base plate. Added bigger base plates and a 8x8 tower on a 16x16 plate. But the idea that the whole design is based on a 8x8 grid pattern remains true. Versions 1.2 to 1.6 add more objects and also 16x16 base plates with wall and corner. Version 1.6 also allows to generate nano legos (more or less...). Each version may include a new brick. I will replace objects without special notice after adding smaller improvements. I printed most objects so far and when I encounter a problem I try to fix it. This also includes usability, e.g. I made some pieces a bit taller and may do it for others. Objects with integrated base plate are easier to print, however they may slightly warp when your print bed is dirty or uneven or too far from the nozzle. The http://youtu.be/RqC9cUzia8k video shows a print in progress (2 towers and a (warped) base plate. For a subset of DUPLO-compatible sized STLs, see http://www.thingiverse.com/thing:31408 Requirements Any PLA 3D printer should be able to print this. To get Lego compatibility, you need a printer that can do 0.25 layers for real (also x/y precision), i.e. probably any good 2012 model. Print times: Depend a lot on your settings and your printer. E.g. with my Felixprinter (see my mid-quality settings below), printing a tower takes about 6-8 hours. Printing 4 pieces together, i.e. a corner tower, 2 fat corners and a wall with stairs took 22 hours. The controller software, Repetier Host, predicted print time as 15:32 minutes, i.e. way off the mark. Slicing parameters I use the following: Layer size: 0.25mm, but 0.2mm should be better Speed: 12-20mm/s for the first layer and nozzle really close 40 mm/s for perimeters 80 mm/s for fills Fills: 0.25 can do (or even less) 0.35 is much safer with respect to the base plate floors. However, this may increase warping. Your choice. Other: Use three fully filled layers (bottom and top) for floors 2 extra shells on base Difficulties Bumps in the bottom layers (top of base plate): Use more fill Base layer won't stick: Reduce speed and put the nozzle closer to the print bed (1 sheet of paper). You also can increase temperature, e.g. 210 for PLA. Ugly bridges (underneath horizontal overhangs): Ignore these or print colder or create a better design. Warping: I did experience warping when printing more than one piece at a time. Since I later managed to print a 16x16 base plate, I figured that (a) the platform wasn't totally even and/or that it had greasy spots (fingerprints) and (b) there could be the fact that after long hours of printing, an object will very very slowly, but gradually dimish adherence with the platform. Printing several pieces at the same time: In theory, most printers could print 6 blocks. For overnight prints I suggest to print 4 at the time, but monitor until the platforms are done ! However, when I do 15-20h prints, I do encounter some warping in some pieces in the morning after. In addition, I noticed quite a decrease in print quality (see some of the walls in the pictures), maybe because the pieces move a bit or because the nozzle can slightly stuck. That being said, at some point I also noticed that the z-axis-motor connection on my printer became loose, i.e. distances became a bit wrong after retraction (reverse turns). Prints now look better again... A little base-plate square (1st few layers) can detach from the platform (I made these to prevent filament bonding sideways and then warping): If you can, put your printer on hold, then take it away, heat it with torch then put it back using tweezers. Else use tape that has glue on both sides or whatever else that will make it stick. Next time, print closer and more slowly. Some bricks are harder, i.e. the ones that are stackable. Slow down speed and maybe reduce layer size if they don't come out as you like. Also, I strongly suggest to print one stackable (baseplate-less) wall at the time. If the nozzle gets caught a bit it may move the print and you will have to restart. Post processing Depending on your slicer settings and your printer, there may be some stringing. Blow these away with a little Dremel blowtorch (or similar). Warming: PLA can turn very quickly from solid to liquid. Keep the flame away and use the protection. Warped plates can be easily mended using a heat gun. Heat at about 120 degrees C for a while, then gently bend. An riskier alternative is to take the piece of a heated print bed while its still warm. At 60 degrees you can bend. Hanging filament (underneath horizontal or diagonal 45 deg. overhangs). Cut off with a little swiss knife, then use the blowtorch to give its look back. For best fit, you could make sure that the squares are really square. You may have to file corners a bit or parts of walls that touch. Again, use a gas torch to give the piece its look bad. In addition, you could use real Lego (R) plates to take irregular bits from the nibbles away if needed. You can use a soft hammer for that. OpenScad code The whole thing is based on: http://www.thingiverse.com/thing:2106 http://edutechwiki.unige.ch/en/Doblo_factory All the castle kit stuff is in file castle-kit-x-y.scad. Each castle block is an OpenScad module that basically just calls ugly modules I wrote. Therefore, you also need my Duplo/lego compatible library called doblo-factory-x-y.scad. See the beginning of the latter if you need to change parameters. I will leave some old versions, since I may make changes in height or introduce bugs and people may not like that. Take the highest version number if you start new. Ideas (1) After 2 weeks, I now feel that that the sort of minimal serious castle could be assembled like this: 4 16x16 corner base plates 1 16x16 base plate 2 16x8 walls with stairs a few stackable towers for connecting the plates and for providing a space to live in That would give a 48x32 sized castle (copy/paste to a text editor, ascii art is hard here): +---+---+---+ |...+---+...| +---+...+---+ |...+---+...| +---+---+---+ Of course, that is just a suggestion. You can go for smaller or bigger (bigger is better). Also, if you already got big Lego(R) base plates, then you only may want to print stackable elements. You also could netfabb or a similar tool for planning your prints, i.e. just use it to position various bricks before printing one by one. See one of the uploaded pictures. (2) File "castle-large_example" shows how you could imagine a horizontal assembly with OpenScad. It's actually printable if you got a really large print bed. However, 2-3 day prints are fairly risky. Anyhow, normally, assembly of blocks is done with Lego pieces... (3) Print aborts: Assemble and then burn with a mini gas torch. It makes lovely destroyed castles as you can see in three of the pictures. Note: These aborts were due to either bad filament, Win 7 shutting down or a nut that got loose on the printer.
With this file you will be able to print Modular castle kit - Lego compatible with your 3D printer. Click on the button and save the file on your computer to work, edit or customize your design. You can also find more 3D designs for printers on Modular castle kit - Lego compatible.