Modular Hydroponics Tower w/ Grow Lights
thingiverse
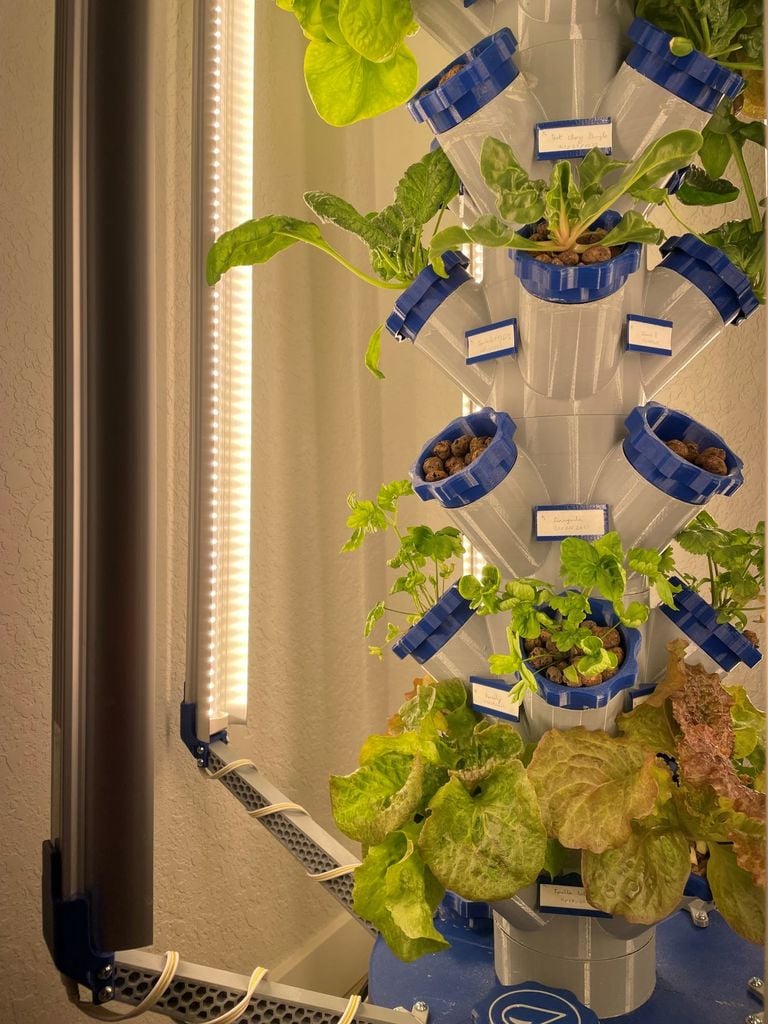
Intro ----- This is a modified version of [boundarycondition's Modular Hydroponic Tower Garden](https://www.thingiverse.com/thing:3405964) and some features of [ghoofman's Smart IoT Modular Hydroponic Tower Garden](https://www.thingiverse.com/thing:4319940). I finally decided to upload my remix of boundarycondition's Modular Hydroponic Tower Garden. I initially just planned to do a make, but soon I decided to invest some time and modify the project to suit my needs and capabilities. What I intended was: * I wanted to utilize the space as much as possible and this meant that I needed a tower at least 6 feet tall. Thus, the base of the tower had to be extra stable to support the weight of the tower. I might have overengineered the base to make it extra stiff, but it worked! * I have a Prusa MINI+, which has a fairly small bed (180mmx180mm). This somewhat complicated things. * Due to the weather I live in, I needed to place the tower indoors. This required the use of grow lights. I couldn't find a grow light holder that fit my print bed and could, in the future, be extended further outward as the plants grow. * Finally, the project had to be modular and easily upgradeable. Thankfully, I have decent experience with Solidworks. Thus, I downloaded the STEP files from the two aforementioned projects and modified a few parts. The pot lid and the LED supports were entirely my creation. I'll provide a link to the STEP files in case someone want to keep modifying the project. The tower has been up and running without any major incident. It has 8 4-way planting modules and 3 spacers. It is surprisingly stable and I plan to add at least a couple more modules once the plants grow a bit more. The pump I'm using is more than capable of pumping enough water all the way to the top. I initially started with 3 42W 4ft LED grow lights, but after a month I decided to try to add to 3 more for a total of 6 to provide better lighting. The grow lights are pretty well secured from the bottom with the arms I designed. I'm also gonna provide a parts list in case anyone doesn't want to do all the research looking for the specific pump or lights needed. Hope this helps! **ATTENTION!** **I already found someone reselling the .STL files on Etsy. Be nice and abide by the CC license. The file are free and for everyone. I promise I'll find every single attempt to resell this project and I'll take appropriate action.** Printing Recommendations ----------------------------------- These are the print setting I used. Feel free to modify them if you see fit: * Printer: Prusa MINI+ * Filament: PETG * Layer Height: 0.25mm * Infill: 20% (except the lid and the LED arms, which are 50% for extra strength) * Print Speed: > 40mm/s * Supports: Not needed (except for the LED arm tip, which has to be printed vertically, and the tag holder, which requires supports on the upper lip). Check the images of the slicer I uploaded) * Print bed: 18'mmx180mm (if you print bed is larger, you can print a 3-way planting module. * Brims: Yes * Perimeters: 3 (makes it watertight and adds extra strengh) Due to the small size of the Prusa MINI+ print bed, I can only print 1, 2 and 4-way planting modules. If you have a larger print bed, you can print any module you want, since I haven't modified the size or the locking mechanism of the modules of [boundarycondition's project](https://www.thingiverse.com/thing:3405964). Recommended Parts ---------------------------- These are the parts and components I bought for this project. All of them (except the IKEA pot) were bought through Amazon. This is only a reference so you don't have to do as much research as I did! * [IKEA 9 1/2" MUSLOT pot](https://www.ikea.com/us/en/p/muskot-plant-pot-white-10308198/#content): I usually fill it with 2.5-3 gallons of water. It looks nice and once full is pretty stable. * [EcoPlus 290 GPH (1098 LPH, 17W) Submersible Water Pump](https://www.amazon.com/dp/B0012UZYMG/?coliid=I1R0QTKAN31OOB&colid=3KQJEAIDBR1I7&psc=1&ref_=lv_ov_lig_dp_it): The current tower is about 5 feet tall and the pump could go up to 6 feet while still delivering enough flow. It is quite enough so you only hear the trickle of water. It's rather relaxing. * [4ft Barrina T8 LED grow light 42W](https://www.amazon.com/dp/B082ZKZVRQ/?coliid=I3CTI8O5BFX5DL&colid=3KQJEAIDBR1I7&psc=1&ref_=lv_ov_lig_dp_it_im): These are not the best grow lights, but I'm just getting started and I wanted to get some affordable lights to get started. You can install up to 6 grow lights. I'll update on how many I'm using. * [Kasa smart Plug](https://www.amazon.com/dp/B091699Z3W/?coliid=I31XSAJI2VG47N&colid=3KQJEAIDBR1I7&psc=1&ref_=lv_ov_lig_dp_it_im): I use these smart plugs to control the scheduling of the lights and pump according to the plants I'm growing and their growth stage. The app is user friendly and allows you to add enough on/off events for the entire day (although I'd recommend you run your pump on +30min on/off cycles). * [Overture PETG Filament 1.75mm, 1kg spool](https://www.amazon.com/dp/B07PJ35G4V/?coliid=IMYYG5Q1VS09S&colid=3KQJEAIDBR1I7&psc=1&ref_=lv_ov_lig_dp_it):You can use the brand you desire, but I'd recommend PWTG over PLA due to it's added strength and durability (and the cost is the same nowadays). * [1 Set Splendid Popular General Hydroponics pH (4.0-8.5) Test Kit Indicator Tester Up and Down, 30ml](https://www.amazon.com/dp/B017XTG6CG/?coliid=ILQ56O2YIWLC1&colid=3KQJEAIDBR1I7&psc=1&ref_=lv_ov_lig_dp_it): I decided to use drops because it's simplicity and cost-effectiveness. Some other people use strips (which is basically the same idea, but more bulky) or pH Meters (however the cost and the errors due to calibration are not ideal for first time users). Use whichever you feel comfortable with! * [2PCS 10ml Glass Graduated Droppers Lab Pipettes](https://www.amazon.com/dp/B07XX3P1TJ/ref=sspa_dk_detail_3?psc=1&pd_rd_i=B07XX3P1TJ&pd_rd_w=j3Evx&content-id=amzn1.sym.88097cb9-5064-44ef-891b-abfacbc1c44b&pf_rd_p=88097cb9-5064-44ef-891b-abfacbc1c44b&pf_rd_r=86VXFH85SYWZYD6SRAAY&pd_rd_wg=heVbp&pd_rd_r=bb012a81-f2fe-4826-bf7a-8963b4a57601&s=industrial&sp_csd=d2lkZ2V0TmFtZT1zcF9kZXRhaWw&spLa=ZW5jcnlwdGVkUXVhbGlmaWVyPUExQjJIOFYwSEU3VVQwJmVuY3J5cHRlZElkPUEwNDg3MDgyMUs0VVNGOEpUVDhXOCZlbmNyeXB0ZWRBZElkPUEwMTQ0NTUzMlFKM09TNVROT0pVTiZ3aWRnZXROYW1lPXNwX2RldGFpbCZhY3Rpb249Y2xpY2tSZWRpcmVjdCZkb05vdExvZ0NsaWNrPXRydWU=): Because I use liquid pH Test Indicator I needed a way to get into the reservoir and grab a small amount of liquid to test. With the pipettes its really easy. In addition, you can use them to measure a tiny amount of pH Down/Up with precision. Usually you only need 1ml or less, so it's quite challenging without a pipette. * [General Hydroponics pH Down Liquid Premium Buffering, Quart](https://www.amazon.com/dp/B00CJID1I4/?coliid=I22XAXPOD5H5I8&colid=3KQJEAIDBR1I7&psc=1&ref_=lv_ov_lig_dp_it): I only got the pH down buffer because in the Rockies the water's pH is already pretty basic. If needed, also get the pH Up version from the same manufacturer. * [GROW!T GMC10L - 4mm-16mm Clay Pebbles, Brown, 10Liter Bag](https://www.amazon.com/dp/B009LNOZQ2/?coliid=IPYGS0BIVLP8D&colid=3KQJEAIDBR1I7&psc=1&ref_=lv_ov_lig_dp_it): These clay pebbles have the right size and don't alter the pH (the first few days the pH might vary slightly before it stabilizes). Make sure to rinse them before use. * [TIMESETL 304 Stainless Steel Woven Wire 80 Mesh - 12"X 40" Filter Screen Sheet Filtration Cloth](https://www.amazon.com/TIMESETL-Stainless-Steel-Woven-Wire/dp/B081QBVPCG/ref=sr_1_3?crid=3QV3CQIJPTA84&keywords=80+steel+mesh&qid=1677208309&s=industrial&sprefix=80+steel+mesh%2Cindustrial%2C159&sr=1-3): This mesh is used to prevent debris and roots from getting into the reservoir and obstructing the pump. This mesh is fine enough to prevent the roots from getting through. The only downside is that it's not easy to cut to shape. You can cut the circle that's sandwich between the two 3D printed pieces with good scissors. The holes for the crews and the tube are harder to make. Be careful, this mesh is sharp and you can get cut. I'M SERIOUS. I managed to make the screw holes with a drill and a template. For the big center hole do a medium size hole and then expand it carefully with scissors. I'd encourage anyone to find a better alternative. * [3/8"ID 1/2"OD Cear Vinyl Tubing, 25ft](https://www.amazon.com/dp/B0925Y75GD/?coliid=INM4QQ7FNC389&colid=3KQJEAIDBR1I7&ref_=lv_ov_lig_dp_it&th=1): You can use any PVC tubing with 3/8" internal diameter and 1/2" external diameter. Always get more length than you need in case you need to make the tower taller in the future. When assembling the tower, cut the tube longer and just spool it inside the reservoir. By the way, don't use the metallic braces that come with the tubing. It will rust quickly and mess with the pH of the water. Just pressure fit the tubes in place. If needed, submerge the tube tip of the tube in hot water to make it more flexible when connecting the tubes with the pump or the dispenser module. * [1.5" Rockwool Starter Plugs for Hydroponics, 28 plugs](https://www.amazon.com/dp/B07VYKNGRW/?coliid=IQ6WSAPN0VI0E&colid=3KQJEAIDBR1I7&psc=1&ref_=lv_ov_lig_dp_it): I'd recommend rockwool for the plugs since it's inexpensive, it doesn't decay and it pH neutral. But for sure you can use other alternatives. Just make sure you get a 1.5" size so the plants have enough support. * [Hydroponics Set of Maxibloom for Flowering & MaxiGro for Vegetable Nutrients](https://www.amazon.com/dp/B00F6OEPXS/?coliid=IS5GTE6DLDE3N&colid=3KQJEAIDBR1I7&psc=1&ref_=lv_ov_lig_dp_it): I decided to go with a powder nutrient mix as opposed to liquid nutrient solution is other because I don't mind dissolving the nutrients before adding them to the reservoir. It's pretty quick) and you get way more for the same price. Eventually you'll have to do you own research on the nutrients needed and schedule. For now, if you only want to grow leafy greens, you only need MaxiGro and you can follow the directions on the back of the bag. * [Luigi's Aquarium & Fish Tank Siphon and Gravel Cleaner](https://www.amazon.com/Aquarium-Fish-Siphon-Gravel-Cleaner/dp/B06XKGYJHR/ref=sr_1_5?keywords=hand+pump+aquarium&qid=1673542509&sr=8-5): This part is almost essential when doing the weekly water change. Once the tower is up and running, changing the water is rather difficult. The best way is to use a siphon (if you don't know what it is, you can check it out [here](https://www.wikihow.com/Siphon-Water)). However, being so close to the ground makes starting a siphon rather tricky. This pump streamlines the process. Just make sure you have a bucket nearby! In addition, the following screws are needed: * 9x #8-32 x 1-1/2 in. machine screws & nuts (for the LED arms) * 24x #10-32 x 1 in. machine screws & nuts (for the lid) Obviously you can find alternatives and/or better components. This is just a guide. STEP files --------------- The STEP files for this project can be found [here](https://mega.nz/folder/W5lXRIiQ#prYVi7QpIpvh07v5zwe3DA). Minimum Build ------------------- At the very least, you need the following parts: * 1x 4-Way_Planting_Module_Hollow_Twist.STL * 1x Dispenser_Module_Internal.STL * 1x Filling_Cap.STL * 1x Filling_Cap_Symbol.STL * 3x IKEA_Muskot_24cm_Petal.STL * 1x IKEA_Muskot_24cm_Petal_Plain.STL * 2x IKEA_Muskot_24cm_Petal_w_Hole.STL * 3x LED_Holder_Arm.STL * 3x LED_Holder_Attachment.STL * 3x LED_Holder_Tip.STL * 1x Lid_Without_Holes.STL * 1x Module_Spacer_40mm.STL (it goes at the bottom of the tower to provide enough clearance to open the watering and pump caps). * 1x Pump_Cap.STL * 1x Pump_Cap_Symbol.STL * 4x Standard_Pot_02_For_4-5-Way_Planting_Module.STL Tower Assembly ---------------------------------- The assembly of the tower is pretty intuitive, but I'll briefly describe how to assemble some key parts and their function. Bucket lid: The tower was designed to fit on a 24cm (9 1/2in ) MUSKOT pot from IKEA. I'm aware that the availability of the pot has decreased since I released the design. I might release a new lid design to fit a different pot, but I'd encourage people to develop their own if they know enough CAD. The lid is made out of 6 different pieces or "petals". Right now, there are three different petals design: * Petal: You need three and only three. These petals have a tab where the tower meets the lids so it locks in place. To ensure the tower locks in place, these petals have to alternate with any of the other two types of petals (see picture). * Plain petal: This petal type has no tab or hole. * Petal with hole: This petal type has a hole for watering, electrical wires or simply access to the reservoir. Thus, you need three petals and a total of three plain petals AND/OR petals with holes. Up to you. All petals have the holes to mount the lights. It's been observed that sometimes water drips out of the lid. This is sometimes due to capillarity and condensation. The only way to mostly solve the issue is to add some sealant (such as silicone) between the petals when assembling the lid together. I'd also advice to put a plate under the reservoir to catch any accidental spill. Filter: The main function of the filter is to prevent particles from clogging the pump in the reservoir. The mesh also slows down the intrusion of roots into the reservoir. However, don't expect the filter to completely block the roots. They'll always find a way into the reservoir. Thus, you will have to trim the roots that got in the reservoir as part of the general maintenance of the tower. To assemble, check the pictures I posted. Cut a circle out of the steel mesh carefully. You can cut the circle that's sandwich between the two 3D printed pieces with good scissors. The holes for the crews and the tube are harder to make. Be careful, this mesh is sharp and you can get cut. I'M SERIOUS. I managed to make the screw holes with a drill and a template. For the big center hole do a medium size hole and then expand it carefully with scissors. I'd encourage anyone to find a better alternative. You can use a finer mesh than the one posted. Don't go too fine or the flow of water could be blocked once the roots colonize the area. Again, the roots will find a way, so there is no point in going too thin. LED: The assembly is pretty straightforward. Adjust the distance to the tower as the plants grow using multiple arm extensions. How to Operate the Tower -------------------------------------- I will write a short "manual" on how to maintain and operate your tower. This section is still a "work in progress". However, I'll start posting as soon as the paragraphs are ready. Firstly, it is recommended that you do a full water change every week, in order to reduce the chance of pests and diseases and the build up of waste. When filling up the reservoir during the water change, add fertilizer as directed. Initially, during the early growth period, don't use the full fertilizer does, as you could kill the young seedling. Once the plants mature, you can go to full strength. After you add the fertilizer, check the pH of the water in the reservoir and adjust accordingly, small amounts at a time. Always check before adding more. The pH will depend on the fertilizer dose and the natural pH of you tap water. I usually have to use pH down (not too much) since my water has a pH of 8. During the week, you'll have to keep an eye on the water pH. Adjust as needed. You should also keep refilling the reservoir as needed so the water level doesn't go too low. Remember, you cannot run the pump dry! During the early growth stages, the level will barely go down. However, once the plants mature, you might have to add up to a gallon of water a day. I currently have 40 plants growing on my tower and they consume almost a gallon (around 3.76 liter) a day! I add water with some fertilizer and always check the pH. Once the plants grow, the roots will start filling up the tower. Eventually, they'll find their way down to the reservoir. Even though I redesigned filtration unit to prevent as much as possible the roots from accessing the reservoir, the filtration mesh I'm using (which is a window screen) is not fine enough and the roots will eventually go through the holes or the sides and enter the reservoir. Thus, regular maintenance is a must. Maintenance -------------------------------------- Although minimal daily interaction with the tower is required, some maintenance and checkup is required. Daily maintenance: Not much is required to do daily. Depending on the growth stage, some things you might want to check every day are: * Water level: At peak production, you might have to refill the reservoir with nutrients and water daily. 40 plants can use all the water in the reservoir if growing healthy. * Pollination: Yes, if you manage to grow flowering plants, you will have to pollinate by hand. Different plants are pollinated differently by hand. Always goggle it first. For example, to pollinate tomatoes gently shake the plants a few times a day. Weekly maintenance: At least once a week, you'll have to do: * Water change: Completely change the water in the reservoir and refill it with fresh water and nutrients. Always make sure the pump is unplugged to prevent it from accidentally running while dry. * Check for leaks, mold, undesired growth or other issues: Use your common sense and check for any issues that could get worse. I know it's pretty vague, but you'll quickly get a sense of what I mean. Major maintenance (every 3-4 months): This is the not so fun part of hydroponics. Every few months or so, depending on the height and number of plants you are growing, the tower will need major maintenance. This basically means disassembling the tower, cleaning it and reassembling. I know it's tedious and takes a few hours, but it will be for the better. For can sill do it while growing plants. However, this makes it more challenging, since keeping the plants intact while disassembling the tower it's messy and not easy. But it can be done. * First, unplug everything and remove the growing lights. * Empty the reservoir completely. * Remove or harvest as many plants as you can. The fewer plants you need to keep the easier it's gonna be. Also, if the plants are at an early growing stage it's gonna be easier. Some plants might be too big and break when twisting and moving the different parts. Keep that in mind. * Now, remove the top cap and the internal dispenser. Cut the tubing that's attached at the internal dispenser. * Now remove the top module. To do so remove first the pots. If you are keeping a plant, remove it carefully and trim the roots a bit. Once you have removed all the plants, clean the module and remove any remaining roots. The idea is to get rid of anything that could rot or clogg the pump. * Keep removing the modules, one by one. * Once you get to the lid, remove the lid to access the pump. Wipe the inside op the pot and clean the pump filter. * Now, start reassembling the tower. * Congrats, all done! Plants & Other Progress Updates ----------- Forthcoming! I will write updated on which plants I'm growing and how they are doing, as well as lessons I learned. I'll keep expanding this section as much as possible. If it becomes too long, I might have to start a blog page. First things first, it's my first time dealing with hydroponics. I have previous experience with gardening and growing vegetables, but I'm not an expert. My idea was to use this tower to learn and experiment with hydroponics. Hopefully other people will share their experiences too so we can all learn which plants grow best and the best settings. Initially, I decided to only grow leafy greens and herbs. They have similar nutrient and light requirements, so I though that would make it easy, at least initially. These are the plants I initially planted and my experience so far with them: * Bok Choy: They are doing great. So far, these have seen the strongest grow and seem to be thriving. They were also the strongest seedlings. One thing I want to look into is whether their location (at the top of the tower) has something to do with it. * Lettuce: I tried different lettuce varieties, and all seem to be doing fine. Their growth seems slow at first, but don't be fooled. If you plant too much you can easily overproduce. If you wait too much to harvest them, they will bolt. They grow fine with 6 lights and are not leggy at all. * Swiss Chard: Slow growth. Not much leaf production before it bolts. * Cilantro: My experience has not been positive really. Doesn't produce many leaves before it starts bolting. * Parsley: It took really long to spout (no surprise there), but it eventually grows abundantly. With a couple plants you will never run out of parsely. * Spinach: Somewhat tricky to sprout. They need a cold room to sprout, which means that they cannot be planted directly in the tower since the room is not cold enough. Once sprouted and transferred, they do good but and produce abundantly. * Chives: Their growth has been minimal. Provably due to a lack of light. * Arugula: Pretty disappointing at first. Initially, it looks like they are trying to survive rather than grow. Once it grows enough roots, it really takes over. All in all, I already expected some challenges due to growing indoors. I think if I can figure out the right amount of light, the sprouting and transfer methods and the watering schedule, things can improve. Initially, I used 3 LED grow lights for 16 hours a day. The pump was scheduled to run 30min on and 45 min off. During the night, the pump was off for longer, about 3 hours (when there is no light plants do not require as much water, just to keep their roots wet). The growth was decent, but I could see some plants struggling, such as the parsley and spinach. The lettuce was growing fine, but there was some lack of pigmentation on the red varieties, which seemed to indicate an insufficient lighting. Therefore, I added the other three grow lights and reduced the light schedule to 12 hours a day. With 6 LED grow lights, the growth is greatly improved. I didn't realize how much the tower can produce until I used all 6 lights. The lettuce is thriving, and all the other plants are doing better. Definitely use 6 lights if you can. Now I've started experimenting with flowering plants: * Tomatoes: My first try was at cherry tomatoes. You really have to check how much the variety grows so you don't get overrun by the plants. But tomatoes seems to grow fine in the tower. So far they've flowered and I've been able to pollinate them. I have dozens of cherry tomatoes maturing right now. I'll update how they taste once they are ready for harvest. * Peppers and strawberries: My next flowering plants after the successful experience with cherry tomatoes are dwarf peppers and wild strawberries. We'll see how that goes. Updates ----------------------------------- 01/10/2023 * Updated Dispenser_Module_Internal.STL. The previous version lacked the holes to allow the water to trickle down. The new version has the required holes. 01/12/2023 * Updated part's list. Removed the Amazon shopping list. * Started writing two new sections: "How to Operate the Tower" and "Plants". * Uploaded a few diagrams showing the assembly of crucial parts. * Misc. changes in the project description. 01/13/2023 * Uploaded new images showing how to support the LED_holder_Tip when printing. * Expanded the "Plants & & Other Progress Updates" section. 01/17/2023 * Uploaded new images showing the 6 grow lights configuration. * Some minor changes on the project description to reflect the current progress. 01/18/2023 * Uploaded IKEA_Muskot_24cm_Lid.STL (IKEA Muskot pot lid as a single piece). 01/26/2023 * Uploaded LED_Holder_Arm_Solid.STL in case people want to choose a different infill pattern. * Uploaded LED_Holder_Arm_Flat.STL in case people need to mount the LED holder away from the lid's edge. 02/06/2023 * Uploaded Tag_Holder_V3.STL to tag plants. 02/11/2023 * Uploaded improved base 40mm section with improved filtration (Filtration_Mesh_Holder_Base.STL & Module_Spacer_40mm_Base.STL). * Uploaded adjustable LED grow light stabilizer (LED_Stabilizer_Arm_Root.STL & LED_Stabilizer_Arm_Claw.STL). * Uploaded Adjustable LED grow light arm, so the distance to the plants can be adjusted as they grow. * Uploaded new diagrams to show assembly of new uploads. * Misc. changes in the project description. 02/14/2023 * Temporarily removed the Dispenser_Module_Internal_LED.STL due to problems with the alignment. 02/16/2023 * Minor modifications to a few .STL files. * Uploaded LED_Holder_Tip_Reverse.STL in case the grow lights plug is reversed (check your lights first). 02/23/2023 * Reuploaded Dispenser_Module_Internal_LED_V2.STL. Now the orientation can be adjusted for any tower configuration so the LED stabilizer arms can always be aligned with the LED grow lights as needed. * Uploaded misc. pictures showing updates. * Replaced the filtration mesh with a finer one. The previous one was too coarse and the roots managed to get through and into the reservoir. The new one is fine enough to prevent that. 05/22/2023 * Added a Maintenance section * Expanded the Plants & Other Progress Updates section * Expanded Tower Assembly section
With this file you will be able to print Modular Hydroponics Tower w/ Grow Lights with your 3D printer. Click on the button and save the file on your computer to work, edit or customize your design. You can also find more 3D designs for printers on Modular Hydroponics Tower w/ Grow Lights.