Modular Oculus Rift Sensor Mounts
pinshape
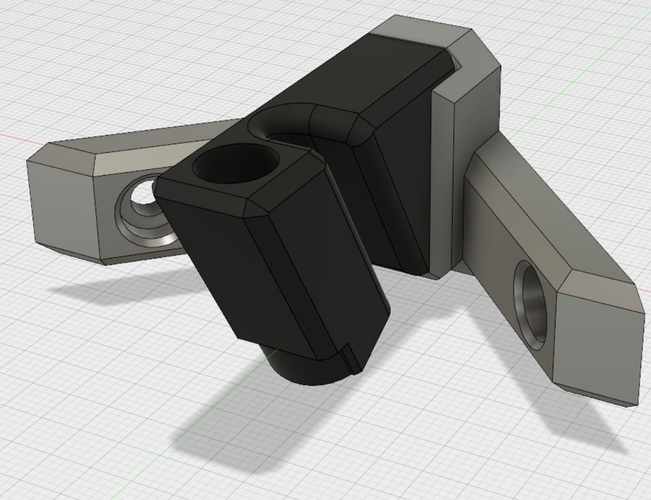
These modular mounts allow you to wall-mount your Oculus Rift sensors with precision. A Sensor Holder secures the sensor firmly in place, guiding the cable towards the wall with ease. You can then mount it using one of three types of mounts: Corner Mount for mounting a sensor at a 90-degree angle between two walls, Flat Mount for mounting a sensor perpendicular to a single wall, or Angled Mount for mounting a sensor at a 45-degree angle to a single wall. I've included the Fusion 360 archive file as well, if you need to adjust any of the parameters. Print Settings: Printer: XYZ Printing da Vinci Mini W Rafts: No Supports: No Resolution: 0.2mm Infill: 10% Notes: Sensor Holders should be printed upside down with the long, thin edge against the print bed. All parts print well without raft or support. Post-Printing: Ensuring a Good Fit You may need to clean up your parts slightly to ensure they fit together smoothly. Using an sharp hobby knife, remove any burrs or edges inside the joint socket. I've found this makes it much easier to separate the parts after assembly. The tolerance on the models is set quite high, as my printer isn't particularly accurate. So you shouldn't have much difficulty. However, if they just won't print properly, you can try editing the joint_tolerance parameter in the Fusion 360 file to give it a bit more "wiggle room". How I Designed This These mounts were designed completely in Fusion 360 using parametric modeling. First, I designed the sensor holder as one component. Then I designed a socket which would connect the sensor holder to the various mounts. Each mount was then created as another component based on the mounting socket. Mounting Instructions Required Hardware: Hangers can be secured to the wall with #8-10 x 1 in drywall anchors and screws. You can get these via Home Depot. Alternatively, you can try using small Command strips instead of screws. Those can also be purchased from Home Depot. Installing the Mounts These instructions assume you are using drywall anchors and screws. If using Command strips or wood screws, make adjustments as necessary. Decide where you want your sensors to be. I personally recommend the 3-corner mounting setup as recommended in this blog from Oculus. Alternatively, if your room isn't suitable for this, you can mount sensors to flat walls either perpendicular or at a 45-degree angle, depending on your needs. Print the required mount For each sensor, print a Sensor Holder. To mount a sensor in the corner of a room, print a Corner Mount. To mount a sensor perpendicular to a wall, print a Flat Mount. To mount a sensor at a 45-degree angle to a wall, print an Angled Mount. Measure the height I recommend 7-8 ft off the floor, depending on the height of your ceiling. Make sure to leave a few inches above the mount in order to connect the sensor holder. Measure the height you want and mark it with a pencil. Pre-drill the holes If you purchased anchors and screws, the package should list which size drill bit to use. Otherwise, use your best judgement given your choice of mounting hardware. Place your selected mount against the wall with the pencil mark as your guide. Holding the mount firmly in place, pre-drill holes for your screws using the holes in the mount as a guide. Insert the drywall anchors Set the mount aside for now. Insert the anchors into the hole you drilled. Gently tap it fully into place, being careful not to damage it. If it refuses to go in without bending or crushing, you can drill out the hole slightly larger. Mount the hanger Place the mount against the wall with the holes lined up with the holes in the anchors. Drive the screws into place, being careful to tighten them down evenly on both sides. Assemble the sensor mount Unscrew the Oculus sensor from the default stand. Insert the stem of the sensor into the hole at the front of the sensor holder. It should be a snug fit, but not require much force. Insert the sensor cable into the guide on the side of the sensor holder. Optionally, secure the sensor to the sensor holder using a 1/4-20 x 3/4 in screw. Hang the sensor Slide the sensor holder into the socket in the hanger mount. It should be very snug and fit securely. Repeat for each sensor Run sensor calibration. Enjoy VR!
With this file you will be able to print Modular Oculus Rift Sensor Mounts with your 3D printer. Click on the button and save the file on your computer to work, edit or customize your design. You can also find more 3D designs for printers on Modular Oculus Rift Sensor Mounts.