Modular Prototyping Holder
thingiverse
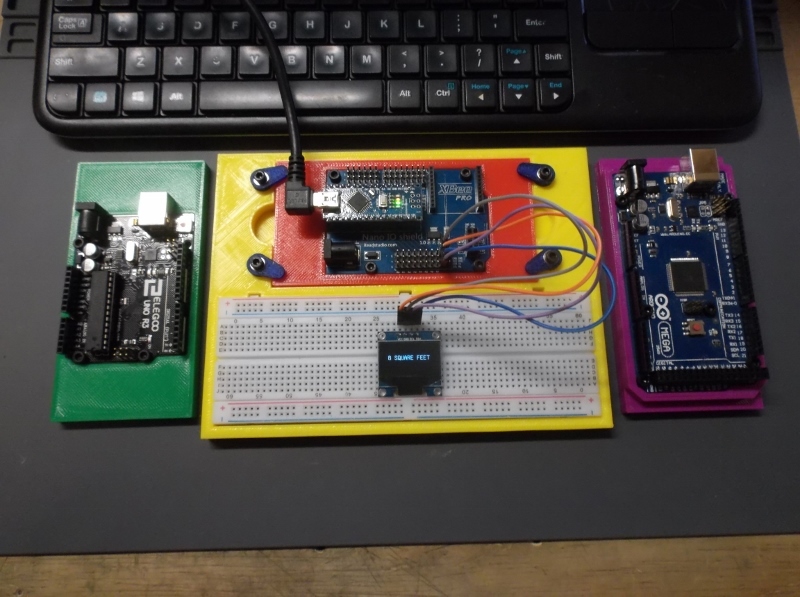
Modular Prototyping Board Holder. When prototyping a new project, I switch between different sized Arduino boards quite often. While I like using a normal breadboard, sometimes keeping everything together and stable can be a pain. Just attaching a USB cable can cause these lightweight boards to twist and turn. I thought about purchasing a breadboard / board holder, but they don't really lend themselves to quickly switching the boards out. And they don't allow for mounting some things, like the IO breakout board for the Nano. So I came up with my own design. The base of the system allows a standard 830 point breadboard to be permanently mounted (using the sticky tape that normally comes on them), and then a modular board holder to be clamped to the board with simple toggle clamps. The board holder has a standard outside dimension, but is custom fit for each board. You can print a single base unit, and then as many different board holders as needed for each type of board that you have. I currently have board mounts for the these Arduino boards: Nano IO Breakout Board UNO MEGA2560 I am using this breakout board for the Nano: https://www.itead.cc/itead-arduino-nano-io-shield.html I am waiting on a some Raspberry Pi stuff. As soon as that comes arrives I'll make holders for those as well The dimensions for the boards are taken directly from the manufacturer, and I've built in some extra clearance around them. But even then, boards may vary depending on how cleanly they were separated from each other. You may have to lightly sand the edges to remove any burrs, etc. ASSEMBLY: All hardware is 3mm. Main Base: 1 each : MPS_Base.stl 4 each : Toggle_Clamp.stl or Toggle_Clamp_v2.stl (Version 2 of the clamp does not have a recess for the washers) 4 each : 3mm X 8mm Cap Screws 4 each : 3mm X 7mm Flat Washer (omit for TC_v2) Attach the Toggle Clamps to the board with the cap screws. Leave them loose to begin with. Insert a board holder into the base. Rotate the clamps over the edge of the board holder and tighten the cap screws until you have a small amount of friction. Don't over-tighten them. You want enough friction to hold the board, but still be able to move the clamps. Board Holders: Print out a board holder for each of the boards you want to use with the base. Attach the board to the holder with cap screws. Each of the holders has a mounting boss for each of the holes in the board, but you might not be able to use all of them (pin headers or trace clearance issues). All of the mounting bosses are at least 6mm deep, so a 5 or 6mm screw should work. Again, don't over-tighten the screws. We're just trying to hold the board to the holder. Use: 1. Place desired board/holder into the base. 2. Prototype!
With this file you will be able to print Modular Prototyping Holder with your 3D printer. Click on the button and save the file on your computer to work, edit or customize your design. You can also find more 3D designs for printers on Modular Prototyping Holder.