Modular Tool Racks for Elfa Utility Board
thingiverse
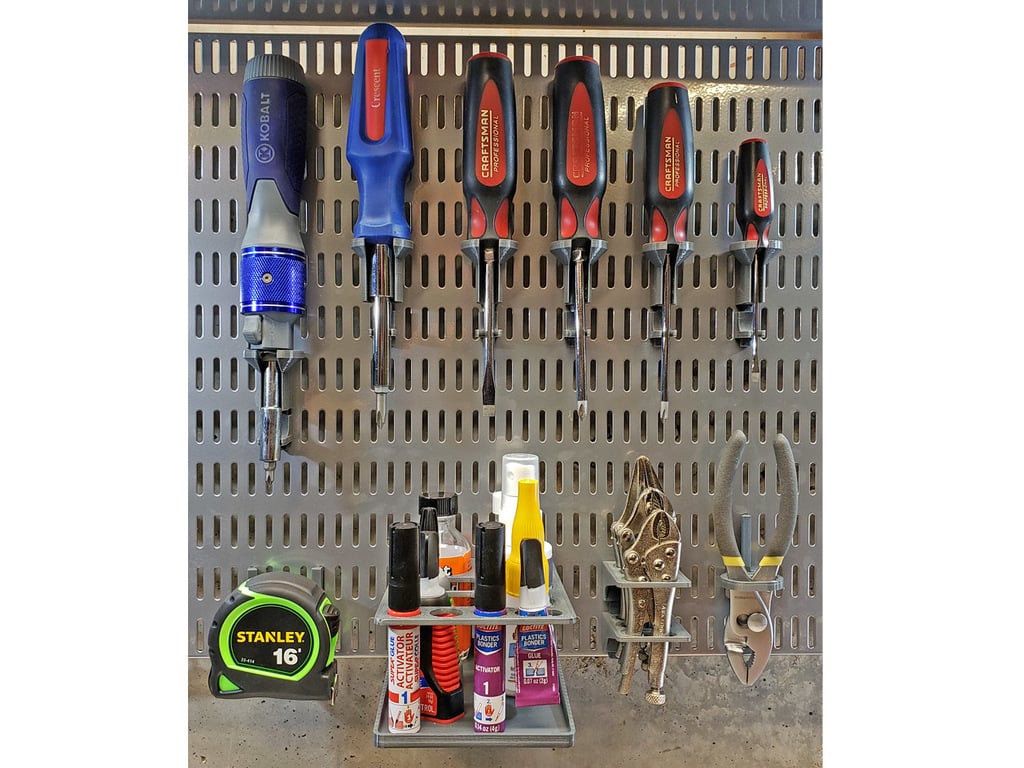
This versatile system enables adaptable racks, loops, and compact shelves for the "[Elfa Utility Board](https://www.containerstore.com/s/elfa/components/elfa-utility/platinum-elfa-utility-board-wall-mounts/123d?productId=10034901)" pegboard system. It utilizes the Elfa spring-clip locking hook design I used in my "[Elfa Utility Board Hooks-Brackets](https://www.thingiverse.com/thing:4012290)" series, but this modular design separates the spring clip part from the loops and racks for easy 3D printing and strength in the clip. This separation allows flexible arrangements like multiple clips per part for strength and larger complex racks, as well as vertical tool support (multiple loops on the same peg clip). ## Modular Assembly To assemble any component, at least one spring clip must be printed for mounting in the slotted utility board. The triangular bar facing outside is used for mounting the loops and racks. For wider or stronger parts, two reciprocal clips must be printed - see the *ElfaModuleClip-Pair* for both the needed mirrored clips. This spring-clip design clips securely straight into the board, yet is easily removed by lifting up on the clip and pulling out from the bottom. The loops (round or oval) and rack shelves are printed flat side down, so no supports are needed. The support legs of these parts slide over the top of the spring clip(s). Such loops and racks can be attached to the clips in various combinations, at the bottom, top, or middle of the clip, as needed. See the photo of the 3 round loops with the screwdriver for an "extreme" example of stacking positions each of the possible parts (normally only one or two positions are needed). ## Top, Middle, and Bottom Positions **Top Components** (with "Top" at the end of the file name) have a "plug" at the top of the clip slot, so they always stay at the top of the clip. You can optionally insert a middle and/or a bottom component below the top component, depending on your needs. **Middle Components** (with "Mid" at the end of the file name) can slide anywhere down on the clip. If combined with a bottom component, its position is determined by the height of the bottom component; otherwise, it will rest on the clip's bottom stop. **Bottom Components** (with "Bot" at the end of the file name) rest on the bottom stop of the clip. They can be combined with either a top or middle component, as needed. ## Updates 2/2/2020 - Added Tape Measure & Screwdriver Holders ## Specialty Components **Screwdriver Holder** - The slotted design of these holders (*ElfaModuleScrewdriver-...*) is intended to improve on the standard simple "loops" commonly used for screwdrivers. Less vertical pegboard space is needed, since you do not have to lift the screwdriver straight up out of a loop. The cupped top "self-centers" the screwdriver, and keeps the handle from sliding out from the bracket. The vertical slot keeps the screwdriver from tipping left or right, but you can easily pull the screwdriver straight out from the board without much lifting space. Usually only the top (or middle) component is needed, but I've also included bottom slots or loops if required. Three sizes are included: *Large* - ("**Lg**" near the end of the file name) for larger multi-blade or ratcheting screwdrivers. *Standard* - ("**Std**" near the end of the file name) for medium/normal screwdrivers. *Small* - ("**Sm**" near the end of the file name) for smaller screwdrivers. **Tape Measure Holder** - This bracket (*ElfaModuleTapeMeasure.stl*) is intended for tape measures that include a belt clip on the back. It will hold many brands of tapes with a belt clip up to about 25mm (1 inch) wide. A pair of board clips (*ElfaModuleClip-Pair.stl*) are needed for mounting. ## Source Files for Customization Source CAD files are provided for your own easy customization, using *FreeCAD*. Instructions are below if you want to try your hand at customizing these hooks for your own specific needs. Even if you don't have or desire any CAD experience, it is relatively easy to create some interesting variations with simple numeric edits (details in the "How I Designed This" section below). If you do try a remix, please link it here - I'd be interested in seeing pegboard organization ideas from other people!
With this file you will be able to print Modular Tool Racks for Elfa Utility Board with your 3D printer. Click on the button and save the file on your computer to work, edit or customize your design. You can also find more 3D designs for printers on Modular Tool Racks for Elfa Utility Board.