Moebius Gears Half Size
thingiverse
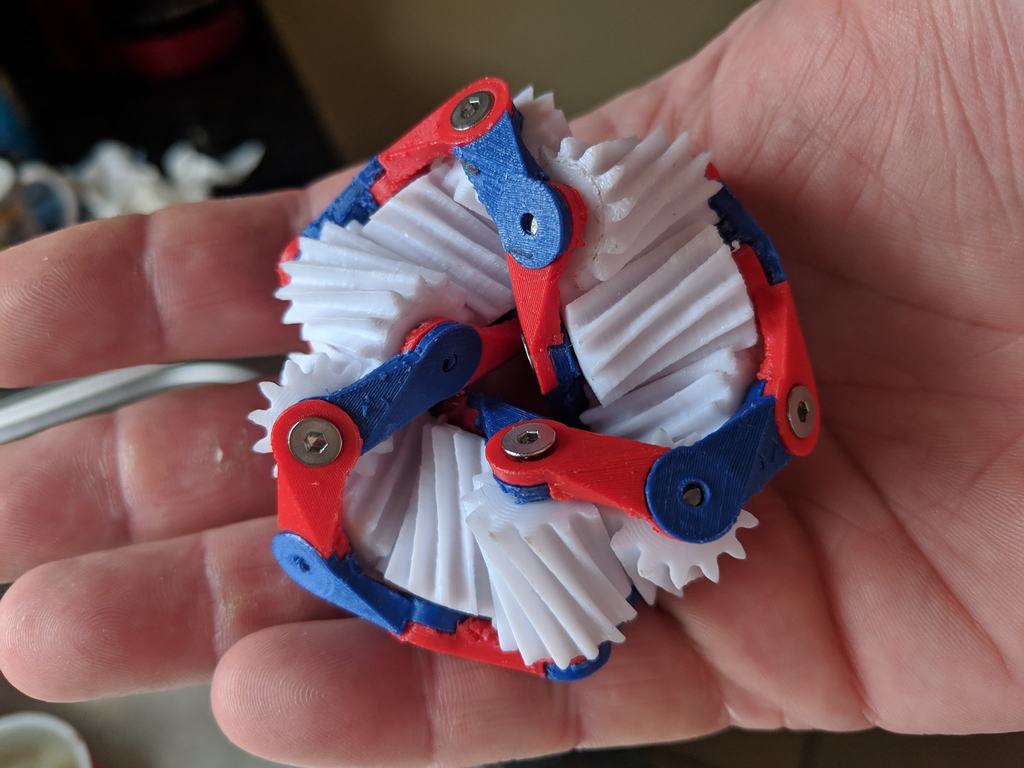
This is Blake Courter's Moebius Gears at half size. You can see the initial thinking and development behind the Moebius Gears at Blake's blog page here: https://blog.grabcad.com/blog/2014/10/14/mobius-gears/ This remix is simply a half-sized version of his Moebius gears v4. https://grabcad.com/library/mobius-v4-m6-with-bearings-1 Additional hardware needed to complete the build are eleven M3x30 screws with countersunk heads, and twenty-two 3x6x2mm ball bearings (Traxxas 6642 or equivalent). The bearings are by far the most expensive part of the build, and I was able to get them for as little as 78 cents each, which for 22 of them works out to $17.16. The ball bearings press-fit into the ends of the gears. No nuts are required for this version as I have chosen the arms that you screw into. No tapping of the threads is required for this version, just screw the M3 screws into the plastic. I was not able to use the nut version of the arm for this half-sized version because standard M3 nuts are 5.5mm across and the build would require specially purchased 5mm nuts. I have also chosen the gears with a -0.2mm offset so they spin better. Other gears are available from Blake's page. I used 0.1mm layer height to print all parts. The gears in particular need to be precise as possible, because the fine teeth of these small gears require fine tolerances. You will need to print all parts with supports as they all have overhangs. The gears have near-horizontal overhangs at the bottom and inside the bearing area. Make sure to remove the support inside the bearing area before press-fitting the bearing on that end. The arms are an odd shape, and it is better that the underside be rough from the supports than the top. Removing the supports from the arms can be difficult due to their small size. A pair of side cutters is useful for removal and trimming of the arms. They don't need to be absolutely perfect as the surfaces will wear-in and remove any unwanted roughness. To assemble, press-fit bearings into each end of the gears. Then alternate the arm types at each end of the gears and put a screw through and screw into the plastic of the arm at the other end. Repeat until you have 11 gears in a Moebius. Some wear-in of the arms and gears will be needed at first to remove the rough edges from supports and printing imperfections. If you want to print the full-sized version, go to Blake's page and download the plans. Use the -0.2 offset gears to start with. https://www.youtube.com/watch?v=tNEJX74onD8 Update, July 19, 2019: Gear_-0.20 has now been re-uploaded at the correct scale. Somehow it had been converted from mm to inches and appeared 17 inches across. The gear should now be about 17mm in diameter.
With this file you will be able to print Moebius Gears Half Size with your 3D printer. Click on the button and save the file on your computer to work, edit or customize your design. You can also find more 3D designs for printers on Moebius Gears Half Size.