Monoprice Maker Select Plus LED Clips
thingiverse
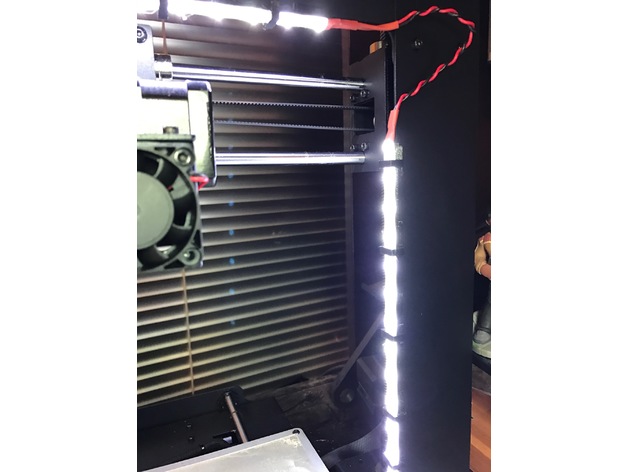
Here is the rewritten text with improved readability: This modification allows for better lighting while the OCTOPI is on, and it's incredibly simple to set up. I completed it in just two hours. The base of the clip opening matches the width of the frame exactly, but tapers down to a smaller size as you get closer to the tips. Updated: 3/16/17 I noticed a slight give from the adhesive on the strips, so I added new clips to keep them in place. Now it's a snug fit! https://youtu.be/WmGBaHgJat4 Print Settings: Printer Brand: Wanhao Printer Model: Wanhao Duplicator i3 Plus Rafts: No Supports: No Resolution: 0.2mm Infill: 15% Notes: If you print this with a raft, it will warp - at least it did on my printer. Print Details: XT (extruder temperature): 245°C BD (bed temperature): 70°C Material: PETG Fan Speed: 100% Overview and Background The project requires the following components: 3528smd LEDs with a 5V power supply USB Cable Soldering Iron Solder For each strip, I used approximately 13 LEDs per side (three in total) and cut them right in the middle of the copper pads. I removed the resin covering the pads and soldered wires about three to four inches long. Next, I removed the 3M sticky cover and placed the strips onto the printed clips. Finally, clip them on and enjoy! Lesson Plan and Activity You'll need a basic understanding of soldering, but don't worry if you're new - it's easy to learn. Check out this tutorial for a basic guide: https://www.youtube.com/watch?v=BLfXXRfRIzY Materials Needed: I used PETG and a prewired 5V LED strip from Amazon (https://www.amazon.com/gp/product/B015R87GQK/ref=oh_aui_detailpage_o03_s00?ie=UTF8&psc=1).
With this file you will be able to print Monoprice Maker Select Plus LED Clips with your 3D printer. Click on the button and save the file on your computer to work, edit or customize your design. You can also find more 3D designs for printers on Monoprice Maker Select Plus LED Clips.