Monoprice Select Mini E3Dv6 Zero Offset Mount

Monoprice Select Mini E3Dv6 Zero Offset Mount

thingiverse

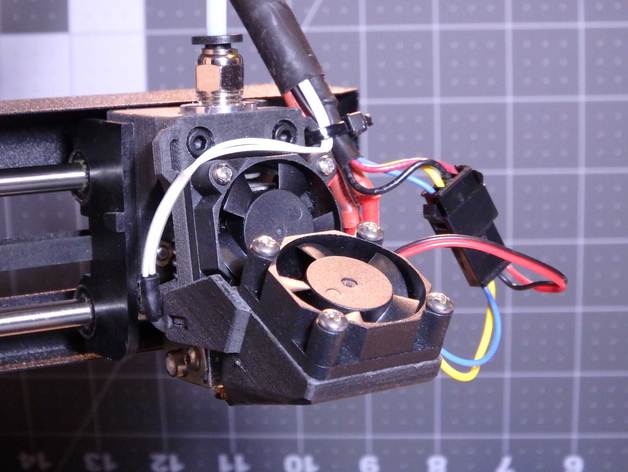
This collection of things combines to form a E3Dv6 Hotend mount for the Monoprice Select Mini (Malyan M200) 3D Printer. These parts were created as part of our ongoing project to maximize the performance of the Monoprice Select Mini Printer. You can read about our other mods on our Hackaday.io page located here: https://hackaday.io/project/14823-monoprice-select-mini-maximum-3d-printer-mods The differences between this mounting adapter and others you may have seen are: 1) The nozzle XY position is almost exactly the same as the stock nozzle, so you don't lose any of the useful print area of the hated bed. 2) The nozzle Z height is almost exactly the same (depending on how you adjust the heat break) as the stock nozzle, so you don't lose adjustment range of the bed leveling screws. 3) The mounting bracket has an integrated belt tensioner feature, which eliminates the stock spring clips. 4) The hot end cooling fan airflow is dedicated to cooling the hot end only, and is isolated from the printed part. This reduces warping and layer separation of ABS and exotic filaments like Polycarbonate. 5) A removable (with no tools) clip on part cooling fan can be installed for PLA and other filaments which require rapid cooling for overhangs and bridges. 6) Dual LED lights are integrated into the part cooling fan, to illuminate the printed part. Print Settings Printer: Monoprice Select Mini Rafts: No Supports: Doesn't Matter Resolution: 0.1mm Layers Infill: 1mm walls, 30% infill. Notes: Note: I printed this in ABS and in PETG and ultimately printed in Carbon Fiber filled ABS because it closely resembled the glass filled nylon parts of the stock printer. PLA will probably not work for this application because it will be close to hot parts. All parts are designed to be printed as oriented in the STL files with no support needed. In some cases, you can enable support if the overhangs are too steep for your printer to print to your satisfaction. It's up to you. Post-Printing Insall two M3 nuts in the bracket. Inserting the clamping nuts You will need to insert M3 nuts into the hexagonal channels in the rear of the bracket. They should snap into the bottom of the channels when the screws are tightened and should not fall out. Remove the factory hot-end and bracket. Preparing the printer To install the adapter, you will need to remove the factory hot-end. To do this you must remove the metal shroud that covers the gantry. Screws on each end hold this in place, Next, you should remove the clips holding the fan to the hot end and then remove the two screws holding the heatsink to the carriage. Save the screws and nuts as they are used on the new bracket. The belt tensioning feature Using the belt tensioning feature Before inserting the bracket in the carriage, you must connect the belt to the belt tension feature on the back of the bracket. To do this, you need to loosen the belt by removing the screw from the end of the gantry that holds the pulley in the end. You should also remove any belt tensioners on the belt. Then you can loop the belt over the bracket and slide the bracket into the carriage. Reassemble the gantry Reassembling the printer. You can now reassemble the printer in the reverse order in which you took it apart. Put the pulley back into the end of the gantry and screw it back into place. Do not over tighten the screw, it strips easily. Note: there is no guide to align the pulley so you need to make sure that it is parallel to the other pulley and rotate it until it is aligned. Fasten the bracket to the carriage using the screws and nuts from the stock hot end. You can also put the metal shroud back over the gantry, or leave it off if you like (it can make the printer noisy because it rattles). Installinmg the E3Dv6 Install the E3Dv6 hot end The cooling fan mount for cooling the hot end doubles as the mounting clamp for the groove mount. Slide the hot end through the hole in the base of the clamp and then attach it to the bracket on the carriage using M3 cap screws. I believe 13mm screws will work best here. Any longer and they will probably bottom out against the carriage. For my printer, I transplanted the heater cartridge and the thermistor from the factory stock hot end to the E3Dv6, so I would not have compatibility issues with the firmware. Install the hot end cooling fan Installing the Hot End cooling fan. The stock hot end cooling fan was transplanted to the new bracket. The hot end cooling fan should run while the hot end is hot, to prevent jams from forming above the heat break. The best way to insure this is to have the fan enabled all the time by the control board. Unfortunately, the Mini does not have a separate fan output for the hot end, so connecting the fan to 12V so it runs when the printer is on is the only option. The optional part cooling fan really needs to be speed controlled for the best prints, so the single fan output on the Mini will be connected to the part cooling fan. Hot end LEDs Lighting the Hot End with LEDs A pair of 3mm white LEDs are used in the optional part cooling fan bracket. I used some white LEDs I had laying around and put 1K resistors in series with each for current limiting. These will connect to the 12V in parallel to the hot end heatsink fan. When the hot end fan is on, the LEDs will be on. I insulted the leads and the resistors with some heat shrink tubing. LEDs installed in fan bracket. Install the LEDs in the part cooling fan bracket. The part cooling fan has holes where the 3mm LEDs will mount. They snap in place and a dab of hot glue holds them from backing out. The slot in the right edge of the bracket under where the fan mounts is provided so the LED wires have a way to escape and connect to power. Part Fan installation shown here. Installing the fan in the part cooling fan bracket. The part cooling fan mounts to the bracket covering the LEDs. I used a 4 position JST type connector so that I can remove the part cooling fan bracket when not needed. I wired this to the connector on the controller board which was formerly the single fan output on the board. This was because the firmware has control of this fan, and the speed of this fan can be configured by a slicer so it is only on when needed and off when part cooling is undesirable. The Zero Offset E3Dv6 Mount installed and wired. The part cooling fan installed. Install the Part Cooling Fan on the Hot End The last thing to do is clip the part cooling onto the E3Dv6 mount. There are two tabs on the sides of the hot end mount that mate with the slots on either side of the part cooling fan bracket. The JST connector is then used to provide the power to the part cooling fan and the LEDs. If you're using ABS or don't otherwise need the part cooling fan, you can remove it completely by sliding it off and setting it aside. This is also useful for cleaning the nozzle or doing maintenance on the hot and. When you want to use the part cooling fan again, you can snap it back on. Here's a short video clip of the Zero Offset E3Dv6 Hot End Mount in action

Download Model from thingiverse

With this file you will be able to print Monoprice Select Mini E3Dv6 Zero Offset Mount with your 3D printer. Click on the button and save the file on your computer to work, edit or customize your design. You can also find more 3D designs for printers on Monoprice Select Mini E3Dv6 Zero Offset Mount.