Monoprice Select Mini V1 upgrade for E3D-V6 HotEnd
thingiverse
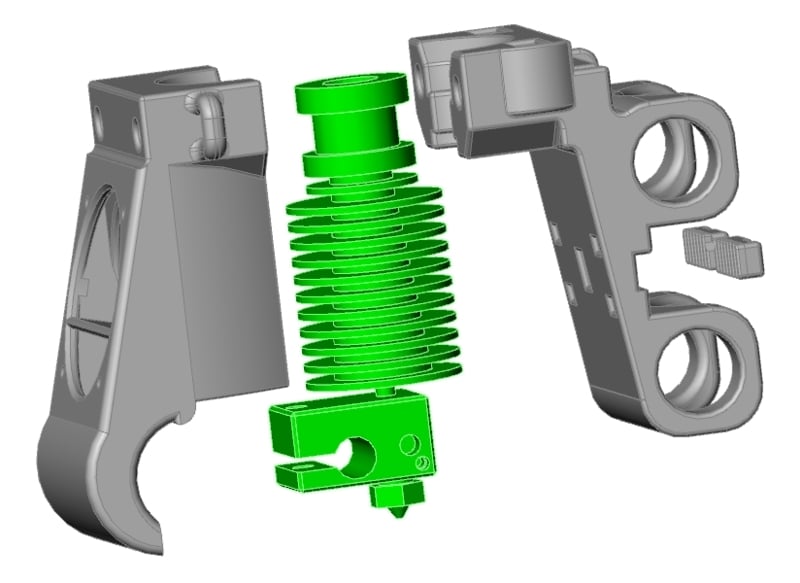
The text appears to be a detailed account of modifications made to an E3D-V6 hot-end assembly on a Monoprice Maker Select V1 3D printer. The writer has made several upgrades, including: * Installing a custom-designed fan holder for improved cooling * Using a belt lock and zips ties to secure the assembly in place * Adding a spacer clip-on shim for 3mm Borosilicate Glass sheet with cropped corners * Uploading STEP & STL files for a mating block that clamps the top of the E3D-V6 * Using heatsink paste on the heater cartridge and thermistor for improved heat transfer The writer also discusses their experience with a glass bed, including installing it and realizing that the aluminum bed was bent. They removed the bend by flexing the bed while still wired. Overall, the modifications made to the E3D-V6 hot-end assembly seem to have improved the performance of the printer, making it easier to service and use. Some notable points from the text include: * The writer used a belt lock and zips ties to secure the assembly in place, which means that the assembly will never move its position on the belt. * The spacer clip-on shim for 3mm Borosilicate Glass sheet with cropped corners is designed to provide level screw access and has a total offset of 3.5mm (0.1367"). * The writer used heatsink paste on the heater cartridge and thermistor, which helps with heat transfer and ensures that the thermistor reads dead on. * The writer had to remove the rear column cover to install the clip-on shim. * The writer used a straight edge steel-ruler diagonal from corner to corner to check for bend in the aluminum bed and was able to remove the bend by flexing it while still wired. * The writer suggests using a custom cut 3/16 aluminum bed with longer corner screws and heat sink paste to solve the issue of the bent bed. Overall, the text provides a detailed account of the modifications made to an E3D-V6 hot-end assembly on a Monoprice Maker Select V1 3D printer.
With this file you will be able to print Monoprice Select Mini V1 upgrade for E3D-V6 HotEnd with your 3D printer. Click on the button and save the file on your computer to work, edit or customize your design. You can also find more 3D designs for printers on Monoprice Select Mini V1 upgrade for E3D-V6 HotEnd.