Monster Kossel v3.1
prusaprinters
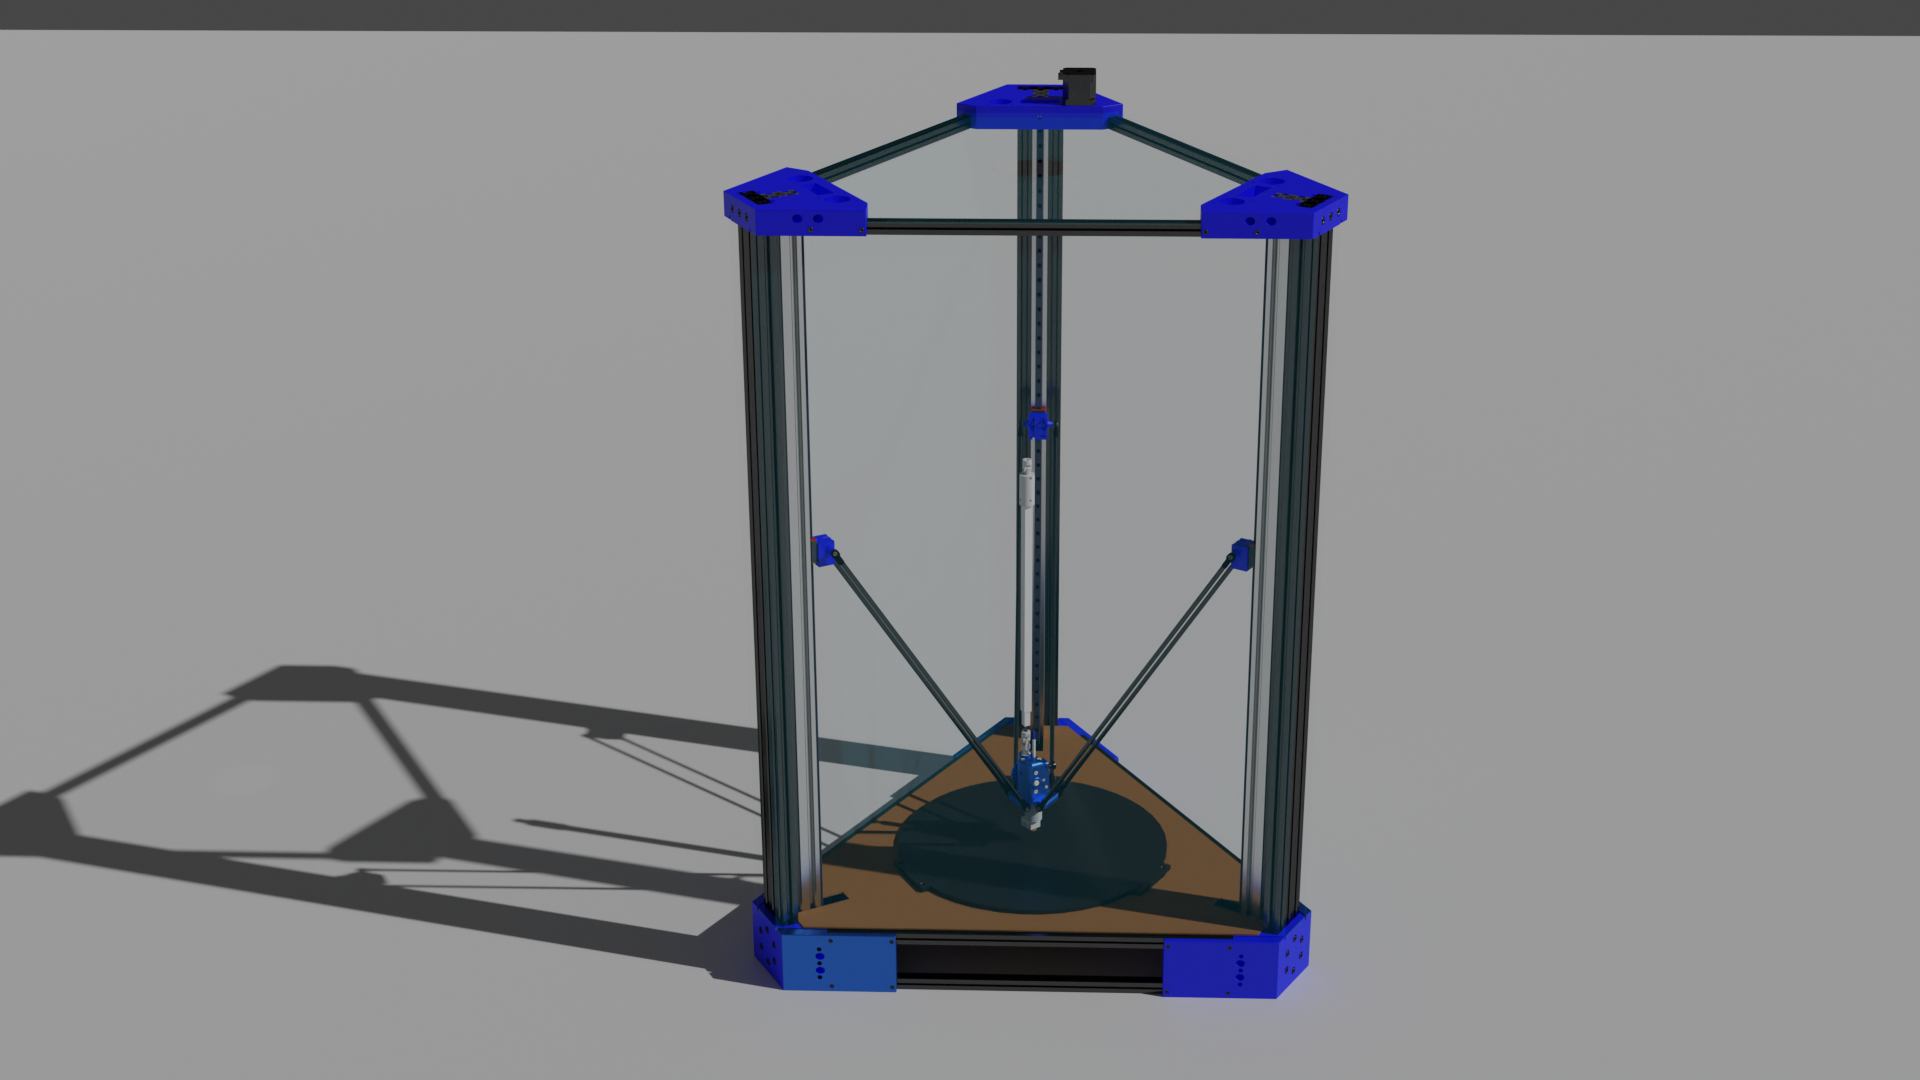
<h3>Update 17-Jun-2022:</h3><p>Added updated renders, not because the machines aren't built (see photos), but because I can't get clean shots of them, they're always busy!</p><p>Added an insulation layer file, along with the bed STEP file. Both the insulation and the bed shape are designed around a 350mm diameter bed. </p><p>Rod length is then between 45 and 50cm (choose one and cut all rods to the same length within +/-0.1mm or less). </p><p>Vertical extrusions and rails can be as long as you want. You lose about 30mm from the top frame, and we found that a 1000mm rail gave all the motion range needed for a 1.5m tall build. </p><p>If you use 1m vertical extrusions, you get ~ 440mm vertical build volume. If you go to 1.5m you get roughly 800-830mm vertical build volume. The 15x15mm side extrusions are calibrated to 500mm length, which should be easy to source. But make sure they all match, and that they're close. Otherwise the bed holes will not fit with the motor frame's.</p><h3>Monster Kossel: v3.1</h3><p>A Kossel-inspired Delta printer with:</p><ul><li>large build volume</li><li>an incredibly stiff frame</li><li>an easily fully enclosed build volume</li><li>piezo-based bed probing (Andromeda layout from precisionpiezo.co.uk)</li><li>easy to tune / upgrade setups</li><li>M3 and M5 screws only</li></ul><figure class="image"><img src="https://media.printables.com/media/prints/202167/rich_content/06a2d8ba-917f-4967-9f71-fce34378707e/whole_assembly_view.png#%7B%22uuid%22%3A%2282459890-a4b8-4a68-9af3-00c51a8eb969%22%2C%22w%22%3A1920%2C%22h%22%3A1080%7D"></figure><figure class="image"><img src="https://media.printables.com/media/prints/202167/rich_content/9921296e-12b1-4dc7-8918-d97c721274d4/carriage_detail.png#%7B%22uuid%22%3A%22ebd574bc-abf8-4c69-896a-c077c7b7d698%22%2C%22w%22%3A1920%2C%22h%22%3A1080%7D"></figure><figure class="image"><img src="https://media.printables.com/media/prints/202167/rich_content/c70b769b-c8c2-4a12-b8a2-00ef3c1c3f2f/lower_frame_assembled.png#%7B%22uuid%22%3A%22a401874f-a3e2-4b96-aa6a-452b30a5e9a0%22%2C%22w%22%3A1920%2C%22h%22%3A1080%7D"></figure><figure class="image"><img src="https://media.printables.com/media/prints/202167/rich_content/a3fcf193-0c40-4d05-8ed5-f1bd0621a78b/top_corner_motor_zoom.png#%7B%22uuid%22%3A%22d210d504-6117-4130-ab54-7713bcd960e5%22%2C%22w%22%3A1920%2C%22h%22%3A1080%7D"></figure><figure class="image"><img src="https://media.printables.com/media/prints/202167/rich_content/86669187-3a36-4714-982c-a723cf8b73d4/top_frame_assembly.png#%7B%22uuid%22%3A%22cc50c99d-3a5c-4254-8279-7bb7f4facc0b%22%2C%22w%22%3A1920%2C%22h%22%3A1080%7D"></figure><p>Design history:</p><p>V1 started with my taking a Kossel XL idea but noticing the OpenBeam frames just weren't rigid enough. I tweaked the STL files with Blender to use 2040 towers instead. It was better... But still a bit wobbly.</p><p>V2 was still done with Blender but introduced the T-based towers using 2060 and 2040 extrusions for the maximum possible rigidity. It also introduced the concept of the fully enclosed build volume.</p><p>It became the test bed for a series of remote drive extruder designs by Dan Cook, which are proving to be incredibly reliable. The latest iteration of which is a mix of extruder and effector design for Kossel sized rod widths. It's proven to handle flexibles as good as a Prusa MK3's stock extruder, if not better.</p><p>V3, shared here, is an ongoing effort to properly draw and design a revision of V2 in a proper CAD format. The aim is to further enhance the experience by incorporating many lessons learned with regards to cable management. It is currently being drawn and assembled in FreeCAD 0.19_pre release, using the Assembly4 plugin.</p><p> </p><p>Assembly file(s)</p><p>The main assembly file is <code>MonsterKossel_assembly.FCStd</code>, made for the <code>Assembly3</code> workbench that you can find from the <a href="https://github.com/realthunder/FreeCAD_assembly3/releases">Linkstage3</a> branch of FreeCAD.</p><p>The other workbench that is required is the <code>Fasteners</code> workbench, to include all the screws & nuts into the assembly.</p><p> </p><p>Current development status</p><p>The main frame of V3 has not yet been fully tested in real life, and the CAD design is undergoing multiple improvements as the tests continue. However at this stage the mechanics are considered solid and the dimensions will not change significantly. Any further improvements will be to improve assembly, printability or esthetics.</p><p>Dan Cook has released his all in one effector / direct drive extruder on <a href="https://www.thingiverse.com/thing:4886240/files">Thingiverse</a>, including the telescoping shaft of my conception.</p><p>Carriages have been redrawn as the original Kossel carriages designed for the MGN19H carriage pattern don't have enough rigidity when using an adapter plate.</p><p>All parts will are printed in PETG rather than PLA for heat resistance. ABS, PCTG, PC are all possible options for the printed parts to be used. Avoid Nylons and other more flexible materials, as the parts need to be as rigid as possible to maintain dimensional stability of the assembled printer.</p><p>The top cover will come in two versions: one as a blank template for builders to customize the layout of elements on their own, the other as I intend to build it, using 100mm (a little under 4" diameter, standard in Europe) AC extraction ventilation systems with filters, wiring and filament paths etc.</p><h3> </h3><h3>BOM</h3><h4> </h4><h4>Printed parts:</h4><p>Best rigidity achieved using PETG or similar flexibility of material, with 1 or 1.2mm thick walls, and 20% infill, and 0.2 or 0.3 layer height. Avoid PLA at least for the motor frames to avoid heat-induced deformation over time.</p><ul><li>bottom corner: 3x</li></ul><p><img src="https://github.com/goeland86/MonsterKossel/raw/master/images/bottom_corner.png" alt="Bottom corner"></p><ul><li>motor frame: 3x (print upside down, flip 180 degrees along x or y in your slicer)</li></ul><p><img src="https://github.com/goeland86/MonsterKossel/raw/master/images/motor_frame.png" alt="Motor frame"></p><ul><li>top corner: 3x</li></ul><p><img src="https://github.com/goeland86/MonsterKossel/raw/master/images/top_corner.png" alt="Top corner"></p><ul><li>carriage belt tensioner: 3x</li></ul><p><img src="https://github.com/goeland86/MonsterKossel/raw/master/images/carriage_belt_tensioner.png" alt="carriage belt tensioner"></p><ul><li>mgn9c carriage: 3x</li></ul><p><img src="https://github.com/goeland86/MonsterKossel/raw/master/images/carriage.png" alt="carriage"></p><ul><li>extruder parts (all are x1, printed with finer layer height is better):<ul><li>18T bevel</li><li>6T bevel</li><li>Body top</li><li>Delta effector</li><li>Latch</li><li>Main body center</li><li>Main body left</li><li>Main body right</li></ul></li></ul><p><img src="https://github.com/goeland86/MonsterKossel/raw/master/images/extruder.png" alt="extruder"></p><p>OPTIONAL</p><ul><li>base corner holder 6x (recommend in flexible material to dampen vibrations, to hold the printer properly in place on a plate/table).</li></ul><p><img src="https://github.com/goeland86/MonsterKossel/raw/master/images/base_corner.png" alt="base corner"></p><ul><li>CPAP-fan-diffuser 1x (to bring in part cooling air from an outside fan blowing cold air onto the part, recommend PETG/high temp material)</li></ul><p><img src="https://github.com/goeland86/MonsterKossel/raw/master/images/fan_diffuser.png" alt="fan diffuser"></p><p>If using an E3D watercooling kit for the hotend:</p><ul><li>Watercooling-pump-bracket-bottom x1</li></ul><p><img src="https://github.com/goeland86/MonsterKossel/raw/master/images/water_bracket_bottom.png" alt="watercooling bracket bottom"></p><ul><li>Watercooling-pump-bracket-top x1</li></ul><p><img src="https://github.com/goeland86/MonsterKossel/raw/master/images/water_bracket_top.png" alt="watercooling bracket top"></p><p>bearing ujoint cube x2</p><p>bearing ujoint fitting x4</p><h4> </h4><h4>Non-printed parts:</h4><ul><li>Power supply (count about 40 to 50W for the motors, plus what your hotend, electronics and fans use)</li><li>Electronics controller (32bit controller highly recommended, numerical precision requires extra computational power). I run mine with a <a href="https://www.iagent.no/product/recore/">Recore</a></li><li>MGN9H rails: 3</li><li>MGN9C carriages: 3</li><li>NEMA17 motors: 4</li><li>Traxxas 5347 spherical joints: 12</li><li>carbon / aluminum rods: estimate 6x 390mm for a 350mm bed - identical lengths required (< 0.1mm difference in lengths recommended)</li><li>E3D V6 hotend with M-12 threaded heatsink (<a href="https://e3d-online.com/products/v6-threaded-heatsink">blue heatsink</a>): 1 (if enclosed, consider getting a <a href="https://www.thingiverse.com/thing:3088118/files">water-cooled, M12-mounting</a> heatsink or hotend instead)</li><li>Telescoping torque shaft:</li><li>aluminum square tubing 9mm on the side : length to be measured</li><li>aluminum square tubing 12mm on the side : length to be measured</li><li>aluminum square tubing 15mm on the side : length to be measured</li><li>double u-joints with 4mm shaft: 2</li><li>round 4mm steel rod: 2x 50mm</li><li><a href="https://www.precisionpiezo.co.uk/product-page/andromeda">PrecisionPiezo Andromeda</a> : 3</li><li><a href="https://www.precisionpiezo.co.uk/product-page/universal-piezo-z-probe-pcb-v2-x-for-1-2-3-or-more-piezos">PrecisionPiezo Universal Piezo Z-Probe PCB</a> : 1</li><li>Endstops: 3 (optional if your electronics & firmware supports high precision sensorless homing)</li><li>Electrical wiring (red and black recommended in equal lengths): ~ 10m of each color recommended. Lots of variability depending on placements.</li><li>GT2-6mm wide belt: 3 times twice the vertical extrusion length (for 1m tall, get 3 of 2m length, will give ~100mm of slack per tower)</li><li>Control board: minimum of 4 stepper drivers + 2 heater controls (2 temperature inputs, 2 MOSFETs)</li><li>PSU: Minimum of 650W if heatbed is not using AC and a relay</li><li>M3 nuts: 69 (bottom assembly: 42, top frame: 12, motor frames: 9, idler centering: 6)</li><li>M3 washers: 18 (motor frames: 18)</li><li>socket cap M3x5: 15 (motor frames: 3, carriage assemblies: 12)</li><li>socket cap M3x8: 69 (tower assemblies: 45, top frame: 12, motor frames: 12)</li><li>socket cap M3x10: 24 (bottom frame: 24)</li><li>button cap M3x15 : 6 (motor frames: 6) - can also be longer, for bed assembly, but no longer than M3x30 (blocked by the NEMA 17 motor otherwise)</li><li>socket cap M3x16: 18 (bottom frame assembly: 18) - can also be M3x15</li><li>countersunk head M3x20: 6 (bottom frame assembly: 6)</li><li>socket cap M3x30: 3</li><li>socket cap M5x8: 24 (top frame: 12, bottom frame: 12)</li><li>socket cap M5x10: 9 (top frame: 9)</li><li>socket cap M5x12: 18 (bottom frame: 18)</li><li>socket cap M5 Openbuilds flat nuts: 51</li><li>F623ZZ flanged bearings: 6 OR idler pulleys for GT2x6mm : 3</li><li>Nema 17 motors (1.8 degree is fine, 1.2-1.5A capability sufficient): 4</li><li>16-teeth pulley for 5mm shaft (with M3x4 set screw): 3</li><li>Acrylic/glass/wood sheet (3mm): 3x 810mm x 500mm (use dimensions of side_panel file instead)</li><li>Acrylic/wood/carbon/fiberglass sheet (5mm): 450mm x 400mm (cut using top_cover dimensions)</li><li>Extruder parts:<ul><li>M8x35 bolt: 1</li><li>MR 148ZZ bearings (8mm ID, 14mm OD, 4mm thick): 4</li><li>Bondtech <a href="https://www.bondtech.se/product/drivegear-kits/">dual drive gears 1.75 / 8</a>: 1 set</li><li>M3x12 hex socket cap</li><li>M4x40 set screw</li><li>M3x8 hex socket cap</li></ul></li><li>MR 84 ZZ bearings (ID 4mm, OD 8 mm, 3mm thick) x4</li><li>Needle bearings (ID 4mm, OD 7mm, length 7mm) x4</li></ul><h5> </h5><h5>Optional parts</h5><ul><li><a href="https://www.aliexpress.com/item/33041228096.html?spm=a2g0o.9042311.0.0.38a54c4dUW6Yg9">CPAP fan + driver</a></li><li>CPAP mounting plate printed 1x</li><li><a href="https://e3d-online.com/products/water-cooling-kit">E3D watercooling kit</a></li><li>Printed M12 nut 1x (make it 100% infill for robustness)</li></ul><p> </p><p>Credit</p><p>I want to thank <a href="https://www.thingiverse.com/dancook3d/designs">Dan Cook</a> for his wonderful <a href="https://www.thingiverse.com/thing:4886240/files">bevel geared extruder design</a>. We've exchanged a fair bit to iterate the design before he published it, and I'm happy to see that project being this successful on its own.</p><p>Additionally he made a <a href="https://www.thingiverse.com/thing:3070352">great delta carriage</a> which I'm using the tensioner design from in this project.</p><p> </p>
With this file you will be able to print Monster Kossel v3.1 with your 3D printer. Click on the button and save the file on your computer to work, edit or customize your design. You can also find more 3D designs for printers on Monster Kossel v3.1.