Montura pared monitor Asus 23'' vx238 Wall mount Asus monitor
thingiverse
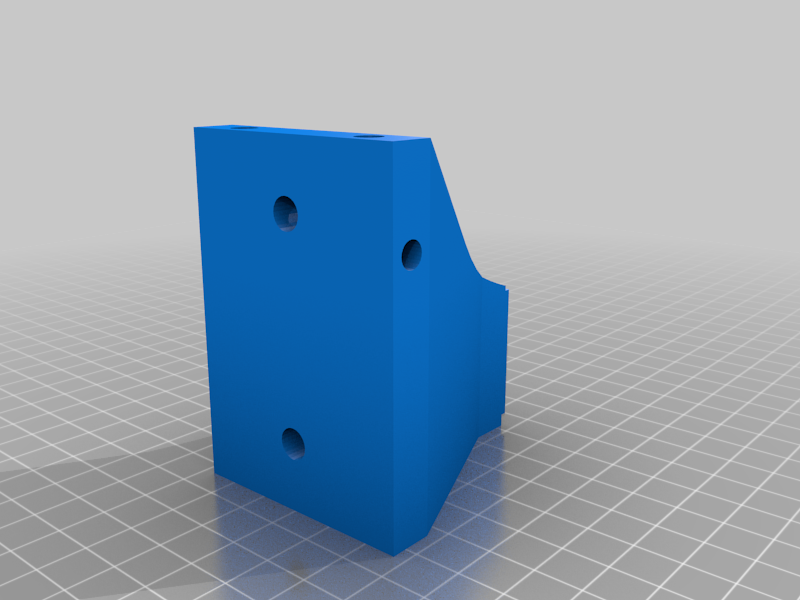
Español: Cansado de tener mis dos pantallas a una altura que no era cómoda para mi, he decido montarlas en la pared con esta montura personalizada. Una vez imprimida la pieza con cuidado deberás introducir mediante calor las tuercas incrustadas M4 10mm en los 3 agujeros de la montura. Para su instalación es necesario desmontar la pantalla para acceder a los tornillos y sacar la base original. Una vez tengas la base original sacada guarda los 3 tornillos. Mide la posición y altura deseada para el monitor y marca los agujeros ayudándote con la pieza impresa. Atornilla a la pared la pieza impresa, a continuación monta la parte trasera del monitor con los 3 tornillos. Asegúrate de que esta bien firme. El ultimo paso será poner la parte frontal de la pantalla mediante presión y ya podrás disfrutar de tu monitor montado en la pared. El acabado es muy robusto además de que se mantiene la posibilidad de inclinar la pantalla hacia atrás. Material necesario: - 3 Tuercas incrustadas M4 10mm (para montar la pantalla) - 2 Tuercas incrustadas M4 6mm (para montar posibles accesorios o extras) (opcional) - 2 Tornillos de 3mm para pared de ladrillo (si tiene otro tipo de pared adapte las dimensiones del tornillo a su tipo de pared) - 2 Tacos para pared de 4mm - Soldador de estaño (para introducir mediante calor las tuercas incrustadas) - Taladro - Broca de 4mm English: Tired of having my two screens at a height that was not comfortable for me, I have decided to mount them on the wall with this custom mount. Once the piece has been printed, you must carefully insert the M4 10mm embedded nuts into the 3 holes of the mount by means of heat. To install it, it is necessary to disassemble the screen to access the screws and remove the original base. Once you have the original base removed, save the 3 screws. Measure the desired position and height for the monitor and mark the holes helping you with the printed piece. Screw the printed part to the wall, then mount the back of the monitor with the 3 screws. Make sure it is tight. The last step will be to put the front part of the screen by pressing and you will be able to enjoy your monitor mounted on the wall. The finish is very robust in addition to the possibility of tilting the screen backwards. Necessary material: - 3 M4 10mm embedded nuts (to mount the screen) - 2 M4 6mm embedded nuts (to mount possible accessories or extras) (optional) - 2 Screws of 3mm for brick wall (if you have other type of wall adapt the dimensions of the screw to your wall type) - 2 4mm wall plugs - Tin soldering iron (to heat insert the embedded nuts) - Drill - 4mm drill bit
With this file you will be able to print Montura pared monitor Asus 23'' vx238 Wall mount Asus monitor with your 3D printer. Click on the button and save the file on your computer to work, edit or customize your design. You can also find more 3D designs for printers on Montura pared monitor Asus 23'' vx238 Wall mount Asus monitor.