Moon Lamp
prusaprinters
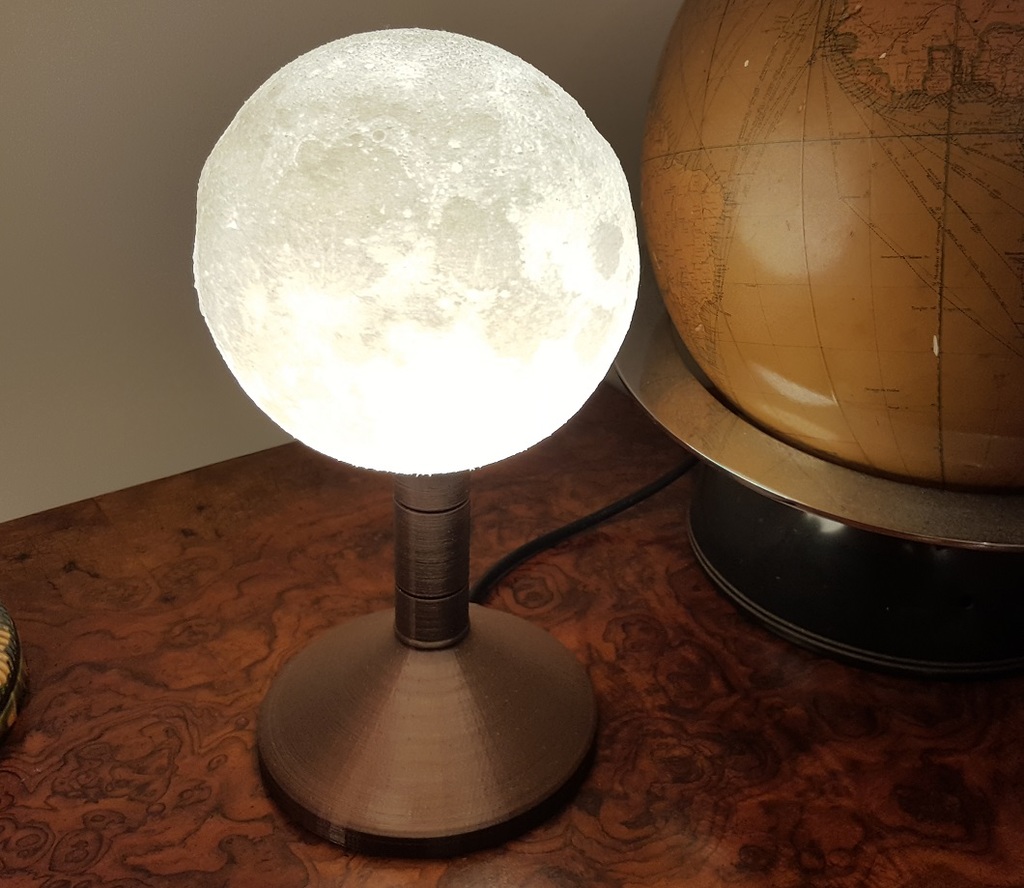
<h3> Moon Lamp</h3> <p>All pieces print on a 150mm or larger bed.</p> <p>I took the 6 inch Moon from <a href="https://www.thingiverse.com/thing:3242080">thing:3242080</a> and cut a hole in the South Pole so as to be able to put a lightbulb inside.</p> <p>I printed the Moon in a "transparent" PLA but it turned out indistinct and crystalline in appearance. Probably because I was using a cheap filament. My printer does not like PLA so you may do better.<br/> I next tried a transparent PETG but the result looked like a round sugar cube because of air in the print. Finally I printed it in a "natural" (ivory) colour ABS and I am really pleased with the result (the 'photo does not do it justice). I used 0.2 layer height but if you have time, I would recommend 0.15 or even 0.1 layer height which would print the top and bottom more cleanly.</p> <p>The lampstand is parts compatible with my Lithophane Lamp <a href="https://www.thingiverse.com/thing:4242632">thing:4242632</a>.</p> <p>I printed the lampstand with copper coloured PLA. You need to print one of each of the files provided as per my illustration. You could have a taller lamp by printing additional sections. I printed the lampstand at 0.2 layer height which is acceptable although printing it at 0.15 could give a better finish.</p> <p>I bought an 8W LED lightbulb and G9 ceramic bulb holder off eBay (see photo). A 5W bulb might be better. A dimmer lamp may show the Moon detail more clearly however my lamp looks less bright and a lot more impressive than it seems in my photograph.</p> <p>The G9 ceramic bulb holder should be secured into the printed holder with two small nut and bolts or with with two small chipboard or self-tapping screws.<br/> A mains cable should be fed through the hole in the base and clamped using two small chipboard or self-tapping screws. I confess that I messed up with the screws and just hot-glue-gunned the cable in place. Or you could use a zip-tie around the cable inside the base to prevent it from pulling out.</p> <p>The base should push fit into the bottom but you may need to track it with glue if it is too loose.</p> <p>The Moon just rests on the top of the lamp to give easy access when it comes time to change the bulb.</p> <h3> Print Settings</h3> <p><strong>Rafts:</strong></p> <p>No</p> <p><p class="detail-setting supports"><strong>Supports: </strong> <div><p>No</p></div><strong>Resolution:</strong></p> <p>0.15 or 0.20</p> <p><p class="detail-setting infill"><strong>Infill: </strong> <div><p>25%</p></div><br/> <strong>Filament:</strong><br/> . PLA or any . <br/> <p class="detail-setting notes"><strong>Notes: </strong> </p><div><p>The Moon (which is a hollow sphere) should be printed with 100% infill and with many layers and shells to ensure that the model is printed solid without any air gaps.<br/> 3x layers, perimeters and 25% infill is okay for the lampstand.</p> <p>Use an ivory colour "natural" PLA or ABS for the Moon. Use a very dark colour for the lampstand.</p> </div></p></p></p> Category: Physics & Astronomy
With this file you will be able to print Moon Lamp with your 3D printer. Click on the button and save the file on your computer to work, edit or customize your design. You can also find more 3D designs for printers on Moon Lamp.