Moondog Lens Magnet Adapter
thingiverse
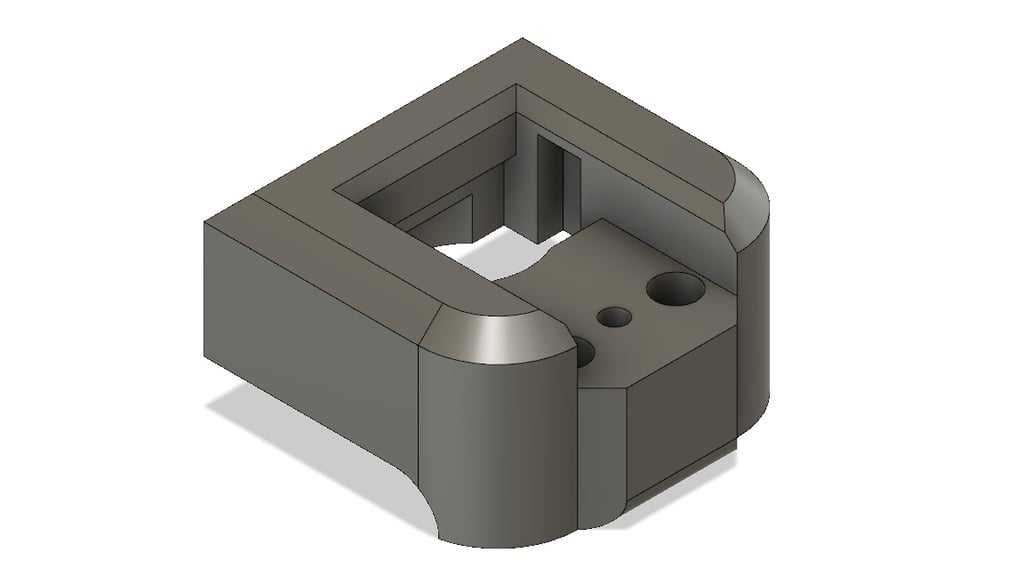
I use my iPhone as my primary camera on all of my shoots. I love how compact the setup is and how I didn't have to invest much money to get a setup that I can get some great results with. When I bought the new iPhone 7+ (when it was new), I didn't know that OIS would be an issue because I was shooting on the 6 originally. Optical Image Stabilization set the lens on a spring so it can absorb some small vibrations, which is great for the average iPhone user. But it ruins the camera for people like me. I went searching for answers and I found that some people are applying magnets to the back of the lens which holds it in place. This seems to work rather well. https://www.youtube.com/watch?v=qUUEbdSJFjs But, that doesn't help me much because the lens I use slides right over the spot where the magnet goes. I solved this problem by creating a new back end for the Moondog Anamorphic lens which houses the magnet behind the metal plate that the lever presses down to clamp to the phone. The magnet I use is a rather standard 10x3mm magnet that I found laying around my house. https://www.amazon.com/Whectin-Fridge-Magnets-Brushed-Refrigerator/dp/B07CWTJMK3/ref=sr_1_8?ie=UTF8&qid=1533943488&sr=8-8&keywords=10x3mm+rare+earth+magnet Unfortunately it doesn't look like you can only buy one, but maybe you'll find other uses for them? DISCLAIMER: I don't think this is necessarily good for the iPhone camera, as it is holding it in place the phone does try to fight against it. I've heard people using it for long periods of time with no issue, and so far I've had no issues from using this. But I am willing to accept any issue that comes from the use of the magnet. It may void warranties. Use at your own risk. I also don't think that Moondog wants you to take apart their lenses. Again, It may void warranties. Use at your own risk. Installing: Installation is easy and I've uploaded pictures of the process. It goes back together the same way it was taken apart. All you have to do is add the magnet. Test which way the magnet needs to face in order to hold the lens BEFORE installing it in the new adapter. I suggest placing it on the phone, and marking the side that holds to the phone. That side needs to be placed face down on the back of the small metal plate so that when it is installed on the phone, it holds the lens just as it did before.
With this file you will be able to print Moondog Lens Magnet Adapter with your 3D printer. Click on the button and save the file on your computer to work, edit or customize your design. You can also find more 3D designs for printers on Moondog Lens Magnet Adapter.