Morse Code Iambic Keyer
thingiverse
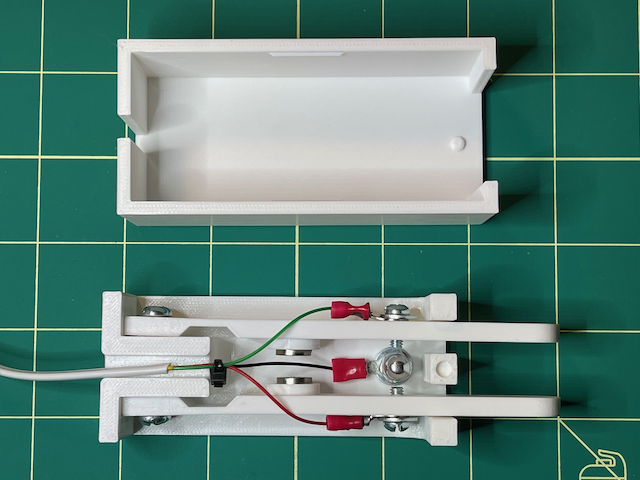
This is an iambic keyer using commonly available hardware. I generally use this by holding it in my left hand and keying with my right hand for SOTA and POTA activations. Gap spacing adjustment is a bit crude, but once you have it set, no adjustments should be necessary. The following hardware is needed: * QTY 1 #8-32 x 3/4" flat head phillips screw * QTY 6 #8-32 x 3/8" round head phillips screws * QTY 3 #8 flat washers (may not need QTY 2 depending on paddle spacing desired) * QTY 1 #8 hex nut * QTY 1 #8 cap nut * QTY 2 neodymium magnets, 10mm dia x 3mm thick * QTY 3 #8 ring crimp connectors, wire size to your liking * QTY 1 small zip tie * QTY 1 1/8" stereo plug * Approx. 3' of 3-conductor wire. I use telephone wire. * Super glue Assemble as follows: 1. Remove the jacket from the wire by approximately 2.5" and Install the three crimp connectors onto the wire. 2. Screw the 3/4" flat head screw in from the bottom of the base. The hole sizes are slightly smaller than the screws in this design so they can thread themselves into the plastic. 3. Place a washer on the top side of the base, then the center contact wire crimp connector, and then a hex nut. 4. Install the cap nut on the top of the center post. 5. Super glue the magnets into the paddles, making sure that the same poles are facing each other so that they repel each other. 6. Install the two 3/8" screws into the back of each paddle to attach them to the base. 7. Install the 3/8" paddle contact screws with the respective ring terminal and a washer on the side of the paddle opposite of the center post. 8. Install a zip tie on the wire just to the inside of the groove in the top of the base. 9. Install the stereo jack onto the other end of the cable. The tip should be connected to the "dit" paddle (or the left paddle). The connector's middle contact should be connected to the "dah" paddle (or the right paddle), and the last connector contact (usually ground) should be connected to the center post in the base. 10. Check the spacing between the paddles and the center post. With this arrangement, the spacing is a bit much for my liking; however, it can be reduced by removing the washers on the paddles and using a dremel tool to slightly shorten the 3/8" screw. I found that not shortening the screw made it too close to the center screw for reliable operation. 11. Push lid down onto assembly. To remove lid, use a small screwdriver and insert it into the cable hole, using it as a lever to unseat the cover. Enjoy! 73s K3GX
With this file you will be able to print Morse Code Iambic Keyer with your 3D printer. Click on the button and save the file on your computer to work, edit or customize your design. You can also find more 3D designs for printers on Morse Code Iambic Keyer.