Mortice Mortise Marking Gauge
thingiverse
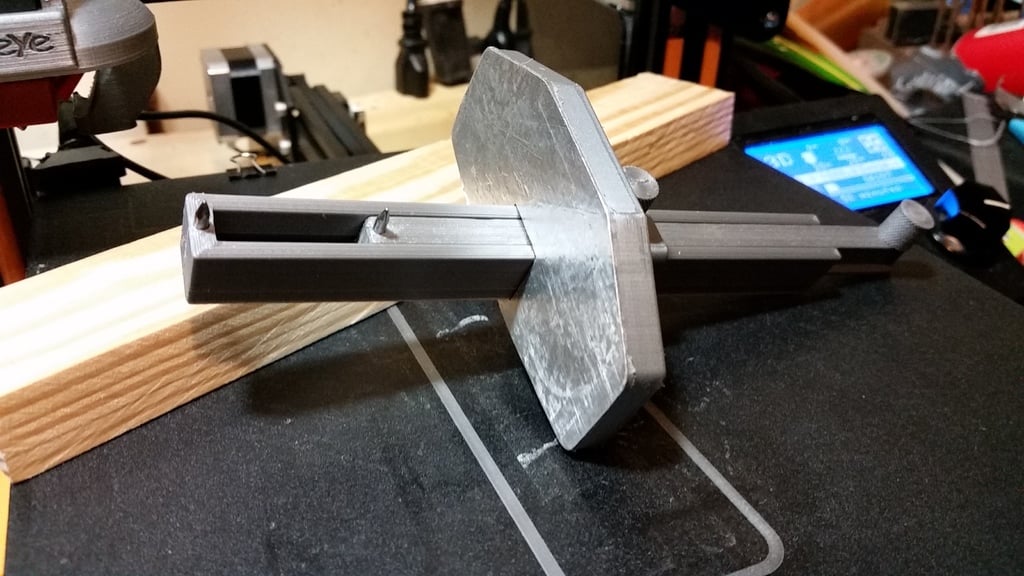
This ... is a *first*! Multiple firsts, actually! This is my *first* finished design using Fusion360. This is my *first* finished 100% original 3D print on my own printer. This is my *first* shared creation online, and first Thing on Thingiverse. What is it? ======== A Marking Gauge ------------------------ Marking Gauges are used in woodworking for scribing a line a set distance and parallel to the edge of a board. These lines are often used for: marking the center of an edge, marking locations for drilling, dove tail layouts, box joints layouts, tongue-and-groove layout, rabbits (or rebates), mortice or mortise and their tenon layouts or any other time a line is needed parallel to the edge of the work. Printing Instructions: ================ All parts can be printed without supports in the recommended orientations shown in the screenshots (not the blue .stl previews). MAIN Body - 1x: ---------------------- .1mm resolution 6 bottoms 4 tops 2 walls 25% infil "bottom" should be sanded as smooth as possible. Any 2-inch wide tape can be applied to this side to provide better wear resistance. Stainless or Aluminum foil tape looks great. Packing tape would likely also work well. OUTER Beam / INNER Beam - 1x each: ------------------------------------------------------ .1mm resolution 6 bottoms 4 tops 4 walls 50% infill (cubic) I DO NOT recommend printing these assembled in place. No sanding should be needed unless there are layer shifts. The small holes in each Beam MUST be drilled for the nails you intend to use. DO NOT drive nails through and expect the plastic to 'stretch' or move. THUMB Screws - 3x: ---------------------------- PRINT THREE! These should be printed as 'solid' as feasable. Alternately, the threaded holes use M5 x .8 threads, so M5 x .8 screws may be used instead. .1mm resolution 6 bottoms 6 tops 6 walls 100% infill (cubic) Assembly Instructions: ================== Drill or file the small holes to match your choice of nails. "picture" or "finish" nails should work well. DO NOT expect to DRIVE these nails through, there is very little plastic left on both sides ... Err on the side of loose, and a dab of glue, if you don't want cracks showing. Slide the INNER Beam, threaded-hole-first through the MAIN Body from the flat side, with the "T" oriented the smallest side of the MAIN Body. Align the OUTER Beam with the INNER Beam and slide through the MAIN Body similar to the first. The two beams will 'nest' within the MAIN Body. Thread the three Screws into the three threaded holes. Do not tighten the two MAIN Body Screws yet. The Screw in the end of the INNER Beam will never be adjusted again, so go ahead and tighten it but be sure that the two beams do NOT lock together. I do not recommend gluing this Screw in place as it may need to be removed when taking the tool apart later. Usage Instructions: =============== Holding the MAIN Body against the edge of the work piece, slide the OUTER Beam through the Body until it's nail lines up with the mark on the work piece, and then SNUG the thrumb Screw on the smallets side of the MAIN Body. DO NOT OVERTIGHTEN this Screw, you will break the Screw, the threads, or possibly even crack the top of the Beam! While still holding the MAIN Body against the edge of the work piece, use the Screw in the end of the INNER Beam as a grip to slide the INNER Beam in or out to line up with the second mark. SNUG the Screw on the underside of the MAIN Body. Again, DO NOT OVERTIGHTEN, or it will break! For marking a SINGLE line, either extend the OUTER Beam far enough out of the way or slip the OUTER Beam completely out of the tool and reinsert it from the other side, leaving only the INNER Beam's nail available for marking. This may be updated in future versions..
With this file you will be able to print Mortice Mortise Marking Gauge with your 3D printer. Click on the button and save the file on your computer to work, edit or customize your design. You can also find more 3D designs for printers on Mortice Mortise Marking Gauge.