Mostly Printed CNC Roland Drag Knife Holder
thingiverse
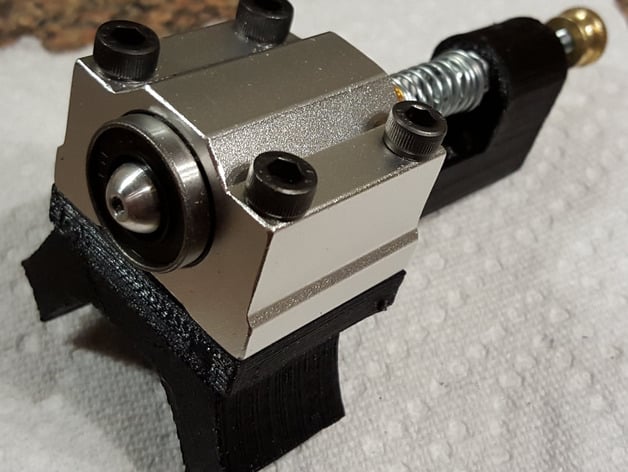
After having given Allted's Liyu/Roland Drag Knife holder design a try:http://www.thingiverse.com/thing:780877 I found it was limited because the drag knife could not float over the surface. If you use a cutting mat under your material like I was, you'll find they are not perfectly flat. When material thickness is measured in thousandths of an inch, this means the cutter will constantly be lifting and crashing across the material, resulting in incomplete cuts and material snags. I found a creative solution here:http://forums.zentoolworks.com/viewtopic.php?f=17&t=2636 ...which allows the knife holder to float across the material surface under spring tension and travel a couple of millimeters to account for an uneven work surface. So I refined and adapted that design along with Allted's blank tool holder part for his awesome MPCNC design. With this assembly I've been able to use the machine as a vinyl plotter now to create over 60 feet of painting stencils for an arcade project I'm working on. An attached photo shows the detail I was able to achieve with this attachment, which I am very pleased with! I am using auto bed-leveling in combination with this tool to improve the performance, but don't feel it's necessary if your work surface is nice and level since the head can float a couple of millimeters. My toolchain is as follows: 1) Design in Inkscape 2) Save as DXF 3) Convert to Linux GCode with DXF2GCODE (drag knife tool selected) http://sourceforge.net/projects/dxf2gcode/ 4) Convert GCode to Marlin GCode with a custom utility (most of what it does is comment out gcode commands unsupported by Marlin, and changes the formatting of movement commands) Thank you Allted for sharing your CNC design! EDIT: incorrectly listed M4 fasteners previously. Updated to M5. Print Settings Printer Brand: RepRap Printer: MakerFarm Prusa i3v Rafts: No Supports: Doesn't Matter Infill: 70 Notes: I used black PLA for the printed parts. Post-Printing Bill of Materials 1 - 12mm SC12UU linear bearing (Amazon or eBay) 4 - M5 X 30mm cap head screws + nuts, for the linear bearing 1 - M5 X 50mm or 10-32 x 2" screw + 4 nuts, 1 washer and thumb knob, for spring adjuster 2 - M3 x 15mm cap head screws, to mount tool adapter to the knife tower 1 - small spring, approx. 3/8" diameter x 1" long 1 - Roland or Liyu-style drag knife holder, with a 12mm barrel (eBay) Assembly Instructions 1) Push the 4 M5 nuts into the captures on the back of the tower part 2) Drill out the 4 mounting holes on the linear bearing so that the M5 screws slide freely but snugly through the holes. 3) Remove the snap ring from one side of the linear bearing, pull out the linear bearing and put a few drops of CA glue along the body. Reinstall the bearing so that the first ring on the bearing is just about to be exposed from the bearing block. Allow the glue to set. 4) Temporarily remove the remaining snap ring from the other side of the bearing, drop the knife holder into the bearing and reinstall the snap ring. 5) Thread the thumb knob onto the spring tensioner screw and tighten. 6) Add 2 nuts into the captures on the tensioner guide, then thread the tensioner screw through the nuts. 7) On the end of the tensioner screw, add a nut, then a washer, then a nut and tighten the sandwich. This is the stop for the tensioner spring. 8) Apply a liberal amount of CA glue to the mating face of the tool adapter, line up and fasten the tower to the tool adapter using the M3 x 15mm screws. Be sure to test fit these parts before gluing to ensure the holes are deep enough on the tool adapter...they may need extra drilling. Also, be sure the M5 nuts on the tower are in place first! 9) Since the tool adapter screws will be blocked by the linear bearing, the assembly just now be installed onto the MPCNC. 10) Fasten the linear bearing onto the assembly with the M5 X 30mm screws. 11) Install the spring between the knife holder and the tensioner screw. 12) Adjust your drag knife so that it cuts only through your material and not the backing. You should barely see a hint of the knife sticking out. 13) Adjust the spring tension to around 120-150 grams of force. It just needs enough force to cut through the material while still being able to float easily. Depending upon your material, I highly recommend polishing the tip of the Roland knife holder. Before I polished mine, it would sometimes grab the material during detail cuts and pull it from the backing. Also, I highly recommend using Krylon Easy Tack (available at Michaels or Hobby Lobby in the U.S.) on your cutting mat, to keep the material in place. For the nut captures, if you find they're too tight to fit, just heat up the nut and push it into the plastic.
With this file you will be able to print Mostly Printed CNC Roland Drag Knife Holder with your 3D printer. Click on the button and save the file on your computer to work, edit or customize your design. You can also find more 3D designs for printers on Mostly Printed CNC Roland Drag Knife Holder.