Motor Mounts for Celestron 130EQ Telescope
thingiverse
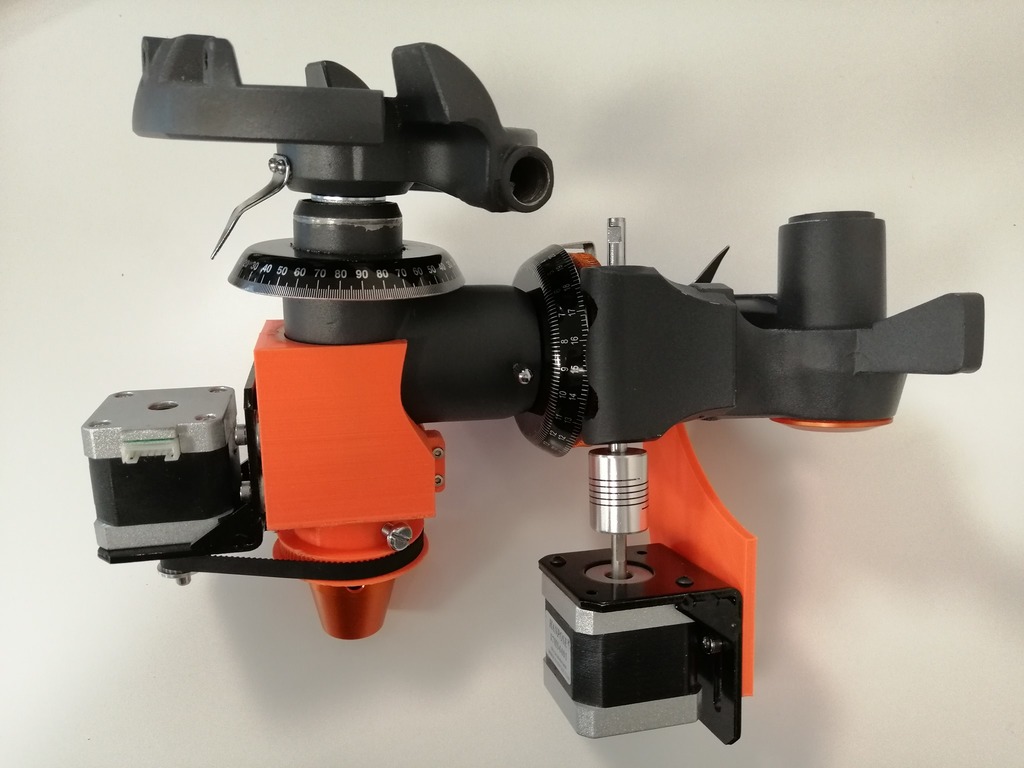
RA and DEC stepper motor mounts for a Celestron 130EQ telescope. *** These are an early prototype, use with caution *** *** CAUTION - To use these you either need a lathe or be prepared to make permanent changes to your telescope mount. *** Remove the telescope before working on the mount! Additional hardware - 2 Nema 17 stepper motors - 2 Nema 17 right angle mounting brackets - 224mm GT2 timing belt - 20 tooth GT2 pully with 5mm bore - 5mm to 6mm flex motor shaft coupler - Various M3, M4 and M5 screws, nuts and washers - M12 threaded rod, nuts and washers RA Motor The RA mount is very easy to fit. It screws onto the mounting screw used by the factory available motor. Screw right angle bracket to the RA mount using M4 screws. Attach motor to bracket. connect motor shaft to slow motion shaft. attach RA bracket to fixing point on mount. DEC Motor This is a more complicated stage. Instructions here are vague. Please don't attempt unless you are confident in your abilities and are prepared to permanently brake your telescope mount if things go wrong. Begin by dismantling the DEC axis. Remove the counter weights. Remove the nut located under the dovetail fitting for the telescope. undo the 2 grub screws on the orange part that the counter weight attaches to. The orange part should now unscrew. It might take some force to turn it.Once removed you can slide the top section out of the mount. Take this all apart and discard all of the grey parts except the dove tail. Clamp the shaft that is attached to the dovetail in a vice and unscrew the dove tail. At this point you can still put it all back together but the next stage cannot be reversed. Drill out the hole that the rod you just removed fitted in to be 11mm. Now tap a M12 thread to match your threaded rod. The metal is very soft to take it slow and careful. Screw M12 rod into dovetail and use a nut from the top to lock it in place. use some thread lock as well. Slide on a washer and fit the dovetail and M12 rod assembly back into the mount. Put a couple more washers on the end of the rod. Now fit the 80 tooth pulley printed part and secure with M5 screws and nuts. Check how long the rod needs to be by fitting the orange metal part that attaches the weights. Measure the gap between this part and the pulley. Remove the metal part and cut the rod down to size. Screw the orange part back on and secure in place with the grub screws. You can fine tune the length of the rod buy adjusting it at the dovetail end. (If you have access to a lathe you could turn down a 12mm rod to fit the existing thread and lock nut in the dove tail and the M12 thread on the orange metal part at the other end. This would then be reversible.) Now attached DEC bracket right and left. Two M3 screws and nuts hold it on one side and the stepper bracket secures it the other side. Mount the bracket, motor, pulley and belt. Connect to your motor controller, rDUINOscope is a good option. Hopefully this will work for you. As mentioned above this project could destroy your mount if it goes wrong so don't do it if you don't want to take the risk. The parts aren't a great fit but work on my mount. There may be differences in how the original parts were cast that may change the fit for you. Good luck and have fun.
With this file you will be able to print Motor Mounts for Celestron 130EQ Telescope with your 3D printer. Click on the button and save the file on your computer to work, edit or customize your design. You can also find more 3D designs for printers on Motor Mounts for Celestron 130EQ Telescope.