Motorcycle Garage Door Opener
prusaprinters
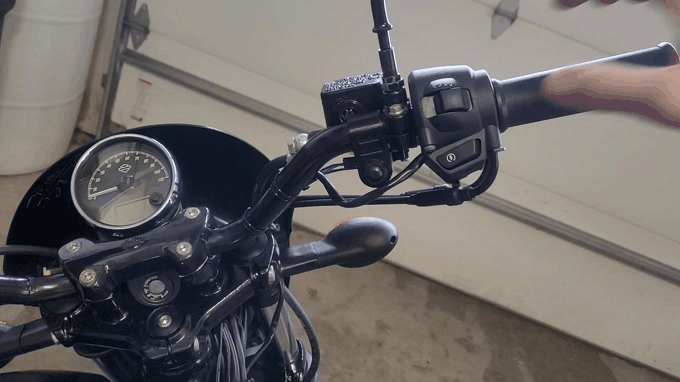
<p><strong>Overview and Parts to Purchase</strong></p><p>When leaving or coming home on my motorcycle, I found it to be a bit of a hassle to dismount to open/close the garage door using the keypad. I purchased a Chamberlain key fob door opener, but it was always deep in a pocket, my tail bag, or other inconvenient place. A purpose made garage door opener for motorcycles is available, but it's over $100 US.</p><p>To solve the problem, I purchased two items from Amazon:</p><p>MC100-P2 Mini Universal Remote ($17.95 US)</p><p><a href="https://www.amazon.com/dp/B08SQY2J47?psc=1&ref=ppx_yo2_dt_b_product_details">https://www.amazon.com/dp/B08SQY2J47?psc=1&ref=ppx_yo2_dt_b_product_details</a></p><p>Momentary, water-resistant push button switch ($7.99 US)</p><p><a href="https://www.amazon.com/dp/B07Q5LNFG3?psc=1&ref=ppx_yo2_dt_b_product_details">https://www.amazon.com/dp/B07Q5LNFG3?psc=1&ref=ppx_yo2_dt_b_product_details</a></p><p> </p><p><strong>The Button Mount</strong></p><p>The mount I used (as seen in the pictures) was the “Handlebar button mount - screws in back” because it fit best with the layout of my controls on my Harley Street 750, but I've included a couple other options that I tried. Some of the mounts, like the one I used, have the screws threading directly into the plastic. Other use a combination of M3 screws and M3 nylock nuts.</p><p>All of the button mount designs include a socket to hold the backing nut for the button captive (I ditched the washer). This allows the button to simply be screwed down snug from the front of the mount. The wires were soldered onto the button, had shrink tubing applied, were fed through the mount, and the button screwed down tight. I then filled the cavity in the back with two part silicone to seal it up completely. This step could be left out if it is not needed or epoxy, rubber cement, or bubblegum could be substituted for the silicone.</p><p>I printed this in PETG because of its durability and flexibility. It also holds threads well, so all holes are sized to allow for the use of common M3 socket head cap screws. I just snapped the mount over my handlebars and then clamped it down with two M3 screws threaded directly into the plastic. I also added a bit of 1mm shelf liner (essentially a rubber sheet) at add to the grip so the button did not rotate or scratch my paint over time.</p><p> </p><p><strong>The Transmitter Case</strong></p><p>The case consists of three parts: The case bottom (PETG), the case top (PETG), and the gasket (I printed it in Ninjaflex). The top and gasket are secured to the bottom using M3 screws threaded directly into the plastic.</p><p>The case holds the internals from the garage door opener. The wires from the handlebar mounted button are fed through holes in the front of the case bottom and soldered to two leads on the garage door opener's micro switch button. For me, it was the bottom left and top right leads, but definitely check this for yourself by programming the opener and shorting the leads in pairs to see which works for you.</p><p>Once soldered, the transmitter board is mounted in the case using two screws from the stock housing. Again, these are threaded directly into the standoffs in the print.</p><p>On the wires between the transmitter and the button, I soldered in a barrel connector, just for ease of installation and so the transmitter could be removed from the bike to change the battery. The transmitter case was mounted in my rear fender using Dual Lock strips (essentially extremely strong Velcro) and the wires follow the harness along the frame of the bike.</p><p> </p><p><strong>Conclusion</strong></p><p>For me, this has met the need more than adequately. It has added a level of ease especially when coming home in the rain to just be able to pull into the garage. For approximately $25 US, I was able to accomplish what would have otherwise cost me over $100. I hope this design is helpful to other riders out there looking for a solution to opening their garage door from their bike easily. Happy printing and riding!</p>
With this file you will be able to print Motorcycle Garage Door Opener with your 3D printer. Click on the button and save the file on your computer to work, edit or customize your design. You can also find more 3D designs for printers on Motorcycle Garage Door Opener.