Motorized IKEA SNUDDA Turntable
prusaprinters
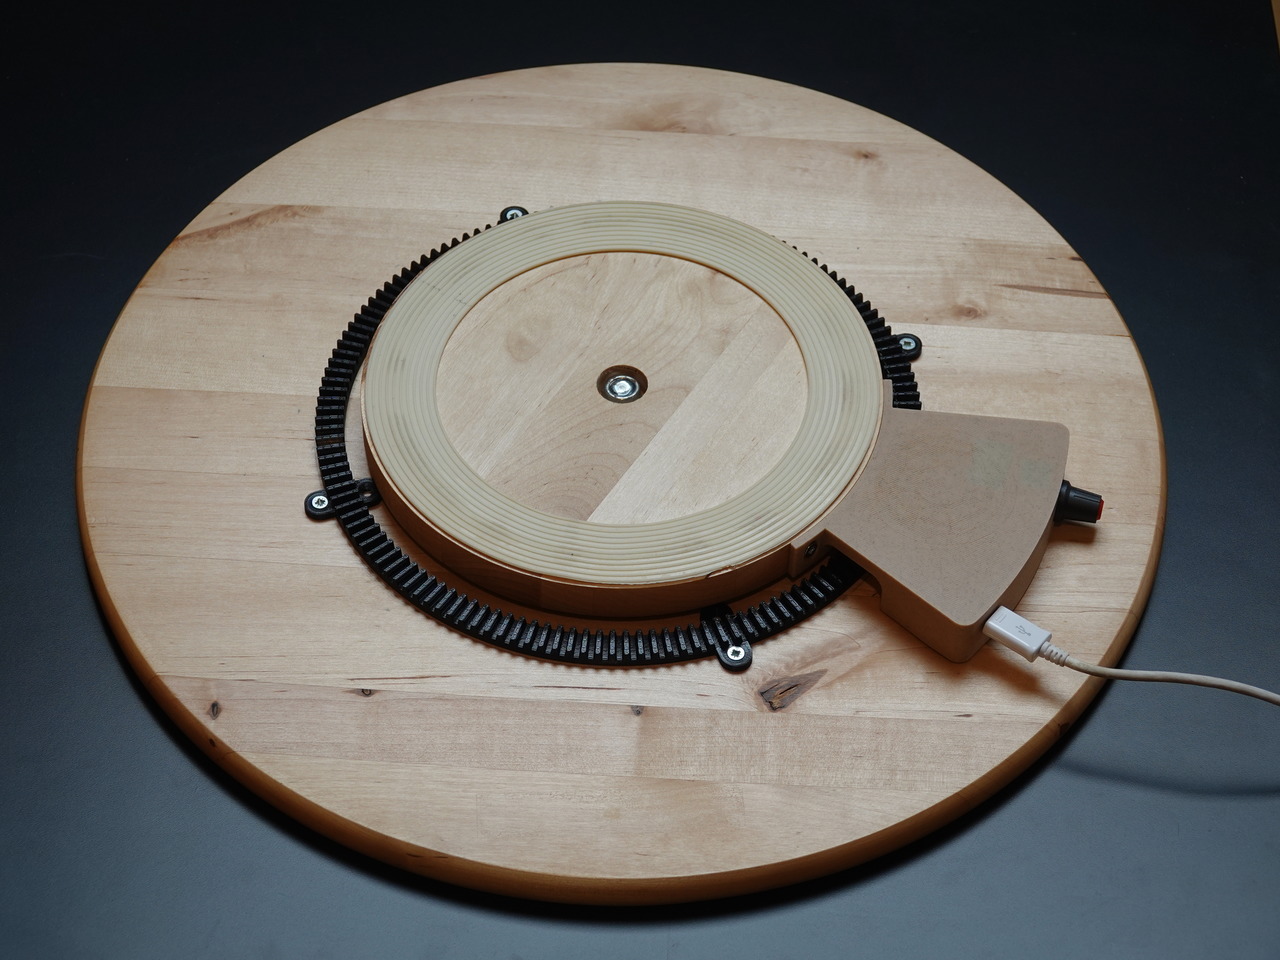
<p>This 3D print provides an easy way to add a speed controllable motor to an IKEA SNUDDA turntable. This allows you to show off artfull 3D creations (your 3D prints, your kids' master pieces, …) from all sides.</p><p><strong>Features:</strong></p><ul><li>Motorization is barely visible (recessed below large disc)</li><li>Turntable is not increased in height</li><li>Can be powered with standard USB charger (e.g. smartphone charger)</li><li>Uses standardized N20 DC geared motor</li></ul><p>The large bevel gear has 140 teeth. The small bevel gear has 7 teeth. Hence the large disc will rotate 20 times slower than the motor shaft. If you buy a DC motor with 50 RPM, the maximum rotation speed of the large disc is 2.5 turns per minute or once every 24 seconds. If you need more speed buy a 100 RPM motor, but you probably want to spin it a lot slower, which is possible by turning the speed knob down.</p><p>I bought my parts from amazon, but if you have the time, you can get them very cheap from aliexpress. </p><p><strong>Parts list:</strong></p><ul><li>IKEA SNUDDA Lazy Susan (900.744.83): <a href="https://www.ikea.com/nl/en/p/snudda-lazy-susan-solid-wood-90074483">IKEA: €7</a></li><li>DC Geared Motor N20 DC 6V Brush 50 or 100 RPM Electric Micro High Torque: <a href="https://www.amazon.nl/gp/product/B07N1CJN48">amazon: €9.50</a> or <a href="https://www.aliexpress.com/item/1005001309709560.html">aliexpress: </a><a href="https://www.amazon.nl/gp/product/B07N1CJN48">€</a><a href="https://www.aliexpress.com/item/1005001309709560.html">1.50</a></li><li>PWM DC Low Voltage Motor Speed Controller 1803BK: <a href="https://www.amazon.nl/-/en/gp/product/B08LYTBZR2">amazon: €8.75 for 2 pcs</a> or <a href="https://www.aliexpress.com/item/1005001651334406.html">aliexpress: </a><a href="https://www.amazon.nl/-/en/gp/product/B08LYTBZR2">€</a><a href="https://www.aliexpress.com/item/1005001651334406.html">1</a></li><li>DIY Male Connector MICRO USB to DIP Adapter 2.54mm 5pin: <a href="https://www.amazon.nl/gp/product/B07TVHR9LF">amazon: €5 for 10 pcs</a> or <a href="https://www.aliexpress.com/item/4000484202812.html">aliexpress: </a><a href="https://www.ikea.com/nl/en/p/snudda-lazy-susan-solid-wood-90074483">€1 for 10 pcs</a></li><li>4x electrical wire in different colors</li><li>6x wood screws 3 mm x 12 mm (self drilling)</li></ul><p><strong>In action:</strong></p><figure class="media"><oembed url="https://youtu.be/HtZl_WKPF9M"></oembed></figure><p> </p><h3>Print Instructions</h3><p>Everything is easy to print in PLA. No supports needed. The color of the printed parts is not really important as they are barely visible in normal viewing conditions.</p><h5>Bevel Gears (Large and Small)</h5><ul><li>0.10 mm DETAIL profile</li></ul><h5>Case</h5><ul><li>0.20 mm QUALITY profile</li><li>Avoid any infill in the curved front wall to get a smooth result:<ul><li>Vertical shells → Perimeters: 4</li><li>Quality → Ensure vertical shell thickness: OFF</li><li>Quality → Detect thin walls: OFF<br> </li></ul></li></ul><h3>Assembly Instructions</h3><p>The assembly is quite easy if you are (a bit) familiar with a soldering iron. If not, lookup some YouTube tutorial. It is not difficult at all. </p><p>Here are the different steps for adding the motorization:</p><ul><li>Draw a circle on the bottom of the turntable. This will be used to align the large bevel gear. Note that the small wooden disc is often not round. So you should take a fixed point on the inner disc and rotate the disc with the pencil around to draw the circle. That way the pencil will be at a constant distance from the rotation axis.</li></ul><figure class="image image_resized" style="width:75%;"><img src="https://media.prusaprinters.org/media/prints/81725/rich_content/e28c08a1-5b3e-4c4f-b8a4-cf629009938c/dsc09508.jpg#%7B%22uuid%22%3A%220d49f64e-c3fd-4805-8f93-90ff7f40b6aa%22%2C%22w%22%3A1280%2C%22h%22%3A960%7D"></figure><ul><li>Put the 4 parts of the large bevel gear around the inner disc. There are two different types and they should alternate. The parts with the narrow ends go below and the ones with the wider ends must be put on top of them.<br> </li></ul><figure class="image image_resized" style="width:75%;"><img src="https://media.prusaprinters.org/media/prints/81725/rich_content/36221e95-0576-47bd-8444-f53fd86e2499/dsc09513.jpg#%7B%22uuid%22%3A%221f50340a-6d50-4b49-bc79-b1ea0b55d953%22%2C%22w%22%3A1280%2C%22h%22%3A960%7D"></figure><ul><li>The picture below show how the pieces fit together (note that the bevel gear is shown upside down here). When the large bevel gear is completed. You must align it on the large disc by keeping a fixed distance to the drawn circle. Then you can screw the large bevel gear on the large disc. The inner screw holes only have to be used if the outer screw holes are not sufficient to fix the large bevel gear firmly in place.</li></ul><figure class="image image_resized" style="width:75%;"><img src="https://media.prusaprinters.org/media/prints/81725/rich_content/e8b4ffd4-2f6e-4ba5-8cb5-82270a82b274/dsc09519.jpg#%7B%22uuid%22%3A%22b89d3027-6030-401a-9440-c2dc574dba9b%22%2C%22w%22%3A1280%2C%22h%22%3A960%7D"></figure><ul><li>Push the small bevel gear on the motor shaft (not too far yet, makes it easier to insert motor)</li><li>Solder 2 wires on USB the connector: black wire on GND pin and red wire on VBUS pin. Twist wires together. Make sure the wires are long enough (they can be trimmed to the right length later). Note: The black and red wires are too short in the picture below. I had to redo them.</li></ul><figure class="image image_resized" style="width:75%;"><img src="https://media.prusaprinters.org/media/prints/81725/rich_content/1446595b-f5a2-4903-9fb7-0785e4d7f44a/dsc09526.jpg#%7B%22uuid%22%3A%22f56b4082-e47f-4141-a008-7557a640b2bf%22%2C%22w%22%3A1280%2C%22h%22%3A960%7D"></figure><ul><li>Solder 2 wires on DC motor and twist wires together.</li><li>Insert motor gently in its holder</li></ul><figure class="image image_resized" style="width:75%;"><img src="https://media.prusaprinters.org/media/prints/81725/rich_content/2925d0f6-1d89-452d-80c3-34dea020b13a/dsc09562.jpg#%7B%22uuid%22%3A%22f9fb3123-1cfd-457f-9852-832e468b7bef%22%2C%22w%22%3A1280%2C%22h%22%3A960%7D"></figure><ul><li>Route motor wires between guides (carefully push 1 wire at a time between guides)</li><li>Insert motor speed controller (shaft first), gently push back side under hooks.</li></ul><figure class="image image_resized" style="width:75%;"><img src="https://media.prusaprinters.org/media/prints/81725/rich_content/8c91945a-2cfa-4f88-92f3-993e273cf3ea/dsc09564.jpg#%7B%22uuid%22%3A%22155d860a-0d64-4885-91d6-8a486da41bc5%22%2C%22w%22%3A1280%2C%22h%22%3A960%7D"></figure><ul><li>Put washer and nut on speed controller shaft to fix the controller in place.</li></ul><figure class="image image_resized" style="width:75%;"><img src="https://media.prusaprinters.org/media/prints/81725/rich_content/a98f2d9d-fa85-4539-a5eb-5c0992e9753f/dsc09566.jpg#%7B%22uuid%22%3A%22c2cdb087-ac4c-41be-a4a4-2a8b1a2171c2%22%2C%22w%22%3A1280%2C%22h%22%3A960%7D"></figure><ul><li>Connect motor wires to speed controller (see picture). Swapping the wires will reverse the spin direction.</li></ul><figure class="image image_resized" style="width:75%;"><img src="https://media.prusaprinters.org/media/prints/81725/rich_content/3225dc7f-ac8b-4fe1-a80d-49814fd674b8/dsc09568.jpg#%7B%22uuid%22%3A%22a48bf4a8-c60c-4f03-a0e1-f7d32a74d942%22%2C%22w%22%3A1280%2C%22h%22%3A960%7D"></figure><ul><li>Insert USB connector (put metal connector in hole first).</li><li>Route USB power wires between guides (carefully push 1 wire at a time between guides)</li><li>Connect the power wires to the motor speed controller as in the picture (and indicated on the shell): The black wire (USB GND) should be connected to the - port (outer most port)<br>The red wire (USB VBUS) should be connected to the + port.<br>Check these connections carefully! Also check that the ports on your speed controller are in the same order as in mine. Make the necessary adjustments, if this is not the case.</li></ul><figure class="image image_resized" style="width:75%;"><img src="https://media.prusaprinters.org/media/prints/81725/rich_content/4461ecb8-8d5c-4feb-9655-e4651ccc6c1b/dsc09571.jpg#%7B%22uuid%22%3A%227618c4c6-705e-4278-a046-46d22dbb8a32%22%2C%22w%22%3A1280%2C%22h%22%3A960%7D"></figure><ul><li>Push the speed controller knob on its shaft (decide yourself what the off position should be)</li><li>Put the wedge shaped case against the inner disc and check that the small bevel gear is aligned with the large bevel gear. Adjust the position of the small bevel gear if needed.<br> </li></ul><figure class="image image_resized" style="width:75%;"><img src="https://media.prusaprinters.org/media/prints/81725/rich_content/55c967a7-587d-4a30-bc10-bd5637ee3707/dsc00047.jpg#%7B%22uuid%22%3A%22d1f5eb85-6500-4ad8-a90a-005acc8a15b2%22%2C%22w%22%3A1280%2C%22h%22%3A960%7D"></figure><ul><li>Screw the case onto the bottom part of the turn table. The edge should be aligned with the wooden edge of the small disc. But slight adjustments can still be made later, if needed.<br> </li></ul><figure class="image image_resized" style="width:75%;"><img src="https://media.prusaprinters.org/media/prints/81725/rich_content/d4a406ad-8542-4245-8ad5-21beadda6acd/dsc09577.jpg#%7B%22uuid%22%3A%221556e98d-132b-46e6-9a31-9d99de5a3238%22%2C%22w%22%3A1280%2C%22h%22%3A960%7D"></figure><ul><li>That's all! You can flip your motorized SNUDDA around, connect a USB charger to the connector and turn the speed knob until the disc starts to turn.</li></ul><p> </p>
With this file you will be able to print Motorized IKEA SNUDDA Turntable with your 3D printer. Click on the button and save the file on your computer to work, edit or customize your design. You can also find more 3D designs for printers on Motorized IKEA SNUDDA Turntable.