Motorized Z-Adjustable Bed for K40 Chinese Laser
prusaprinters
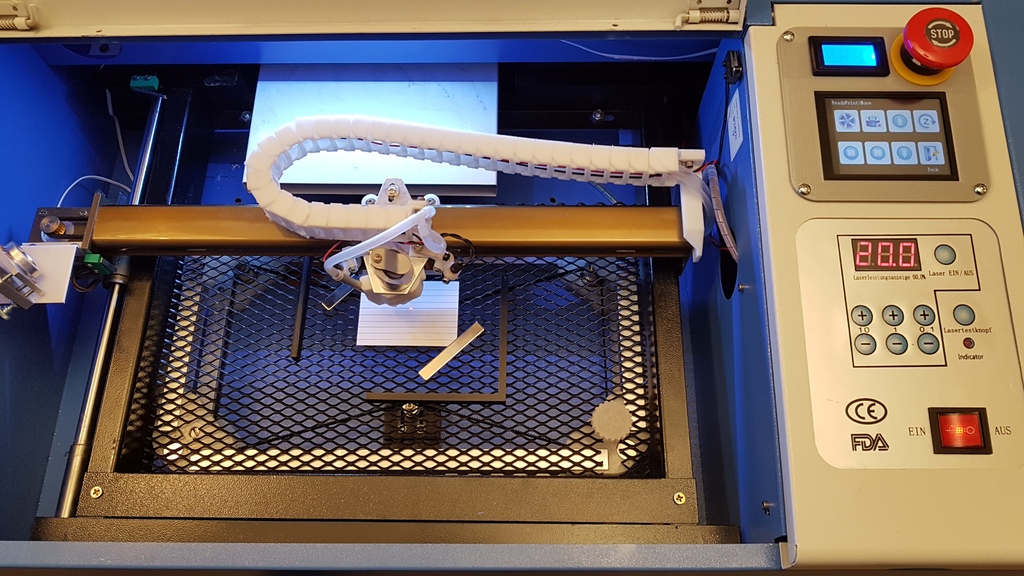
<p>Inspired by the adjustable Z-bed by brianvanh I wanted to have one which can be adjusted motorized controlled by the upgraded smoothieboard in the cutter.</p><p>The realized bed can move its surface up to 30mm below the lasers focus.</p><p>Beside the printed parts and some different M2 and M3 bolts and nuts there are the following parts necessary:</p><ul><li>4 x quadratic aluminum profile 15mm x 15mm x 2mm length 300mm</li><li>4 x quadratic aluminum profile 15mm x 15mm x 2mm length 150mm</li><li>1 x NEMA17 stepper motor 17HS4401</li><li>4 x GT2 20 teeth timing pulley aluminum bore 8mm</li><li>1 x GT2 20 teeth timing pulley aluminum bore 5mm</li><li>3 x GT2 16 teeth idler aluminum bore 3mm</li><li>1 x GT2 timing belt closed loop 6mm x 1140mm</li><li>3 x M8 threaded rods 67mm</li><li>1 x M8 threaded rod 85mm for handle (if wished, otherwise 67mm too)</li><li>6 x M8 nuts (4 x if no handle is wished)</li><li>4 x 608 ball bearings 8mm x 22mm x 7mm</li><li>2 x micro switches 105126SPGJL5375</li><li>1 piece of stretched metal (better a honeycomb plate) 220mm x 360mm made of steel</li><li>8 x neodyme magnets round 15mm x 5mm</li></ul><p>The function of the finished bed is to see on youtube: <a href="https://youtu.be/CRq5Kx4GHnM">https://youtu.be/CRq5Kx4GHnM</a></p><h3>Print Settings</h3><p><strong>Printer:</strong></p><p>FIashForge Dreamer</p><p><strong>Rafts: </strong></p><p>No</p><p><strong>Supports:</strong></p><p>Yes</p><p><strong>Resolution: </strong></p><p>0.5mm</p><p><strong>Infill:</strong></p><p>50%</p><p><strong>Filament:</strong></p><p>PETG</p><p><br> </p><p><strong>Notes:</strong></p><p> </p><p>The corners are printed out of PETG with a 0.7mm nozzle and a layer height of 0.5mm to save time. Some support is necessary especially for the top corners.<br>The other parts are printed out of PLA with a 0.4mm nozzle and a layer height of 0.2mm. If printed in the given orientation no support will be necessary.</p><h3>Post-Printing</h3><p>Put the profiles and corners together and drill 2,5mm holes at the given positions into the profiles. Cut a M3 thread into the holes and fix the corners with M3 bolts.</p><p>Put a M8 nut at the end of each M8 rod followed by a ball bearing and a timing pulley and fix it all with the inbus screws of the pulley. Normally the bearings should fit tight into the corners holes. If your printer tends to underextrusion use some drops of glue to fix the bearings in the holes.</p><p>Put the belt as to see at the pictures around the pulleys but don't tense it. Turn the rods (fixed in the bottom frame) through the M8 nuts fixed in the top frame and screw the rods independend until the top part reaches its deepest postion above the bottom frame. Now the belt can be tensioned. For this it is necessary to saw small slots at the bolts tops to be able to move them with a screwdriver.</p><p>The optional handle can be shifted tight over two countered M8 nuts at the end of the longer rod after turning the rod through the upper corner.</p><p>If you don't want to use a motor or want to add the motor later the part "stepper-placeholder" mounted at the motors position and equipped with an idler instead a pulley makes it possible to get the belt tensioned.</p><p>If you are not able to fully tense the belt you can use up to two additional belt tensioner at the small sides of the bottom frame.</p><p>Adjust the upper micro switch to stop the bed if the surface of the bed reaches the focus hight of the laser. So it is easy to lower the bed for the half of the thickness of the placed material (for cutting) or the full thickness of the material (for engraving) by the stepper movement menu.</p><p>Stretched metal as bed is easier to get but not really recommended. The sloped edges of this metal reflects the cutting beam back to the bottom side of the material making ugly marks there (see picture). In this case the attached corner stands can be used to keep the material away from the reflections and to adjust the homed bed easy by lowering it by exact 10mm (the thickness of the stands).</p><p>The magnets at the bottom corners fixes the bed in the cutter, the magnets at the top corners fixes the stretched metal on the bed. The stretched metal can also fixed with M6 screws. Therefore are dimples for M6 nuts provided. But with screws it will be harder to temporary remove the stretched metal.</p><p>To setup your CNC-controller correct use a value of 160 steps/mm (or when using 1/32 microsteps 5120 steps/mm) for this axis.</p><p>It is highly recommended to place a piece of cardboard laminated with a sheet of aluminum foil (diffuse side upward) over the full size of the bed over the belt and the mounts. Otherwise the laser beam may cut or harm these parts when passing the stretched metal.</p><p><img src="https://cdn.thingiverse.com/assets/44/68/61/36/40/20181203_090206.jpg"></p><p> </p><p> </p><p>Category: DIY</p>
With this file you will be able to print Motorized Z-Adjustable Bed for K40 Chinese Laser with your 3D printer. Click on the button and save the file on your computer to work, edit or customize your design. You can also find more 3D designs for printers on Motorized Z-Adjustable Bed for K40 Chinese Laser.