Mounting Plate for 2 in 1 out Switch Hotend for Geeetech Prusa I3
thingiverse
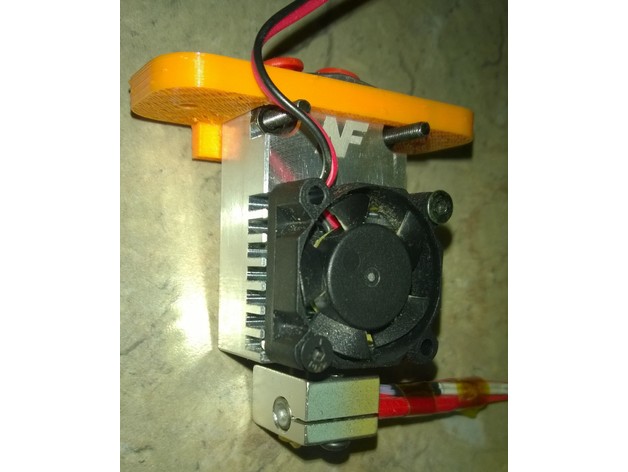
Update 12/6/17 I'm planning a cooling scheme overhaul from axial fan to radial fan. First cut at the duct has been added with a temporary transition piece using a 30 mm axial fan. The duct mounts on the back, nearest linear bearings, so it doesn't interfere with layer fan and makes hot-end changes easy. I haven't tried it yet and it may take several months to finalize. Please let me know if you try this setup and have any suggestions. Update 4/16/17 Added link to information on using a Y-block hotend. 4/19 https://1drv.ms/w/s!AoMNMLsOFAgFj-AnywOk94qGBizVrg Update 3/30 Changed spacer and plate with closed bottom to 3 hole version. Update 3/15 I found that this hotend requires a higher filament temp than the one I was using. Also, extruder PIDs needed adjustment to keep temperature more constant than larger one I had been using. I used to get good results with one PLA type at 193 deg. Now I believe something over 200 is required for same filament. The following PIDs seem to work well at a print temp of 202 C: Kp 13.5 Ki 0.8 Kd 57.6. Heater block is uninsulated at this time. I've found it's worthwhile to add some insulation to the block. I use cereal box paper secured with kapton tape. Update 3/13/17 Added a couple photos of part installed in very thin test print of bracket. Part looks very good. So far, I've only used it as single extruder. Heat break is very effective. Upper part of block stays very cool when printing PLA, even without fan running. There are holes on back of upper block for layer cooling fan. I've removed my cooling fan temporarily from extruder bracket while testing things. More updates as I figure out scripts required to make it function as a switcher. Update 2/27 Minor tweak in cavity dimensions. Added 2 mm Spacer. Updated 3/17 I only printed this part as lite-weight test-prototype. It's for mounting new 2-to-1 hot end that is similar to Cyclops, but permits two filaments to be switched between one output. It will not mix two filament streams and does not have backflow problem if you only load one filament in block. The plate is intended to mount on single extruder mounting plate like that furnished with Geeetech I3 Pro B printer with 50 mm mounting centers. When this design is proven, I expect to be able to switch between Cyclops/Chimera clone setup I have on this printer and this 2 to 1 switch hotend with minimal readjustment of the printer. That means I will adjust the bracket as necessary to get close to same vertical height as I currently have on my Cyclops clone using the mounting plate and spacer I designed. I expect the plate will mount on top surface of extruder bracket, but the .STL file has a thin surface covering this hole. I have high hopes for this part for use as an easy way to switch between filaments during print. My Cyclops setup is OK as a mixer but tricky when trying to use it as a switcher with high ratios between two filaments. The printer manager will require some code to retract unused filament back into cool zone and advance other filament when extruder is switched. Print Settings Printer: Prusa I3 Modified Rafts: No Supports: No Resolution: 0.3 is OK Infill: 25% Hex should be plenty Notes: I will probably use 4 perimeters and 3 top/bottom layers. A brim will help keep part on bed if printed in ABS. Post-Printing Cut out the thin bottom on rectangular hole. I think the holes are sized for using nuts, but they may have to be opened slightly. I prefer to cut threads into part for mounting, but location of part may make it difficult to cut threads into plate, so that also is an uncertainty. How I Designed This Sketchup 2017
With this file you will be able to print Mounting Plate for 2 in 1 out Switch Hotend for Geeetech Prusa I3 with your 3D printer. Click on the button and save the file on your computer to work, edit or customize your design. You can also find more 3D designs for printers on Mounting Plate for 2 in 1 out Switch Hotend for Geeetech Prusa I3.